You send a campaign. Everything looked right – the copy was good, the timing was solid, the list had been sitting in your ESP for months. Then the report comes back and there it is: a bounce rate you weren’t expecting.
So why do emails bounce? And more importantly – what are you supposed to do about it?
Here’s the thing, most guides on why do emails bounce won’t tell you upfront: the bounce itself isn’t the problem. The cause is. Two campaigns can both show a 4% bounce rate in their reports, but one of them has a list quality issue that needs immediate suppression work, and the other has an authentication misconfiguration that no amount of list cleaning will fix. Treat them the same way and you’ll either waste time cleaning a list that didn’t need it, or miss an infrastructure problem that keeps recurring campaign after campaign.
That’s exactly what this guide is built around. Instead of giving you a flat list of reasons why emails bounce back – which is what most articles on this topic do – we’re going to look at bounce causes through the lens of where the failure actually originates. Because that’s what determines the fix.
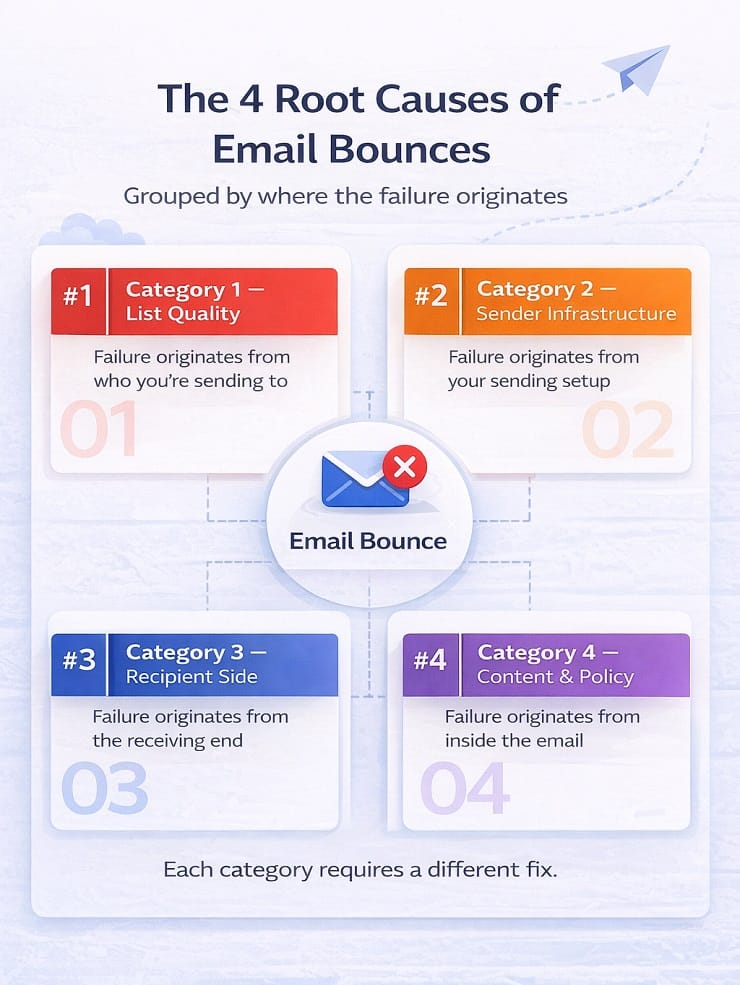
There are four origin layers. Some failures come from your list. Some come from your sending infrastructure. Some come from the receiving end, completely outside your control. And some come from what’s inside the email itself. Once you know which layer a bounce is coming from, the right response becomes obvious.
Let’s start with what’s actually happening when an email bounces – because understanding the mechanics is what makes everything else in this guide click.
What Actually Happens When an Email Bounces?
Most people think of a bounced email as a simple failure – you sent it, it didn’t arrive, end of story. But what’s actually happening under the hood is a lot more structured than that, and that structure is genuinely useful once you know how to read it.
The Bounce Mechanism Explained
When you send an email, your sending server initiates a conversation with the recipient’s mail server using a protocol called SMTP (Simple Mail Transfer Protocol). That conversation goes back and forth in a matter of seconds – your server says “I have a message for this address,” the receiving server either accepts it or rejects it, and the result is logged.
When the receiving server rejects the message, it doesn’t just go silent. It sends back a Non-Delivery Report (NDR) – sometimes called a bounce-back message or delivery status notification. That NDR contains two things that matter enormously:
- An SMTP status code – a three-digit number that tells you the category and nature of the failure
- A reason string – a plain-language explanation of why the message was rejected
This combination is your diagnostic signal. It’s not noise. It’s the receiving server telling you exactly what went wrong – and if you know how to read it, you know exactly what to do next.
The problem is that most ESPs simplify this information before it reaches your dashboard. Instead of showing you the raw SMTP code and reason string, they surface a label like “hard bounce” or “soft bounce” and leave it at that. That label is useful for a quick overview, but it strips out the specificity that tells you why the bounce happened. If your ESP only shows simplified labels, look for a raw export option – most platforms include the full SMTP response in the CSV bounce data even when the UI doesn’t display it.
What the SMTP Code Tells You
SMTP codes follow a consistent structure. The first digit tells you the code family, and that single digit is the most important piece of information for deciding how to respond:
| Code Family | What It Means | What You Should Do |
|---|---|---|
| 4xx | Temporary failure – “not right now, try again” | Let your ESP retry automatically |
| 5xx | Permanent failure – “this will never work, stop trying” | Suppress the address immediately |
The second and third digits – and the reason string that follows – narrow it down further. A 550 with “user unknown” means something completely different from a 550 with “DMARC policy violation,” even though both are 5xx permanent failures. One is a list problem. The other is an infrastructure problem. The code family tells you whether to retry or suppress. The subcode and reason string tell you which of the four origin layers the failure is coming from. All the SMTP error codes and their fixes are covered in detail in a separate guide.
We’ll get into the specific patterns to look for in Section 7, where we cover how to actually read your bounce report and diagnose the category. For now, the key takeaway is this: a bounce is a structured signal, not just a failure notification. Treating it as data rather than noise is what separates reactive bounce handling from actual email bounce management.
The 4 Root Categories of Email Bounce Causes
Here’s where this guide diverges from most of what you’ll find on this topic.
If you search for “why do emails bounce” or “what causes an email to bounce,” the overwhelming majority of results give you a numbered list – ten reasons, twelve reasons, seven common causes. Each item is treated as its own isolated problem with its own isolated fix. It’s not wrong, exactly, but it’s not how bounce diagnosis actually works in practice.
The more useful way to think about it – and the way experienced deliverability teams think about it – is by grouping causes according to where in the sending process the failure originated. Because that’s what determines the correct response, and more importantly, it’s what prevents you from applying the wrong fix to the right symptom.
Why Category Matters More Than the Individual Cause
Think about it this way. Suppose your campaign report shows a spike in bounces. You look at the data and see a mix of 5xx permanent failures. The instinct for most senders is to export the bounced addresses, remove them from the list, and move on.
But here’s the question that most people don’t ask: why did those addresses fail?
If they failed because the addresses don’t exist – Category 1 – then yes, removing them is exactly right. But if they failed because your SPF record is misconfigured and the receiving server rejected your email as unauthenticated – Category 2 – then removing those contacts does absolutely nothing. The same addresses will bounce again on your next campaign, and the campaign after that, until you fix the authentication problem.
That’s why the category matters more than the cause itself. Two bounces can look identical in your ESP dashboard and require completely different responses.
The four categories are:
| Category | Origin | What It Means |
|---|---|---|
| Category 1 – List Quality | Who you’re sending to | Address is invalid, expired, disposable, or role-based |
| Category 2 – Sender Infrastructure | How your setup is configured | Authentication failure, blacklisting, or insufficient warm-up |
| Category 3 – Recipient Side | The receiving end | Temporary server issue, full mailbox, or ISP throttling |
| Category 4 – Content & Policy | What’s inside the email | Content filter trigger, size limit, or policy block |
Each category carries a different reputation risk, requires a different fix, and shows up in your bounce report with different signal patterns. The sections that follow break each one down in full – what causes it, what the SMTP signal looks like, and what the right response is. We have covered in detail about why emails are not delivered in a separate post.
One more thing before we get into the categories: understanding what causes an email to bounce at the category level also helps you prioritise. Not all bounce causes are equally damaging to your sender reputation. Some need to be addressed today. Others can wait. We’ll rank them by reputation impact in Section 8, once you’ve seen what each category actually involves.
Category 1 – List Quality Problems
These failures originate from who you’re sending to.
Most answers to why do emails bounce start here – with the list itself. Not with your server configuration, not with your email content, not with anything technical at all – just with the simple fact that some of the people on your list no longer exist at the address you have for them, or never did in the first place.
That sounds obvious. But list quality problems are the most underestimated bounce category because they build slowly and invisibly. You send a campaign, 1.8% bounces, you move on. Next campaign, 2.1%. Then 2.4%. Each individual send looks manageable. What you’re not seeing is that you’re training ISPs – Gmail, Outlook, Yahoo – to associate your sending domain with a predictable pattern of failures. And once that association is made, reversing it takes considerably more effort than preventing it.
So let’s get into exactly how list quality problems enter your database, because the cause almost always determines the fix.
Invalid and Non-Existent Email Addresses
This is the most straightforward answer to why do emails bounce – and the one responsible for the majority of hard bounces across most sending lists. When an email address simply doesn’t exist at the destination domain, the receiving mail server returns a permanent 5xx rejection immediately. No ambiguity in the signal. The address is gone, was never real, or was typed incorrectly.
The tricky part is understanding how these addresses got onto your list in the first place. There are usually three distinct entry points:
Typographical errors at capture: Someone types their email address into a form quickly – gmial.com instead of gmail.com, a missing dot, a transposed letter, a forgotten @ symbol. These are honest mistakes and they happen constantly, especially on mobile devices where keyboards are small and autocorrect is unpredictable. Email verification providers consistently report that somewhere between 2% and 8% of addresses collected via web forms contain a typo. If you’re running any kind of lead generation at volume without verifying at capture, you’re accumulating these errors with every single form submission.
Deliberate fake addresses: This happens when someone wants the thing you’re offering – a discount code, a whitepaper download, a free trial – but doesn’t want the ongoing email relationship. So they type in [email protected], [email protected], or any variation of something that looks plausible but leads nowhere. These produce instant hard bounces the moment you send to them. If your acquisition strategy relies heavily on gated content or incentivised signups without any verification layer, these accumulate faster than most people realise.
Deactivated or abandoned accounts: Arguably the most damaging entry point. An address that was completely real when you collected it – had engagement history, received previous campaigns, maybe even clicked – but has since been shut down. Someone changed jobs, closed an old personal account, or simply stopped using that address years ago. These are the hardest invalid addresses to catch through standard list audits because they passed every quality check at the time of capture and look like legitimate contacts on paper.
The combined effect of all three entry points is a list that looks healthy in your CRM but has a meaningful layer of non-deliverable addresses distributed throughout it – some clearly invalid, most not obviously so.
Disposable Email Addresses
Disposable addresses sit in a slightly different category from straightforwardly invalid addresses, and they’re worth understanding separately because they behave differently and require a different prevention strategy.
A disposable email address – sometimes called a temporary email or throwaway inbox – is a real, functioning address at the moment it’s created. Services like Mailinator, Guerrilla Mail, and Temp Mail allow anyone to generate a working inbox in seconds, use it to receive a confirmation email, and then let it expire or simply never check it again. The address validates successfully at the point of capture. It receives your welcome email. It might even open it. Then it goes dark.
The timing problem is what makes disposable addresses particularly frustrating. They often pass your first send without producing a bounce because the inbox still technically exists at that point. The bounce comes later – on your second email, or your third, sometimes weeks after the original signup. By that point the address has a short history in your system, your ESP has attempted multiple deliveries, and the bounce pattern looks different from a straightforward invalid address.
Here’s something worth thinking about beyond the technical side: a high rate of disposable email signups on a particular form or offer is often telling you something about the mismatch between the perceived value of what you’re offering and the perceived cost of receiving your emails long-term. People use disposable addresses when they want the thing but not the relationship. That’s a positioning signal as much as a data quality problem.
From a prevention standpoint, the solution is real-time verification at capture that specifically checks for known disposable domains – because standard format validation won’t catch these. The domain is real and the format is correct. You need a verification layer that queries a database of known disposable providers and flags them before they enter your list.
Role-Based Addresses
Role-based addresses are the ones that don’t belong to a specific person – info@, admin@, support@, sales@, hello@, postmaster@, noreply@. They route to a shared team inbox, a helpdesk queue, a distribution list, or sometimes nowhere at all depending on how the receiving organisation has configured them.
The bounce behaviour here is inconsistent, which is part of what makes them a challenge:
- Some organisations configure role-based inboxes to accept all inbound mail without issue
- Others configure them to silently discard bulk email – it appears to deliver but goes nowhere
- Others return an explicit rejection that shows up directly in your hard bounce data
- And some accept the email but route it to a shared inbox where it gets ignored, flagged as spam, or marked for unsubscription by whoever happens to review it that day
For bounce management purposes, the immediate concern is the ones producing explicit rejections. But the subtler concern is the ones that appear to deliver successfully but are effectively dead ends – dragging your engagement metrics down in ways that have their own long-term deliverability consequences. An individual’s personal inbox carries a completely different level of personal investment than a shared info@ mailbox.
Role-based addresses are worth filtering out of your main sending lists even when they’re not actively bouncing.
Contacts Who Have Changed Jobs or Domains
This one is particularly common in B2B sending lists, and it causes a level of list decay that most B2B marketers significantly underestimate.
Corporate email addresses are inherently tied to employment. When someone changes jobs, their company email is typically deactivated within a short window – anywhere from immediate on the day they leave to a 30 or 90-day grace period. After that, the address is gone. Every email you send to it bounces with a “mailbox not found” or “user unknown” rejection.
The scale of this problem is worth sitting with for a moment:
| Metric | Typical Range |
|---|---|
| Average employee tenure (tech/SaaS/marketing) | 2–3 years |
| Annual employee turnover rate | 15–25% |
| Annual address decay on a 10,000-contact B2B list | 1,500–2,500 addresses |
That last number means that on a well-maintained B2B list, without adding a single bad address through poor acquisition practices, somewhere between 15% and 25% of your contacts may become invalid every year purely from job changes. This is why B2B lists require significantly more frequent re-verification than consumer lists. A personal Gmail address lasts for years or decades. A corporate address is tied to an employment relationship that will end.
There’s an additional nuance worth noting: when a corporate address is deactivated, companies sometimes let the domain itself lapse rather than just the individual inbox. When that happens, the bounce comes from a failed DNS lookup rather than a live mail server rejection. The SMTP error looks slightly different – a domain-level failure rather than a mailbox-level failure – but the correct response is the same: suppress immediately and don’t retry.
The Sender Reputation Signal for Category 1
Understanding the causes is useful. Understanding what ISPs make of those causes is what actually makes you treat this urgently rather than as a routine cleanup task.
Every campaign you send contributes to an ongoing picture of your sending behaviour that feeds into the trust signals ISPs maintain for your domain and IP. Bounce patterns are one of the most significant inputs into that picture. When Gmail, Outlook, or Yahoo consistently sees hard bounce failures coming from your sending domain – even moderate ones across multiple campaigns – they’re drawing one of two conclusions: either you don’t know your list has problems, or you don’t care. Neither conclusion positions you as a trustworthy sender.
Here’s how the email bounce thresholds typically play out:
| Bounce Rate | What Typically Happens |
|---|---|
| Below 1% | Normal range – no immediate action from ESPs |
| 1%–3% | Throttling, sending restrictions, account flags begin |
| 3%–5% | Account review territory with most major ESPs |
| Above 5% | Suspension risk – immediate intervention required |
But the more insidious dynamic is what happens before you hit these visible thresholds. ISPs don’t just react to spikes – they track trends. A sender consistently sending at 1.8% hard bounce rate across twelve campaigns is building a pattern. That pattern gradually erodes the implicit trust the ISP extends to your domain, showing up first as slightly reduced inbox placement, then more frequent spam folder routing, then more aggressive filtering overall. The whole process can unfold over months without any single campaign triggering an obvious alarm – which is why list quality problems often feel like they came out of nowhere when the deliverability impact finally becomes visible.
What to Do About Category 1
Category 1 is the most fixable bounce category, which makes it worth addressing with real urgency rather than pushing it to the next quarterly review.
Immediate action:
- Suppress every hard-bounced address from future sends – and be clear that suppression and deletion are not the same thing. Your ESP suppresses hard-bounce addresses automatically, but they still exist in your database. If you switch ESPs, migrate data, or import a list without checking your suppression records, those addresses can re-enter your active sending list. Maintain a permanent suppression list in your master database, not just in your ESP.
Medium-term priority:
- Run your full list through a bulk email verification tool before your next major campaign. Verification checks each address against syntax validation, domain and DNS checking, and SMTP-level mailbox confirmation – without sending an actual email. This surfaces invalid addresses, disposable addresses, and role-based addresses that have been sitting in your list undetected. If you’re dealing with a large list that hasn’t been cleaned in a while, this single step usually produces an immediate, measurable improvement in bounce rate.
Long-term fix:
- Implement real-time verification at the point of capture. Rather than periodically cleaning a list that keeps getting dirty, you stop invalid addresses from entering in the first place. The cost of catching a bad address at the point of entry is essentially zero. The cost of cleaning it up after it’s been in your list for two years and contributed to months of elevated bounce rates is significantly higher.
- Audit your list acquisition sources quarterly by bounce rate. Segment your bounces by the source that originally captured each contact and look for patterns. A specific lead magnet, a third-party list, a trade show badge scan – these often show dramatically higher bounce rates than organic signup channels. Fixing the source fixes the ongoing problem rather than just cleaning up after it.
Category 2 – Sender Infrastructure Problems
These failures originate from how your sending setup is configured.
When people ask why do emails bounce and the list checks out fine, this is almost always where the real answer is hiding – and the consequences of misdiagnosing it are significant.
When senders see a spike in bounce rates, the natural instinct is to clean the list. And if the problem is Category 1, that instinct is correct. But Category 2 bounces look almost identical in your campaign report, and no amount of list cleaning will fix them. A sender can have a perfectly verified, meticulously maintained list of 50,000 contacts and still hit a 15% bounce rate if their SPF record is misconfigured. The addresses are fine. The infrastructure isn’t.
Understanding what causes an email to bounce at the infrastructure level means understanding the authentication layer that sits between your sending server and every inbox your email is trying to reach.
Every one of these infrastructure failures traces back to gaps in your email authentication setup – and the full explanation of how SPF, DKIM, and DMARC work together is in our email authentication guide.
SPF Record Missing or Misconfigured
SPF – Sender Policy Framework – is a DNS record that specifies which IP addresses and sending services are authorised to send email on behalf of your domain. When a receiving server gets your email, one of the first things it does is check whether the IP it came from is on your SPF-authorised list. If it isn’t, the server has no way to verify that the email is legitimate, and many servers will reject it or treat it as high-risk.
The three most common SPF failure scenarios are:
No SPF record published: The most basic version of the problem. If your domain has no SPF record at all, every server that checks for one will see a missing authentication signal. Depending on the receiving server’s policy, this ranges from a minor negative signal to an outright rejection.
SPF record exists but doesn’t include your ESP’s sending IPs: This is extremely common when teams switch ESPs, add a new sending platform, or start using a new transactional email service without updating their DNS records. Your SPF record was accurate at some point – it just doesn’t reflect your current sending setup. Every email sent from the new service is technically unauthenticated even though everything looks fine on the ESP dashboard.
SPF record exceeds the 10 DNS lookup limit: The SPF protocol has a hard limit of 10 DNS lookups per evaluation. Organisations that use multiple sending services – a marketing ESP, a transactional email provider, a CRM with email capabilities – often accumulate enough SPF includes to breach this limit. The result is a “permerror” that many receiving servers treat as an authentication failure.
DKIM Not Set Up or Failing Verification
DKIM – DomainKeys Identified Mail – works differently from SPF. Instead of checking where the email came from, DKIM checks whether the email’s content has been tampered with in transit. It does this by attaching a cryptographic signature to every outgoing message. The receiving server checks that signature against the public key published in your DNS records. If they match, the email is verified as authentic and unmodified.
When DKIM is missing or failing, you lose that verification layer. For most receiving servers, a missing DKIM signature isn’t an automatic rejection – but it does mean your email arrives without a significant trust signal that increasingly sophisticated filters are looking for. For high-security receiving environments – corporate IT departments with strict inbound policies, financial institutions, government agencies – a missing or invalid DKIM signature can be enough to trigger an outright rejection.
The most common DKIM failure scenario is a key mismatch after a domain migration or DNS update. The ESP is still signing with the old key, but the public key in DNS has been updated or removed. Everything looks correct on the sending side, but verification fails at the receiving end.
DMARC Policy Rejecting Unauthenticated Mail
DMARC – Domain-based Message Authentication, Reporting and Conformance – is the policy layer that sits on top of SPF and DKIM. It tells receiving servers what to do when an email fails one or both of those checks. The three DMARC policy settings are:
| DMARC Policy | What It Instructs Receiving Servers To Do |
|---|---|
| none | Monitor only – deliver the email and report failures |
| quarantine | Send failing emails to the spam folder |
| reject | Bounce failing emails – do not deliver |
Here’s the scenario that catches teams off guard: your own domain’s DMARC policy is set to “reject” – which is the right security posture for protecting your domain against spoofing – but your sending setup isn’t correctly aligned with your SPF and DKIM records. The result is that your own emails fail your own DMARC policy, and receiving servers bounce them back to you. It’s one of the more frustrating infrastructure problems to diagnose because the sending looks correct on the ESP side, but the authentication chain breaks somewhere in the DNS alignment.
This is increasingly common in organisations that have tightened DMARC policies in response to phishing concerns without running a full audit of every service that sends email on behalf of their domain.
Sending from a New Domain or IP Without Warming Up
ISPs don’t extend trust by default. They assign it based on a track record of consistent, legitimate sending behaviour over time. A new sending domain or IP address has no track record – which means no trust – and the sending behaviour of a new identity ramping up to high volume immediately is indistinguishable, from an ISP’s perspective, from a spam operation that just spun up a fresh infrastructure.
The result is a predictable pattern of soft bounce failures – 4xx temporary deferrals – and aggressive rate limiting as ISPs throttle the unknown sender. The email isn’t being rejected because anything is wrong with it. It’s being deferred because the sender hasn’t earned the right to deliver at that volume yet.
The fix is a structured email warm-up process: starting with small daily sending volumes and gradually increasing them over four to eight weeks, prioritising your most engaged contacts first to build positive engagement signals alongside the volume increase. Skip the warm-up, or rush it, and you’ll be fighting ISP throttling for months.
Sending Domain or IP on a Blacklist
If your sending domain or IP address appears on a DNS-based blacklist – sometimes called a DNSBL or RBL – receiving servers that check against that list will reject your email immediately. The bounce message typically includes language like “listed on blacklist”, “blocked due to spam activity”, or a reference to a specific blacklist provider like Spamhaus or Barracuda.
Blacklistings are most commonly caused by:
- Sustained high spam complaint rates from recipients
- Sending to spam trap addresses – dormant or honeypot addresses maintained by anti-spam organisations specifically to identify poor list hygiene
- A previous sender on a shared IP pool behaving badly, resulting in the IP being listed regardless of your own behaviour
- A sudden, unexplained spike in sending volume that triggers automated abuse detection
The critical point for this section is one worth repeating clearly: blacklisting is an infrastructure problem, not a list problem. Cleaning your list will not resolve a blacklisting. You need to identify which blacklist you’re on, understand the specific reason, fix the underlying behaviour that triggered it, and submit a formal delisting request to the blacklist operator. Until you do that, the bounces will continue regardless of how clean your list is. It’s better to check our guide on email blacklist check & removal guide for in-depth information.
The Sender Reputation Signal for Category 2
The tell for Category 2 bounces – the thing that distinguishes them from Category 1 in your bounce data – is the language in the SMTP error message. Authentication and infrastructure rejections use specific terminology that list-quality rejections don’t:
- “Unauthenticated email from your domain”
- “DMARC policy violation”
- “550 5.7.26 – this message does not pass authentication checks”
- “Not permitted to relay”
- “Listed on [blacklist name]”
- “550 5.7.1 – IP reputation problem”
When you see this language in your bounce data, the response is never to suppress the contact. The contact’s address may be completely valid. The problem is on your side, not theirs. Suppressing them means losing a potentially good contact while leaving the infrastructure problem entirely unresolved.
This is the most important distinction in the entire bounce management conversation – infrastructure problems require infrastructure fixes, and understanding how each category affects your email sender reputation over time is what makes that distinction urgent rather than theoretical.
Category 3 – Recipient-Side Problems
These failures originate from the receiving end – outside your control.
If Category 2 is the most misdiagnosed answer to why do emails bounce, Category 3 is the most over-reacted to. These are failures that have nothing to do with your list quality, nothing to do with your sending setup, and nothing to do with your email content. They happen because of temporary conditions on the recipient’s side – and in most cases, they resolve themselves without any action from you at all.
The challenge is that they show up in your bounce report looking similar to more serious failures, which triggers the instinct to suppress the contact or investigate the infrastructure. Understanding what causes an email to bounce at the recipient side is largely about knowing when not to act.
Full Mailbox
When a recipient’s mailbox has reached its storage limit, the receiving server returns a soft bounce – typically a 452 4.2.2 with a reason string like “mailbox full”, “insufficient storage”, or “over quota.” The email address is valid. The domain is functioning normally. The infrastructure on both sides is working correctly. The inbox just has no room.
A single full-mailbox bounce on an address is harmless. Your ESP’s retry logic will attempt redelivery automatically at intervals over the next 24–72 hours, and in many cases the email will eventually get through once the recipient clears some space.
Where it becomes worth paying attention is when the pattern repeats:
| Occurrence Pattern | What It Signals | Recommended Action |
|---|---|---|
| Single occurrence | Timing issue – inbox temporarily full | Let ESP retry automatically |
| Second occurrence within 30 days | Account may be getting inactive | Flag for monitoring |
| Third occurrence across multiple sends | Account is likely abandoned | Move to re-engagement segment or suppress |
An inbox that is perpetually full and never empties is not being actively used. It’s the recipient-side equivalent of an invalid address – and at that point, continuing to send to it starts generating the kind of persistent failure signals that do carry a reputation cost.
Receiving Server Temporarily Down or Throttling
Mail servers experience temporary outages, maintenance windows, and load-related slowdowns just like any other server infrastructure. When a receiving server is temporarily unavailable or overloaded, it returns a 4xx deferral – a temporary “try again later” signal rather than a permanent rejection.
Your ESP handles this automatically. The message is queued and retried at defined intervals – typically over 24 to 72 hours – until either the server comes back online and accepts the message, or the retry period expires and the message is marked as failed.
From your perspective as the sender, there is genuinely nothing to do here. These bounces don’t reflect anything about your list quality, your infrastructure, or your content. They are transient infrastructure events on the receiving end.
The only scenario where this becomes a concern is if you notice a consistent pattern of temporary failures across a large number of recipients at a specific domain over an extended period. That may indicate a configuration problem on their end – or it may be the early signal of ISP-level throttling, which is a slightly different dynamic worth understanding separately.
ISP-Level Rate Limiting and Throttling
ISPs impose sending rate limits on domains and IPs that haven’t yet established sufficient trust at the volume they’re sending. When you exceed the rate an ISP is comfortable accepting from your sending identity, they don’t reject your email outright – they defer it with a 4xx temporary failure and language like “too many connections from this IP”, “rate limit exceeded”, or “please try again later.”
This is important to understand clearly: rate limiting is not a rejection of your email or your contacts. The addresses are valid. The content is fine. The ISP is simply saying “we’re not comfortable letting you deliver this fast given your current trust level with us.”
The nuance here is that ISP-level throttling often has roots in Category 2 rather than being a purely recipient-side problem. A sending identity that hasn’t been properly warmed up, or one whose sender reputation has been eroded by previous bounce issues, will hit ISP rate limits much more aggressively than a well-established sender with a clean history. The throttling is the symptom. The underlying trust deficit is the cause.
The Sender Reputation Signal for Category 3
Category 3 is the least damaging bounce category from a reputation standpoint – with one important condition: retry logic must be in place, and over-suppression must be actively avoided.
The most common mistake senders make with Category 3 bounces is treating them like Category 1. They see a bounce, they suppress the address, they move on. But suppressing a valid address because of a temporary server outage or a momentarily full inbox means losing a potentially engaged contact for no good reason. Over time, systematic over-suppression of Category 3 bounces quietly shrinks your active list in ways that compound with every campaign.
The rule of thumb is straightforward:
- 4xx code, first or second occurrence, no pattern → retry and monitor, take no action
- 4xx code, repeated across multiple campaigns on the same address → investigate before suppressing
- 5xx code → this is no longer Category 3, regardless of the reason string – treat as Category 1 or 2 depending on the error message
Category 4 – Content and Policy Problems
These failures originate from what’s inside the email.
Category 4 is the most confusing answer to why do emails bounce – and the most frustrating – because the list is clean, the authentication is correctly configured, the infrastructure is fine, and the email still bounces. Everything that’s supposed to work is working. The failure comes from the content of the message itself, or from the policies of the receiving environment it’s trying to reach.
This is also why understanding what causes an email to bounce at the content level matters so much. Senders who don’t recognise this category as distinct from the others often spend weeks cleaning lists and auditing authentication records looking for a problem that isn’t there.
Email Content Triggering Spam Filters
Receiving servers don’t just check authentication and validate addresses – they also evaluate the content of your email before deciding whether to accept it. Content filtering has become increasingly sophisticated, and while the days of a single trigger word causing a rejection are largely behind us, certain patterns in your email’s content and structure can still result in a bounce.
Common content-related rejection triggers include:
- Aggressive promotional language in the subject line or preview text – excessive use of words like “FREE”, “GUARANTEED”, “LIMITED TIME”, “ACT NOW”, “WINNER”, particularly in all-caps
- High image-to-text ratio – emails that are primarily images with minimal text are a known spam signal. Content filters can’t read images, so an email that’s mostly visual looks like it may be hiding its actual message
- Shortened or redirected URLs – third-party URL shorteners and multi-step redirect chains in links are associated with phishing and spam operations, and content filters treat them with suspicion
- Broken or misleading HTML – hidden text, mismatched display text and link destinations, malformed tag structure, or excessively complex HTML templates can trigger policy rejections
- Missing plain-text version – HTML-only emails with no plain-text alternative score worse with content filters and are rejected outright by some receiving environments
The important thing to understand about content-triggered bounces is that they don’t mean the recipient’s address is invalid or your infrastructure is broken. The failure is specific to what’s inside this particular email – which means a different version of the same email, sent to the same address, might deliver without issue.
Attachment and Message Size Limits
Most major receiving servers enforce strict incoming message size limits, and exceeding them produces a hard rejection regardless of how clean your list or authentication setup is:
| Email Provider | Maximum Incoming Message Size |
|---|---|
| Gmail | 25 MB |
| Yahoo Mail | 25 MB |
| Outlook / Exchange | 20 MB (often lower in corporate environments) |
| Apple Mail (iCloud) | 20 MB |
In practice, the risk comes from campaigns with embedded high-resolution images, PDF attachments, product catalogues, or presentation files. Marketing teams building visually rich campaigns sometimes don’t realise how quickly image file sizes add up when multiple product images are embedded directly in the HTML.
The fix is consistent and straightforward: host large files externally – on your website, a CDN, or a file hosting service – and include a download or view link in the email rather than attaching the file directly. This approach also has the benefit of making the link clickable and trackable, which gives you engagement data you wouldn’t get from an attachment.
Recipient-Level Policy Blocks
Some receiving environments operate with inbound email policies strict enough to reject categories of email that would deliver perfectly normally to a standard consumer inbox. High-security corporate servers, government agencies, financial services organisations, healthcare providers, and educational institutions frequently fall into this category.
These policy blocks appear in your SMTP error data with language like:
- “Rejected by policy”
- “Administrative prohibition”
- “550 5.7.1 – message does not meet policy requirements”
- “This message has been blocked for compliance reasons”
The defining characteristic of a policy block is that it has nothing to do with your sending quality. The email is being rejected because of the type of email it is – bulk commercial mail, an email with a certain link structure, an email from a certain category of sender – not because anything about your specific email is wrong. You could have a pristine sender reputation, perfect authentication, and a spotlessly clean list, and these blocks would still occur.
They’re not fully fixable from the sender side. The options available to you are limited to reducing the likelihood of triggering the policy: using plain-text versions of your email, simplifying HTML structure, removing external links where possible, and avoiding attachment-heavy campaigns to audiences that include a high proportion of these receiving environments.
The Sender Reputation Signal for Category 4
From a sender reputation standpoint, Category 4 bounces sit in the middle of the damage spectrum – more consequential than temporary recipient-side deferrals, less immediately damaging than persistent hard bounces from invalid addresses.
A single campaign with elevated content-triggered rejections is rarely catastrophic. ISPs don’t make permanent trust decisions based on a single data point. But consistent content-triggered rejection patterns across multiple campaigns do contribute to deliverability erosion over time – particularly because content filtering signals often correlate with spam complaint rates, and spam complaints carry significant weight in ISP reputation scoring.
The other reason Category 4 is worth taking seriously is the diagnostic confusion it creates. Because the list is clean and the infrastructure is correct, senders in this situation often don’t know what they’re looking for. They run verification on the list, audit their DNS records, check their sender score – and everything looks fine. The problem is invisible until you look at the SMTP error language, which will consistently point to content or policy rather than address validity or authentication.
That’s the thread that runs through all four categories and connects them to everything we’ve covered so far: the answer is always in the bounce signal. You just need to know what you’re reading.
How to Read Your Bounce Report and Identify the Category
Everything we’ve covered so far about why do emails bounce – the four categories, the causes, the reputation signals – is only useful if you can actually connect it to what you’re seeing in your own bounce data. And that’s where most guides on this topic stop short. They explain what bounces are and why they happen, but they don’t show you how to look at a real bounce report and work out which category you’re dealing with.
That’s what this section does.
It’s also the most practically valuable thing in this entire post – because once you can read a bounce signal accurately, you stop guessing. You stop cleaning lists that don’t need cleaning. You stop missing infrastructure problems that do. Every bounce in your report becomes a data point you can act on with confidence rather than a number you’re trying to manage down.
Where to Find the Signal
The first challenge is that most ESPs don’t show you the raw bounce data by default. What they show you is a simplified interpretation of it – labels like “hard bounce”, “soft bounce”, “invalid address”, “mailbox full.” These labels are useful for a quick campaign overview, but they strip out the specificity that tells you why the failure happened.
The raw signal lives in two places:
The SMTP status code – a three-digit number returned by the receiving server at the moment of rejection. The first digit tells you the code family (4xx = temporary, 5xx = permanent). The second and third digits narrow it down to the specific failure type.
The reason string – the plain-language explanation that accompanies the SMTP code. This is where the real diagnostic information is. Two bounces can share the same SMTP code but have completely different reason strings – and those strings point to completely different categories.
Here’s how to get to this data in practice:
- In your ESP dashboard: Look for a “bounce details” or “delivery details” view at the individual contact or campaign level. Some platforms surface the SMTP code and reason string at this level even when the campaign overview doesn’t show it.
- Via export: Most ESPs include the full SMTP response in the raw CSV export of bounce data, even when the dashboard UI simplifies it. If you’re not finding what you need in the interface, export the bounce report and look for columns labelled “bounce code”, “SMTP code”, “bounce reason”, or “delivery status.”
- Via webhooks: If your team uses webhooks to ingest delivery data, the full SMTP response is almost always included in the event payload. This is the most complete and actionable version of the data.
Once you have the SMTP code and reason string for a bounce, identifying the category is a pattern-matching exercise. Here’s the reference you need.
Bounce Signal Pattern Reference
Use this table to identify which category a bounce belongs to. Match the SMTP code family first, then look for the reason string pattern.
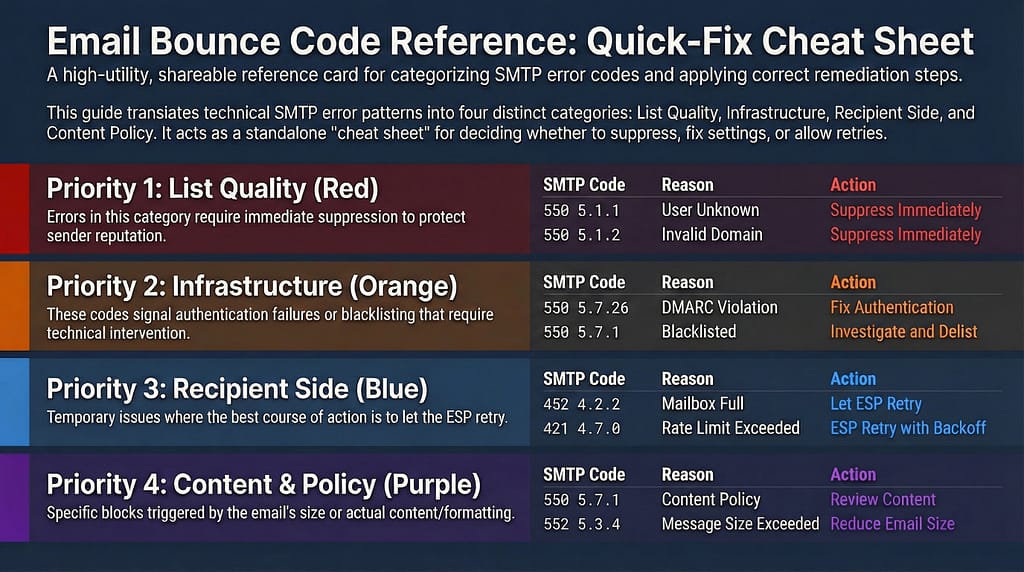
| SMTP Code | Reason String Pattern | Category | Recommended Action |
|---|---|---|---|
| 550 5.1.1 | “user unknown”, “mailbox not found”, “no such user” | Category 1 – List Quality | Suppress immediately. Never retry. |
| 550 5.1.2 | “bad destination mailbox address”, “invalid domain” | Category 1 – List Quality | Suppress immediately. Check domain validity. |
| 550 5.1.10 | “recipient address rejected”, “does not exist” | Category 1 – List Quality | Suppress immediately. Never retry. |
| 550 5.7.26 | “unauthenticated email”, “DMARC policy violation”, “not permitted to send” | Category 2 – Infrastructure | Fix SPF/DKIM/DMARC. Do not suppress the contact. |
| 550 5.7.1 | “blacklisted”, “blocked”, “IP reputation”, “not permitted to relay” | Category 2 – Infrastructure | Investigate blacklist status and delist. Do not suppress the contact. |
| 535 5.7.8 | “authentication credentials invalid”, “authentication failed” | Category 2 – Infrastructure | Audit sending credentials and authentication setup. Do not suppress. |
| 452 4.2.2 | “mailbox full”, “insufficient storage”, “over quota” | Category 3 – Recipient Side | Let ESP retry automatically. Suppress only on repeated recurrence. |
| 421 4.7.0 | “too many connections”, “rate limit exceeded”, “try again later” | Category 3 – Recipient Side | Let ESP retry with backoff. Review sending volume if pattern is broad. |
| 451 4.3.5 | “server temporarily unavailable”, “service unavailable” | Category 3 – Recipient Side | Let ESP retry. No action required unless pattern persists across a domain. |
| 550 5.7.1 | “content policy”, “message rejected due to content”, “administrative prohibition” | Category 4 – Content/Policy | Review content and HTML structure. Do not suppress the contact. |
| 552 5.3.4 | “message size exceeds limit”, “maximum message size exceeded” | Category 4 – Content/Policy | Reduce email size. Remove attachments. Host files externally. |
| 554 5.6.0 | “content rejected”, “invalid message content”, “malformed HTML” | Category 4 – Content/Policy | Audit HTML structure and formatting. Do not suppress the contact. |
A few things worth noting about this table:
First, the same SMTP code can appear in multiple categories. 550 5.7.1 is a good example – it shows up in both Category 2 (infrastructure blocks) and Category 4 (content policy rejections). The reason string is what tells them apart. This is why looking at the code alone isn’t enough – you need both pieces of information.
Second, receiving servers don’t always use standardised reason strings. Gmail, Outlook, Yahoo, and corporate mail servers all have their own variations of these messages. The patterns in the table above are representative rather than exhaustive – use them as a starting framework and apply judgment when the exact wording differs.
Third, if a large proportion of your bounces from a single campaign are showing the same SMTP code and similar reason strings, that’s a pattern worth investigating at the infrastructure or content level rather than treating as individual address failures.
The One-Question Diagnostic
If you’re looking at a bounce and you’re still not sure which category it belongs to after checking the error message, there’s a single question that resolves most ambiguity quickly:
If I sent to a completely different email address at the same domain, would it also bounce?
- If yes – the problem is with the domain or sending infrastructure, not the individual address. That points to Category 2. The receiving domain may be blocking your sending IP, your authentication is failing their policy checks, or your domain is listed on a blacklist that their server checks against.
- If no – the problem is specific to that address. Depending on the error language, that points to Category 1 (address doesn’t exist), Category 3 (temporary recipient-side condition), or Category 4 (content triggered a filter that applies to that specific receiving environment).
This single question separates infrastructure problems from address problems in under 60 seconds – and it prevents the most expensive mistake in bounce management, which is suppressing valid contacts because of a sending infrastructure issue that hasn’t been identified yet.
Which Bounce Causes Damage Your Sender Reputation the Most?
Not all causes of why do emails bounce carry equal weight in the eyes of ISPs. Understanding the reputation impact of each category helps you prioritise your response – because when multiple things need fixing, fixing the highest-impact problem first produces the fastest recovery.
Reputation Impact Ranking
Here’s how the four categories rank by the damage they do to sender reputation, from most to least severe:
| Rank | Category | Reputation Impact | Why |
|---|---|---|---|
| 1 | Category 1 – List Quality | Highest | Hard bounces from invalid addresses are persistent and recurring. ISPs track consistency across campaigns. Even a moderate sustained rate erodes trust over time. |
| 2 | Category 2 – Infrastructure | High | Authentication failures signal inability to prove identity. Blacklistings produce immediate widespread blocks across all servers checking that list. |
| 3 | Category 4 – Content/Policy | Medium | Damaging over time but rarely catastrophic from a single campaign. Consistent patterns across multiple campaigns erode deliverability gradually. |
| 4 | Category 3 – Recipient Side | Low | Temporary deferrals handled by retry logic leave no lasting reputation signal under normal conditions. |

Why Category 1 Leads the Damage Rankings
The reason Category 1 is the most reputation-damaging answer to why do emails bounce isn’t just about the volume of failures it produces. It’s about the consistency signal it sends to ISPs over time.
A one-off campaign with a slightly elevated bounce rate from a list import issue is forgivable. ISPs understand that data quality problems happen. What they watch for – and what causes lasting reputation damage – is a sender who consistently delivers hard bounce failures across multiple campaigns over an extended period. That pattern tells them something structural about how the sender operates. It tells them the sender either doesn’t verify their list before sending, doesn’t suppress hard bounces properly between campaigns, or acquires contacts through channels with poor data quality controls. None of those conclusions are ones you want an ISP drawing about your domain.
The compounding effect is also worth understanding. Category 1 problems, if left unaddressed, frequently generate Category 2 problems downstream. A sending domain with chronically poor list hygiene accumulates spam complaints alongside its bounce failures. Spam complaints trigger blacklist monitoring. Blacklisting triggers the kind of widespread infrastructure-level block that takes weeks or months to fully recover from. The path from ‘we have a moderate bounce rate problem’ to ‘our domain is blacklisted’ is shorter than most senders expect – we’ve covered exactly what happens when email bounce rate is high and how that escalation unfolds in a separate guide.
The Nuance in Category 3
Category 3 sits at the bottom of the damage rankings under normal conditions, but there’s an important exception worth calling out.
ISP-level throttling – the rate limiting that occurs when you’re sending at a volume that exceeds an ISP’s comfort level for your current trust level – can become a reputation signal if it’s happening at scale and persisting across multiple campaigns. If a significant proportion of your sends to a particular ISP are being deferred repeatedly, that ISP may start treating your sending identity as a high-volume low-trust sender and apply more aggressive filtering going forward. The temporary deferral transitions into a more permanent trust deficit.
This is most common in two scenarios: senders who have recently scaled volume rapidly without a corresponding warm-up process, and senders who are recovering from a previous reputation issue and trying to send at pre-problem volumes before their reputation has fully recovered. In both cases, the right response is to reduce sending volume temporarily, prioritise your most engaged segments, and let positive engagement signals rebuild the trust level before increasing volume again.
What to Do Next – Matching the Fix to the Cause
Everything in this guide about why do emails bounce has been building toward a single practical outcome: when you look at your bounce data after a campaign, you know exactly what you’re seeing and exactly what to do about it. This section is that – a clear action map that connects each category to the right response.
If Your Bounces Are Category 1 – List Quality
This is where to start for most senders, because Category 1 is the most common root cause and the most directly fixable.
Step 1: Suppress hard bounces immediately Every address that has produced a 5xx permanent failure should be on your suppression list before your next send. Don’t wait for a scheduled list review. If your ESP hasn’t already auto-suppressed these addresses, do it manually. And as noted earlier – maintain that suppression list in your master database, not just in your ESP, so it survives any platform migrations or data imports.
Step 2: Run a full list verification before your next major send Before you send your next campaign to your full list, run it through a bulk email verification process. This isn’t about finding addresses that have already bounced – your ESP bounce data handles that. This is about surfacing the addresses that will bounce on your next send: invalid addresses that haven’t been mailed yet, disposable addresses that have since expired, role-based addresses that will reject bulk mail. Catching these before you send is significantly better for your sender reputation than discovering them in your post-campaign bounce report.
This is exactly what MailCleanup is built for. Upload your list, run it through bulk verification, and get a clean, bounce-risk-scored output that tells you which addresses are safe to send to and which should be removed before your next campaign. If you’re dealing with a list that hasn’t been verified in a while – or one that’s been showing a creeping bounce rate over recent campaigns – this single step typically produces an immediate, measurable improvement.
Step 3: Fix the acquisition source, not just the symptoms After verifying and cleaning your current list, look at where the bad addresses came from. Segment your bounces by acquisition source and identify which channels are delivering the highest concentration of invalid addresses. That’s the source you need to fix – whether it means adding real-time verification to a specific signup form, reconsidering a third-party data source, or tightening the validation on a particular lead generation campaign.
Step 4: Implement real-time verification at capture going forward The sustainable long-term fix. Verification at the point of capture stops invalid addresses from entering your list in the first place. The cost of catching a bad address at entry is effectively zero. The cost of cleaning it up after it’s been in your list for two years – and contributing to six months of elevated bounce rates – is considerably higher in both time and deliverability damage.
If Your Bounces Are Category 2 – Sender Infrastructure
Step 1: Start with an authentication audit Check that SPF, DKIM, and DMARC are correctly configured for every domain and sending service you’re currently using. This means checking your actual DNS records against what your ESP expects – not just assuming they’re correct because they were set up correctly at some point in the past. Authentication configurations drift over time, especially when teams add new sending services, switch ESPs, or update DNS records without a full audit of downstream impacts.
Step 2: Check blacklist status Run your sending domain and IP address against the major blacklist databases. Several free tools allow you to check against multiple lists simultaneously. If you find a listing, identify the specific blacklist, read their listing reason, fix the underlying behaviour that triggered it, and submit a formal delisting request. Don’t submit a delisting request without fixing the underlying cause first – most blacklist operators will reject or ignore requests that don’t demonstrate the problem has been resolved.
Step 3: Review sending volume relative to warm-up status If your bounce pattern shows broad 4xx throttling across multiple ISPs rather than specific address failures, check whether your sending identity has been properly warmed up for your current sending volume. If you’ve scaled recently or switched to a new domain or IP, you may need to step back on volume temporarily and work through a structured warm-up process.
If Your Bounces Are Category 3 – Recipient Side
In most cases, the action here is deliberately minimal.
Confirm that your ESP’s retry logic is active and configured to retry over at least a 24–48 hour window. If it is, the majority of Category 3 bounces will resolve themselves without any intervention on your part. Check your ESP settings to make sure retry is enabled – some platforms allow you to configure retry behaviour, and it’s worth knowing what yours is set to.
The only active management Category 3 requires is monitoring for recurrence patterns. If the same addresses are producing full-mailbox bounces across three or more consecutive campaigns, flag them for a re-engagement sequence or move them to a low-frequency sending segment. Persistent full-mailbox failures are a reliable signal of abandoned accounts – and abandoned accounts are heading toward Category 1 territory.
If Your Bounces Are Category 4 – Content and Policy
Step 1: Run a pre-send content test Before your next campaign, run your email through an inbox testing or spam scoring tool. These tools evaluate your content against major spam filter criteria and flag specific issues – subject line patterns, HTML problems, image-to-text ratio, link structures – before you send. Fixing content issues before sending is always preferable to diagnosing them from post-campaign bounce data.
Step 2: Audit your HTML Check for broken tags, hidden text elements, mismatched link display text and destinations, and overly complex template structures. Even small HTML issues can trigger content filters in strict receiving environments. If your email template has been through multiple rounds of editing across different tools, it’s worth doing a clean HTML review periodically.
Step 3: Move large files off the email If size-related bounces are appearing in your data, audit your email for embedded images and attachments. Host files externally and replace direct embeds with clearly labelled links. As a general practice, keeping your email HTML under 100KB and your total message size well under 1MB gives you the most consistent deliverability across receiving environments.
Step 4: Consider a plain-text version for high-security audiences For audiences that include a high proportion of corporate or institutional email addresses – common in B2B sending – a plain-text alternative version of your email bypasses the majority of content filter triggers that HTML-formatted email encounters. It won’t win any design awards, but it delivers reliably to environments where HTML campaigns don’t.
Closing Thoughts
Here’s the thing about why do emails bounce: it’s never a mystery. Every single one of them comes with a structured error message that tells you exactly what went wrong and where the problem originated. The signal is there in your bounce data after every campaign – it just needs to be read correctly.
The four-category framework in this guide is really just a systematic way of reading that signal. List quality problems tell you something about who’s on your list. Infrastructure problems tell you something about how your sending is set up. Recipient-side problems tell you something about conditions outside your control. Content and policy problems tell you something about what’s inside the email. Each category points to a different fix, and applying the right fix to the right category is what turns bounce management from a recurring fire into a controlled, predictable part of your sending operation.
Senders who treat their bounce data as diagnostic information – rather than just a number to minimise – stop fighting the same email deliverability problems cycle after cycle. That’s the shift this guide is designed to help you make.