There is a particular kind of deliverability problem that is harder to diagnose than most. Your campaign goes out, engagement drops sharply, bounce rates spike, and when you look at the bounce message text, you see something like “550 5.7.1 – message rejected per policy” or a reference to Spamhaus or Barracuda.
Your domain or sending IP is on an email blacklist, and until you deal with it, a significant proportion of your emails are not reaching anyone.
The frustrating part is that blacklistings often go unnoticed for longer than they should. Most senders only discover one when they investigate an unusual bounce spike or receive a complaint from a customer who stopped getting their emails. By the time the listing is confirmed, two or three campaigns may have already gone out through a blocked infrastructure, deepening the reputation damage with every send.
This guide covers the complete picture. What an email blacklist actually is and how it works technically, the critical difference between public blacklists (where you can request removal) and private ISP blacklists (where you cannot), how to check whether your domain or IP is listed, the exact steps to get removed, and the prevention practices that make re-listing structurally unlikely.
If you want to understand how blacklistings connect to your bounce reports and overall sending health, our email bounce management guide covers the operational side, and what causes email bounces explains how blacklisting fits into the broader bounce cause framework.
TL;DR — Email Blacklist Check and Removal: What You Need to Know
- An email blacklist is a real-time database of IP addresses and domains flagged as sources of spam. When your sending infrastructure is listed, receiving servers reject or filter your emails automatically before they reach any inbox.
- There are two fundamentally different types of blacklist. Public blacklists like Spamhaus and Barracuda have lookup tools and formal delisting processes. Private blacklists maintained internally by Gmail, Outlook, and Yahoo have no delisting form. Recovery from a private block requires rebuilding reputation through consistent clean sending over weeks.
- Not all email blacklist listings are equally serious. A Spamhaus SBL listing affects delivery across a large proportion of global inboxes and requires immediate action. A UCEPROTECT Level 3 listing is a hosting-level block that many deliverability professionals recommend deprioritising entirely.
- Before submitting any delisting request, fix the root cause. Requesting removal without addressing what triggered the listing results in re-listing, often within days.
- Blacklistings show up in bounce reports as specific SMTP codes. Codes like 550 5.7.606 (Outlook) and 554 with blacklist-specific text in the message body are the diagnostic signals that point directly to a listing.
- The list quality problems that cause most blacklistings, including invalid addresses, spam trap risk contacts, and unverified imports, are exactly what bulk email verification is designed to remove before they do any damage.
What Is an Email Blacklist?
An email blacklist is a real-time database that receiving mail servers query during the delivery process to decide whether an incoming message should be accepted, filtered to spam, or rejected outright. The databases are maintained by third-party organisations, ISPs, and security vendors, and they list IP addresses, domains, or URLs associated with spam activity.
When your sending infrastructure ends up on one of these lists, the consequences happen automatically. The receiving server does not read your content, check your engagement history, or consider whether you intended to send spam. It queries the blacklist, finds your IP or domain listed, and applies a rejection or filtering rule. The whole process takes milliseconds, and your email never gets a fair hearing.
Understanding what an email blacklist actually is underneath the surface, how it works technically, and what the different types mean in practice, is what makes the difference between a targeted, efficient recovery and weeks of confused troubleshooting.
How Email Blacklists Work: The DNSBL Mechanism
The technical name for most email blacklists is DNSBL, which stands for DNS-Based Blackhole List. You will also see the term RBL (Real-time Blackhole List) used interchangeably. Both refer to the same mechanism.
Here is how the lookup works in practice:
- Your email is sent from your ESP to the recipient’s mail server.
- The receiving server takes your sending IP address and queries a DNSBL database by constructing a specific DNS lookup request.
- The DNSBL responds with either a positive result (your IP is listed) or a negative result (not listed).
- Based on the result, the receiving server applies its configured policy: accept the message, deliver it to spam, or reject it entirely.
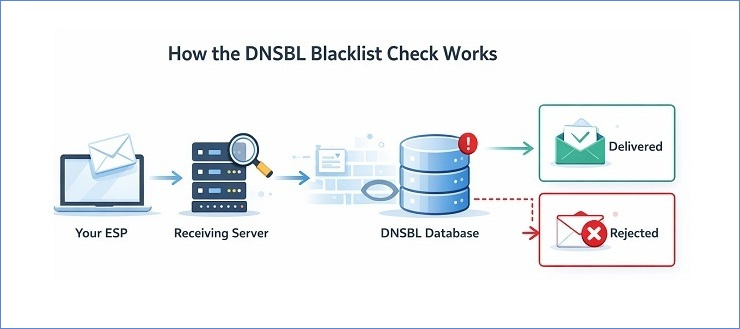
The whole sequence happens before your message content is evaluated at all. A blacklist hit at the DNSBL stage is an infrastructure-level block, not a content filter. No matter how clean and well-designed your email is, it will not get past a blacklist check if your IP or domain is listed.
One important nuance: what happens when a listing is found depends on how each receiving server is configured. Some servers hard-reject messages from listed IPs. Others deliver to spam. Others use the listing as one weighted signal among many. This is why a blacklisting does not always produce a 100% delivery failure rate. Some emails still get through depending on the recipient’s provider and configuration. But inbox placement degrades significantly across the board, and the senders who keep sending without investigating are the ones who end up with the deepest reputation damage.
IP Blacklists vs Domain Blacklists: What Each One Means for Your Sending
There are two primary categories of email blacklist, and they target different parts of your sending infrastructure. Knowing which type you are dealing with determines your recovery path.
IP blacklists flag a specific IP address used to send email. When your sending IP is listed, every email sent from that IP is affected, regardless of which domain it comes from. If you share a sending IP with other customers on your ESP’s shared pool, a listing can affect you even if your own sending behaviour did not cause it. Other senders on the same IP may have generated the complaints or spam trap hits that triggered the listing.
Domain blacklists flag a sending domain, a tracked link domain, or a domain appearing in message content. Domain-based blacklists like SURBL and URIBL focus particularly on URLs embedded in email content, which means your domain can end up listed because of the links in your campaigns even if your sending IP is clean.
The practical implication is significant:
| Blacklist Type | What Gets Flagged | Switching IPs Helps? | Switching Domains Helps? |
|---|---|---|---|
| IP blacklist | Sending IP address | Yes, if new IP is clean | No |
| Domain blacklist | Your sending or link domain | No | Yes, but not a sustainable solution |
| Both | IP and domain together | Partial | Partial |
If your domain is blacklisted, switching to a new sending IP does nothing. The domain is the problem, and it travels with every email you send regardless of which IP sends it. Conversely, if your IP is listed on a shared pool and your domain reputation is clean, moving to a different IP (or a dedicated IP) may resolve the delivery failures quickly. Understanding which type of listing you are dealing with before taking action saves a significant amount of time. For the broader picture of how these signals affect your overall sending reputation, our email sender reputation guide covers the compounding effects in detail.
Public vs Private Blacklists: Two Completely Different Recovery Paths
This is the distinction that most guides mention briefly and then gloss over. It is actually the most important thing to understand about email blacklists, because it determines everything about your recovery approach.
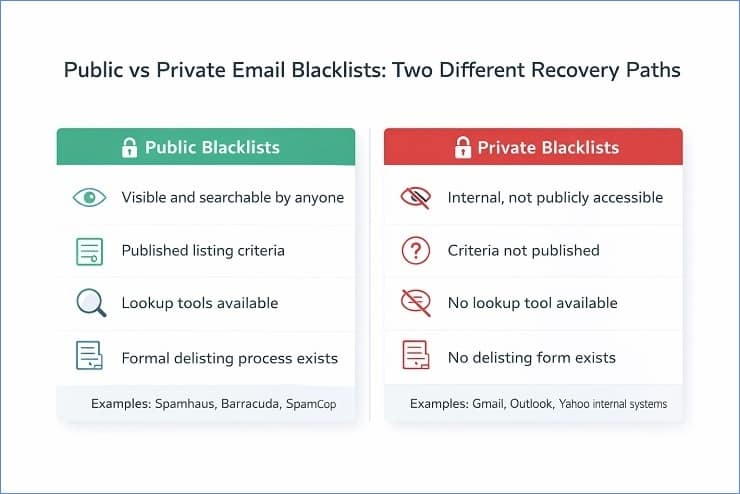
Public blacklists are operated by third-party organisations and made available to any receiving server that wants to query them. Spamhaus, Barracuda, SpamCop, SURBL, and URIBL are all public blacklists. They have published listing criteria, public lookup tools where you can check your status, and a formal delisting process where you can request removal once you have fixed the underlying cause.
Private blacklists are internal reputation databases maintained by major inbox providers and enterprise security vendors. Gmail, Outlook, and Yahoo each maintain their own internal systems for identifying senders whose mail should be filtered or rejected. These are not publicly accessible, they do not have lookup tools, and they do not have a delisting form you can submit.
Here is why this distinction matters so much in practice. A sender who discovers a delivery problem affecting Gmail addresses specifically runs their domain through MXToolbox, sees no public blacklist hits, and concludes they are not blacklisted. But they are blocked at Gmail. The block just does not show up on any public tool because it is internal to Google’s infrastructure.
The recovery path for each type is fundamentally different:
| Type | How to Check | Recovery Method | Timeline |
|---|---|---|---|
| Public blacklist | MXToolbox, Spamhaus direct, MultiRBL | Fix root cause, submit delisting request | Days to weeks depending on blacklist |
| Gmail internal | Google Postmaster Tools – domain reputation | Consistent clean sending, high engagement, clean authentication | 2 to 6 weeks |
| Outlook internal | Microsoft SNDS, bounce code patterns | Microsoft delisting portal, then clean sending | 1 to 4 weeks |
| Yahoo internal | Yahoo Sender Hub, delivery failure patterns | FBL enrolment, complaint reduction, clean sending | 2 to 4 weeks |
The table above captures the core principle. For public blacklists, there is a process to follow. For private ISP blocks, there is a behaviour pattern to establish. Both require fixing the root cause first. But only one involves submitting a form.
The Major Email Blacklists Explained: Severity and Impact
Not all email blacklist listings carry the same weight. A listing on one database might affect delivery to 60% of global inboxes. A listing on another might affect delivery to almost nobody with any real-world impact. Understanding the severity spectrum is what determines how urgently you need to act and where to focus your energy first.
One of the most common mistakes senders make after running a blacklist check is treating every listing with equal urgency. MXToolbox checks against over 100 databases simultaneously. Seeing 3 hits out of 100 can look alarming even when 2 of those 3 are obscure lists with minimal adoption. The practical skill is knowing which ones actually matter.

High-Impact Blacklists That Require Immediate Action
These are the email blacklists used by a large proportion of receiving servers globally. A listing on any of these should be treated as an urgent problem.
Spamhaus SBL (Spamhaus Block List): The most widely respected and impactful public blacklist in existence. The SBL lists IP addresses and domains that Spamhaus has identified as sources of deliberate, persistent spam. It is used by Gmail, Yahoo, and the majority of enterprise mail filters globally. An SBL listing typically causes significant delivery failures across a broad range of providers simultaneously.
Spamhaus DBL (Domain Block List): Spamhaus’s domain-specific list, covering domains used in spam. If your sending domain or a domain used in your tracked links appears here, delivery failures can occur even if your sending IP is clean.
Spamhaus PBL (Policy Block List): Lists IP addresses that should not be sending email directly to the internet, typically dynamic residential IPs and end-user IP ranges. If you are sending from a dynamic IP rather than a static one, this is worth checking. Unlike the SBL, PBL listings are often self-service removals.
Spamhaus XBL (Exploits Block List): Lists IPs of compromised systems, devices infected with malware, or servers being used as part of a botnet. An XBL listing on your infrastructure is a serious signal that something may be actively compromised. The fix requires cleaning the compromise before any removal can happen.
Barracuda Reputation Block List (BRBL): Widely used by enterprise mail filters, particularly in B2B environments. If you send heavily to corporate addresses, a Barracuda listing can significantly affect your B2B delivery even if your B2C delivery looks normal. Barracuda’s delisting process is straightforward once the cause is addressed.
SpamCop: A complaint-based blacklist that operates on a scoring system. When recipients mark emails as spam using SpamCop’s reporting tool, the sending IP accumulates complaint points. Listings expire automatically after a period of no new complaints, which means SpamCop does not have a manual removal process. The fix is stopping the behaviour that generated the complaints.
Lower-Impact Blacklists: What to Prioritise and What to Deprioritise
These lists exist and may appear in your MXToolbox results, but they warrant a different level of urgency.
UCEPROTECT Level 1: Individual IP listings based on spam detection. A Level 1 listing is manageable and follows the standard process: fix the cause, request removal. Most major providers do not use UCEPROTECT as a primary filtering signal, but it is worth addressing.
UCEPROTECT Level 2: Lists entire IP ranges based on the collective behaviour of IP addresses in the same neighbourhood. If your sending IP is on a shared hosting range where other IPs have high spam rates, you can appear on Level 2 through no fault of your own. Removal requires your IP to be clean while neighbouring IPs improve, which is not always within your control.
UCEPROTECT Level 3: Lists entire ASNs (Autonomous System Numbers), which effectively means entire hosting providers or ISPs. A Level 3 listing is a judgement on your hosting provider’s infrastructure, not on your specific sending behaviour. It is widely considered an unreliable and overly broad list by deliverability professionals, and many recommend not prioritising it unless you can directly trace specific delivery failures to providers using it as a filter signal.
The practical rule here is simple. Run your full check. Identify every listing. Then sort by impact. Spamhaus listings come first, always. Barracuda and SpamCop come next. UCEPROTECT Level 1 gets addressed when the higher-priority listings are resolved. UCEPROTECT Level 2 and 3 get assessed based on whether they are causing verifiable delivery problems before spending significant time on them.
ISP Internal Blacklists: Gmail, Outlook, and Yahoo
As covered in the public vs private section above, the major inbox providers maintain internal reputation databases that function like email blacklists but operate completely differently from public DNSBLs. These deserve their own section because they are the most common source of email delivery failures that senders misdiagnose as something else.
Gmail’s internal reputation system does not produce a simple listed or not-listed result. It produces a reputation band: High, Medium, Low, or Bad. You can see your domain’s band in Google Postmaster Tools. A “Bad” domain reputation with Gmail means a high proportion of your emails to Gmail addresses are being rejected or delivered to spam, and no public blacklist check will surface this. The diagnostic question to ask when troubleshooting any delivery problem is: “Is this affecting all recipients or only recipients at one specific provider?” If it is concentrated at Gmail, the problem is almost certainly internal to Google’s systems.
Microsoft’s internal system is more likely to produce specific SMTP error codes that reference the block directly, particularly the 550 5.7.606 code for IP range blocks and 550 5.7.1 for reputation-based policy rejections. Microsoft does have a delisting portal for Outlook.com delivery issues, which makes their internal block somewhat more tractable than Gmail’s. Microsoft SNDS gives you IP-level reputation data and complaint rate visibility. Our SMTP error codes guide covers the full range of Microsoft-specific rejection codes and what each one requires.
Yahoo’s internal filtering is heavily weighted toward complaint rate data from Yahoo recipients. A sustained high complaint rate from Yahoo addresses will result in increasingly aggressive filtering even without a specific error code pointing to an explicit block. Yahoo Sender Hub is the monitoring tool, and their complaint feedback loop (FBL) is the data source that makes complaint-driven filtering diagnosable.
How to Check If Your Domain or IP Is on an Email Blacklist
The earlier you catch a blacklisting, the less damage it does. A listing discovered within hours of it appearing means two or three emails have gone out through blocked infrastructure. A listing discovered three weeks later, after multiple campaigns have been sent, means weeks of compounding reputation damage and potentially thousands of contacts who never received anything.
Running an email blacklist check proactively, rather than waiting for a visible problem to surface, is what separates senders who treat blacklisting as a rare emergency from those who treat it as a managed risk. This section covers how to recognise the warning signals early, how to read the bounce report signals that point directly to a listing, and which tools to use for a thorough check.
Warning Signs That You May Be Blacklisted
Before you run any tools, there are signals in your existing data that can tell you a blacklisting has probably occurred. None of these signals are definitive on their own, but any combination of two or more warrants an immediate email blacklist check.
Signals to watch for:
- A sudden spike in hard bounce rate, particularly in the 5.7.x SMTP code range, on a campaign where the list has not changed significantly
- Bounce message text that explicitly references a blacklist name, such as “blocked by Spamhaus” or “rejected per Barracuda policy”
- Delivery failures concentrated at one specific provider, such as all bounces coming from Gmail addresses or all from Outlook addresses, while other providers show normal delivery
- A sharp drop in open rates and click rates across two or three consecutive campaigns without any content or subject line change
- An alert or warning from your ESP indicating a sending rate limit, delivery problem, or account review triggered by elevated bounce or complaint rates
- A customer reaching out to say they have not been receiving your emails, particularly if they are all on the same email provider
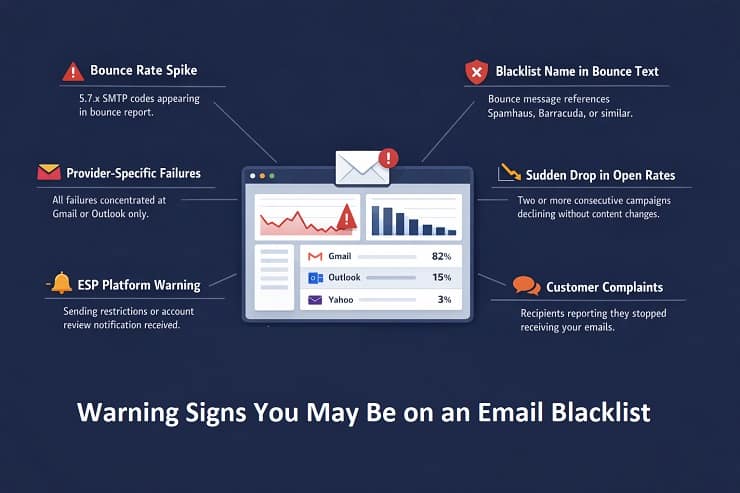
The provider-specific failure pattern is worth highlighting separately because it is the clearest diagnostic signal for a private ISP block. If your delivery failures are evenly spread across Gmail, Outlook, Yahoo, and other providers, you are more likely looking at a public blacklist. If failures are concentrated at one provider while the others look normal, the problem is almost certainly internal to that provider’s reputation system.
Reading Blacklist Signals in Your Bounce Report
Your bounce report is often the fastest and most specific source of blacklist diagnostic information available. Most senders look at the bounce rate as a number and do not read the message text that comes back alongside the SMTP codes. That text is frequently where the blacklist name or the specific rejection reason appears.
Here are the SMTP codes most directly associated with email blacklist rejections, and what each one tells you:
| SMTP Code | What It Indicates | Where to Look Next |
|---|---|---|
| 550 5.7.606 | Microsoft IP range block. Your sending IP is on Microsoft’s internal block list. | Microsoft delisting portal and SNDS |
| 550 5.7.1 + blacklist text | Policy rejection referencing a specific blacklist. Read the full message text. | Public blacklist named in the text |
| 554 + provider identifier | Broad permanent rejection. Text often names the blacklist or policy. | Full message text for blacklist name |
| 550 5.7.26 | DMARC failure at Gmail. Not a blacklist directly, but authentication failures increase blacklisting risk. | Email authentication setup |
| 421 4.7.0 (recurring) | ISP rate limiting or reputation-based throttling. Can precede a harder block if behaviour continues. | Google Postmaster Tools or SNDS |
The diagnostic habit to build is this: never look at just the code. Always read the full bounce message text. The code tells you the category of rejection. The text tells you the specific cause, and in blacklisting cases, it frequently names the list directly.
To access raw bounce message text in major ESPs:
- Mailchimp: Campaign Reports, Activity, Bounced, export the bounce list and check the raw message column
- Klaviyo: Analytics, Deliverability, Bounces, click individual bounce events for the full SMTP response
- HubSpot: Marketing, Email, campaign details, Bounces tab, export for raw data
- SendGrid: Activity Feed, filter by failed events, click individual messages for the full response
For the complete reference of every authentication-related and blacklist-related SMTP code, our SMTP error codes guide has the full breakdown. And for the process of reducing the bounce rate that blacklisting contributes to, our guide on reducing your email bounce rate covers the full fix sequence.
Tools for Running an Email Blacklist Check
Once you have identified the warning signs, or as part of a routine monitoring process, these are the tools to use for a thorough email blacklist check. Each one covers a different part of the blacklist landscape, and a complete check uses more than one.
MXToolbox Blacklist Checker (mxtoolbox.com/blacklists.aspx)
The starting point for most senders. Checks your IP address against over 100 DNS-based blacklists simultaneously. Free to use. Gives you a clear listed or not-listed status for each database it queries. Important limitation: MXToolbox checks IP-based DNSBLs. It converts domains to their sending IP before checking, which means it may miss domain-specific blacklist listings if your domain is listed independently of its sending IP.
Spamhaus Direct Lookup (check.spamhaus.org)
Check Spamhaus separately from MXToolbox, even if MXToolbox shows a clean result there. Spamhaus’s own lookup tool is the authoritative source for their specific lists (SBL, DBL, PBL, XBL, CSS). Run both your sending IP and your domain through it.
MultiRBL (multirbl.valli.org)
Checks against a broader range of DNSBLs than MXToolbox, including some that MXToolbox does not cover. Useful for a comprehensive sweep when you want to be thorough.
Google Postmaster Tools (postmaster.google.com)
Free. The only way to get visibility into your domain’s reputation with Gmail specifically. Shows your domain reputation band (High, Medium, Low, Bad), spam rate trends, delivery error rates, and authentication pass rates for Gmail recipients. This is the tool that surfaces Gmail internal blocks that no public blacklist check will show. If you are not already enrolled, set this up immediately regardless of whether you suspect a problem.
Microsoft SNDS (sendersupport.olc.protection.outlook.com)
Microsoft’s Smart Network Data Services portal. Shows reputation data for your sending IPs with Microsoft’s infrastructure, including complaint rates, trap hits, and the status of each IP in Microsoft’s filtering system. Enrolment is free and takes a few minutes.
Yahoo Sender Hub (senders.yahooinc.com)
Yahoo’s programme for bulk senders. Provides access to Yahoo’s complaint feedback loop and sender reputation data. Particularly important for senders with a significant proportion of Yahoo or AOL addresses in their list.
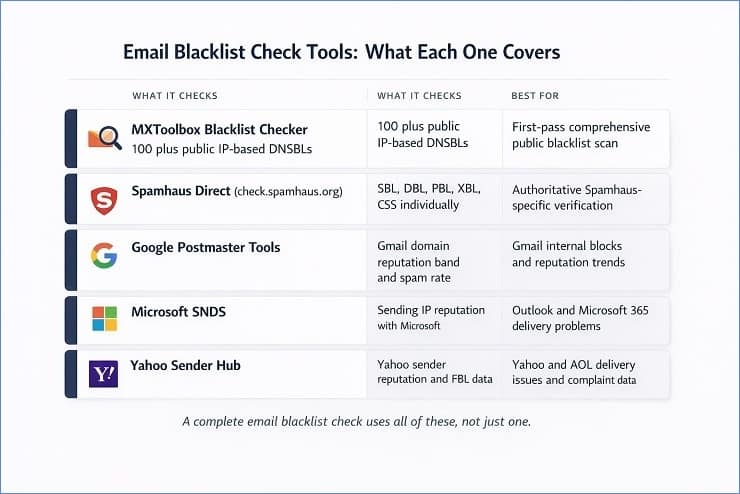
A note on what each tool covers:
No single tool checks everything. MXToolbox covers most public IP-based DNSBLs. Spamhaus’s own tool covers their specific lists authoritatively. Google Postmaster Tools covers Gmail’s internal view. SNDS covers Microsoft’s internal view. Running all four takes about ten minutes total and gives you a genuinely comprehensive picture of your email blacklist status.
Why Domains Get Blacklisted: The Root Causes
Understanding why your domain ended up on an email blacklist is not just useful background knowledge. It is the operational prerequisite to getting off the list and staying off it. Every major blacklist that has a delisting process requires you to demonstrate that the root cause has been addressed before they will consider removing the listing. Submitting a delisting request before fixing the problem is the single most common mistake in the email blacklist removal process, and it results in one of two outcomes: the request is rejected, or the domain gets relisted within days of removal.
This section covers every significant cause of blacklisting with enough specificity to make the fix actionable. Later in this guide, the removal section maps each cause directly to its fix.
1. High Spam Complaint Rates
Spam complaints are the most direct signal that ISPs and blacklist operators use to assess whether a sender should be listed. When a recipient marks your email as spam, that signal gets registered with their inbox provider and, depending on the provider, fed into complaint-based blacklist systems.
The thresholds to understand are:
- Gmail: Published spam rate threshold of 0.10% per day for initial warnings. Rates above 0.30% trigger active enforcement action. These are daily rates, not campaign averages.
- Yahoo: Similar thresholds to Gmail, though less publicly documented. Yahoo is particularly aggressive in response to sustained complaint rates above 0.10%.
- SpamCop: Complaint-driven blacklist that scores sending IPs based on user-submitted spam reports. Repeated complaints from SpamCop users accumulate into a listing.
The most common causes of high complaint rates are sending to contacts who did not clearly opt in and expect the emails, sending too frequently to disengaged segments who would unsubscribe but cannot find the link easily, and sending content that does not match what subscribers signed up for.
2. Spam Trap Hits
Spam traps are email addresses maintained specifically to catch senders with poor list hygiene. They do not belong to real users, they never opted in to anything, and receiving an email at one of these addresses is a direct signal to the blacklist operator that your list has a data quality problem.
There are three types, and they carry different levels of blacklisting risk:
Pristine traps are addresses that have never been published anywhere a legitimate sender could have collected them. They exist only to attract senders who scraped addresses, purchased lists, or collected data without consent. Hitting a pristine trap is one of the most serious blacklisting triggers because it is very difficult to explain as an accident.
Recycled traps are real email addresses that were once valid but were abandoned and then reactivated by the provider as spam traps. Hitting a recycled trap signals that your list contains old, unverified addresses that have not been checked or cleaned in a long time.
Typo traps are addresses at common misspelling domains, for example @gnail.com instead of @gmail.com. They catch senders who allow addresses with obvious formatting errors to remain on their list without any syntax validation.
For the full breakdown of spam trap types, how they enter lists, and how to reduce your exposure, our what are spam traps guide covers the topic in depth.
3. High Bounce Rates and Poor List Quality
A sustained high hard bounce rate is both a direct reputation signal and an indirect blacklisting trigger. ISPs track the proportion of your sends that result in permanent failures. A consistently high rate signals that you are not maintaining list hygiene, which is exactly the kind of behaviour that precedes spam trap hits and complaint spikes.
The risk thresholds to operate within are:
- Hard bounce rate below 0.5% per campaign is the target for senders who want to stay well clear of blacklisting risk
- Hard bounce rates above 2% create active reputation deterioration that accumulates over campaigns
- Hard bounce rates above 5% put you in the range where blacklist operators and ISP filtering systems begin treating your infrastructure as high-risk
For the full picture of what constitutes an acceptable bounce rate and how the numbers interact with sender reputation, our acceptable email bounce rate guide has the benchmarks and thresholds in detail.
Poor list quality is the underlying cause of most bounce-driven blacklisting scenarios. Unverified imports, old lists that have not been checked in 12 or more months, and acquisition sources with no real-time validation at capture are the specific mechanisms that introduce invalid addresses, inactive accounts, and spam trap-risk contacts into a list that then generates the bounce rates and trap hits that trigger a listing.
4. Missing or Broken Email Authentication
Authentication failures contribute to blacklisting risk in two distinct ways, and it is worth understanding both.
The first is direct. Unauthenticated mail is treated with greater suspicion by spam filters and blacklist monitoring systems. A sender whose messages consistently fail SPF or DKIM checks is signalling, from a technical perspective, that the sending infrastructure is not properly configured. This increases the likelihood of spam filter triggers that feed into blacklist scoring.
The second is indirect and more serious. Without DMARC enforcement, your domain can be spoofed. Attackers can send phishing or spam emails that appear to come from your domain, and those emails generate spam trap hits and complaints that are attributed to your domain by blacklist operators. Your domain ends up blacklisted for spam you never sent, purely because DMARC was not set up to reject unauthenticated mail.
DMARC at p=reject is the specific configuration that closes this attack vector. Our email authentication guide covers the full setup process for SPF, DKIM, and DMARC, including the staged rollout sequence from p=none to p=reject.
5. Sudden Volume Spikes and Insufficient Warm-Up
Spam filters and blacklist monitoring systems look for sending patterns that match known spam behaviour. One of those patterns is a sudden, large increase in sending volume from an IP or domain with no established sending history.
A new domain that jumps from zero emails to 50,000 emails in a day looks, from a pattern-matching perspective, like a domain that was registered specifically for a spam campaign. The same is true for a new dedicated IP used at full volume from day one rather than warmed up gradually.
A dedicated IP starts cold and must be properly warmed before use. Our complete email warmup guide covers the step-by-step process for both domain and IP warmup.
Volume spikes on established senders can also trigger listings. A sender who normally sends 10,000 emails per week and suddenly sends 200,000 in a single day is exhibiting behaviour that matches a rented list or a compromised account. Even if the intention is legitimate, the pattern triggers automated blacklisting systems before any human review happens.
The fix is gradual volume management: a proper warm-up protocol for new IPs and domains, and consistent sending cadence for established infrastructure. If you need to send significantly higher volume than your normal cadence, increase it gradually over several sends rather than in a single step.
6. Compromised Accounts and Security Breaches
This is the blacklisting cause that catches senders most off-guard because they did not send the mail that triggered the listing. A compromised email account, a hacked website form, or malware-infected infrastructure can result in spam being sent from your domain or IP without your knowledge.
The signals that a compromise may be behind a blacklisting include:
- Blacklisting on the Spamhaus XBL, which specifically lists compromised systems and botnets
- Sending volume in your ESP logs that you did not initiate
- Bounce reports showing sends to addresses you do not recognise as being in your list
- An unusually high volume of authentication failures (DKIM signature failures) suggesting someone is sending from your domain without your signing key
If a compromise is suspected, the steps before any delisting attempt are: reset all ESP account credentials, audit recent sending activity in your ESP dashboard, check your website and CRM for unauthorised form submissions or API activity, and confirm with your hosting provider that no outbound spam activity has been detected from your server.
The blacklist removal cannot happen until the compromised system is secured. Most blacklist operators will re-list within hours if the spam activity continues after a delisting request.
Email Blacklist Removal: How to Get Delisted Step by Step
Email blacklist removal is a two-part process: fix the root cause first, then request removal. In that order, without exception. Every guide on this topic tells you this, but most stop short of explaining what fixing the root cause actually looks like in practice, or what a delisting request should contain to have the best chance of being accepted the first time.
This section covers both parts in full. The step-by-step process for identifying every listing, the cause-specific fixes you need to complete before touching a delisting form, and the exact process for each major blacklist including what to include in manual requests, what the expected timelines are, and what to do after removal is confirmed.
One thing to set expectations on upfront: the delisting process for public blacklists is manageable and usually resolves within days to a few weeks if the root cause is genuinely fixed. Private ISP blocks, covered in the section after this one, operate on a different timeline and through a different mechanism entirely.
Step 1: Identify Every Blacklist You Are On
Before fixing anything or contacting anyone, map the full scope of the problem. Running one tool and acting on those results is a common mistake that leaves listings undiscovered and keeps delivery failures active after you think the problem is resolved.
Run all of the following:
- MXToolbox Blacklist Checker for both your sending IP and your domain. Note every listing, the specific database name, and any reason codes provided.
- Spamhaus direct lookup at check.spamhaus.org for both IP and domain separately. Spamhaus operates multiple lists (SBL, DBL, PBL, XBL, CSS) and each has a different delisting process.
- MultiRBL for broader coverage of less common DNSBLs.
- Google Postmaster Tools for your Gmail domain reputation band. Even if no public blacklist shows a hit, a “Low” or “Bad” reputation in Postmaster Tools means Gmail is filtering your mail.
- Microsoft SNDS for your sending IP’s reputation with Microsoft’s infrastructure.
Record every result before taking any action. You want a complete picture of every database where your IP or domain appears before you start fixing and requesting removal. Addressing listings one at a time without this full inventory leads to situations where you get removed from one list, resume sending, and immediately get re-listed on a different one you did not know about.
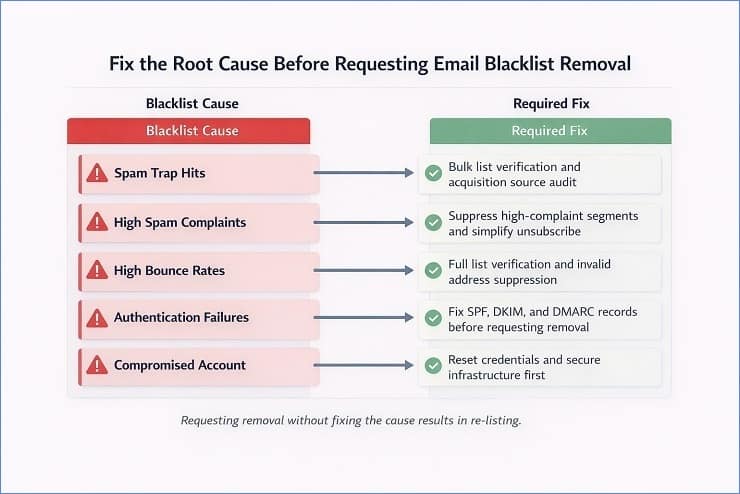
Step 2: Fix the Root Cause Before Requesting Removal
This step is where most email blacklist removal attempts fail. The blacklist operator does not care that you discovered the listing and want to be removed. They care whether the behaviour that caused the listing has genuinely stopped. A delisting request submitted before the root cause is fixed will either be rejected outright or result in re-listing within days of removal.
Here is the cause-specific fix map:
If you were listed due to spam trap hits:
Spam trap hits are the hardest root cause to address because you cannot see which specific addresses are traps. The fix operates at the list level rather than the address level.
- Run full bulk verification on your entire active list and suppress all addresses flagged as invalid, risky, or undeliverable.
- Identify and close the acquisition source that introduced the trap addresses. Old purchased lists, scraped data, and any import with no opt-in documentation are the primary suspects.
- Suppress all contacts who have not engaged in the past 12 months, as recycled spam traps are most commonly found in the inactive tail of aging lists.
- Do not send again until the verification and suppression steps are complete.
If you were listed due to high spam complaint rates:
- Identify the specific segments with the highest complaint rates. Your ESP’s complaint data and, if enrolled, ISP feedback loop data will show you where the complaints originated.
- Suppress all contacts from high-complaint segments immediately.
- Review your unsubscribe process. If recipients cannot find or use the unsubscribe link easily, they mark as spam instead. Make it visible and one-click.
- Reduce sending frequency to any segments that show low engagement alongside elevated complaint rates.
If you were listed due to high bounce rates:
- Run bulk verification on your full active list, not just the segments that bounced. If bounce rates are high, list quality problems are likely present across the database, not just in the campaign that triggered the listing.
- Suppress all addresses flagged as invalid.
- Check your acquisition sources for the import or channel that introduced the invalid addresses, and add validation at capture to prevent the same problem recurring.
If you were listed due to missing or broken authentication:
- Verify your SPF, DKIM, and DMARC records are all published, correctly formatted, and passing verification.
- For DMARC, check that you are at minimum at p=quarantine and progressing toward p=reject.
- Check that your DKIM d= domain aligns with your visible From domain, not just your ESP’s signing domain.
- Run a test send and check the Authentication-Results header in the received message to confirm all three protocols are passing.
Our email authentication guide covers the full setup and repair process.
If you were listed due to a volume spike:
- Pause sending temporarily, ideally for 24 to 48 hours.
- When you resume, start at a significantly reduced volume, no more than 20 to 30 percent of your normal campaign size.
- Scale volume back up gradually over the following sends, increasing by 25 to 50 percent per campaign as long as bounce rates stay clean.
If you were listed due to a compromised account or server:
- Reset all ESP credentials, API keys, and any authentication tokens for your sending infrastructure.
- Audit recent sending logs for volume or destination patterns you did not initiate.
- Contact your hosting provider or ESP to confirm the compromise has been contained on their end.
- Do not submit any delisting request until you have documented confirmation that the compromised system is secured. Blacklist operators will re-list immediately if spam continues after removal.
Step 3: Submit the Delisting Request
With the root cause fixed and documented, you are ready to submit removal requests. Each major blacklist has its own process. Here is the specific path for each one.

Spamhaus
Spamhaus operates several separate lists, and the delisting process differs by list.
For the SBL (Spamhaus Block List): go to check.spamhaus.org, enter your IP or domain, and if listed, click through to the case submission form. You will need to provide the listed IP or domain, a clear explanation of what caused the listing, the specific corrective actions you have taken, and confirmation that the behaviour will not recur. Spamhaus reviews submissions manually. Response times vary from 24 hours to several days depending on the severity of the listing and their current queue.
For the PBL (Policy Block List): the PBL specifically lists IP addresses that Spamhaus considers should not be sending email directly. If you are on a static IP that you legitimately use for sending, you can request PBL removal through their self-service PBL removal form. If you are on a dynamic IP, the appropriate fix is to route your email through a proper SMTP relay rather than sending directly.
For the XBL (Exploits Block List): XBL listings often clear automatically once the compromised system is cleaned and the spam activity stops. If the listing persists after confirming the compromise is resolved, submit a case through check.spamhaus.org with documentation of the remediation steps taken.
For the DBL (Domain Block List): domain-based Spamhaus listings are addressed through the same case submission process as the SBL. Be specific about which domain is listed and what changes have been made to the sending or content setup.
Barracuda
Go to barracudacentral.org/rbl/removal. Enter your sending IP address and a contact email. Barracuda’s removal process is relatively straightforward. Once a request is submitted and the sending IP’s history shows improved behaviour, removal typically happens within 12 to 24 hours. If your removal is declined, Barracuda will indicate the reason, which usually means the underlying cause has not fully resolved.
SpamCop
SpamCop does not have a manual removal process. Listings expire automatically after a period with no new complaint submissions pointing to your IP. The correct approach is to stop the behaviour that generated the complaints, monitor the listing, and wait for automatic expiry. Aggressively continuing to send while listed on SpamCop simply resets the expiry timer.
Microsoft Outlook Delisting Portal
Go to sendersupport.olc.protection.outlook.com. This portal is specifically for Outlook.com and Hotmail.com delivery issues, separate from the general Microsoft support channels. Enter the sending IP address and submit the delisting request. Microsoft reviews the request against their internal reputation signals for the IP. If the sending history shows improvement, removal is typically processed within 24 to 48 hours. If the request is denied, the response will explain why, and you will need to address the stated issue before resubmitting.
What to include in any manual delisting request
When a blacklist requires a written explanation rather than just an IP entry form, here is what to include:
- The specific IP address or domain that is listed
- When you first discovered the listing
- Your honest assessment of what caused it, based on your investigation
- The specific steps you have taken to fix the root cause, with dates
- Any verification or authentication fixes you have implemented
- A commitment to the specific practices that will prevent recurrence
Keep it factual and specific. Blacklist operators review these requests regularly and can identify vague or formulaic responses. A clear, honest explanation of a genuine remediation effort is far more effective than a template response that shows no real investigation.
Do not submit multiple requests
Submitting a delisting request multiple times for the same listing does not accelerate the process. For many blacklists, repeated submissions without new information delay the review rather than speed it up. Submit once, completely. Follow up once if you have received no response after the expected timeframe for that specific blacklist.
Step 4: Verify Removal and Test Delivery Before Resuming Full Volume
Removal confirmation from the blacklist operator does not mean your delivery is immediately back to normal. A few additional steps are necessary before resuming full sending volume.
Re-run the full blacklist check sequence from Step 1 after the expected removal timeframe for each list. Confirm that every listing from your original inventory shows as clean. If any listings remain, address those before resuming sending.
Send a test campaign at reduced volume, around 20 percent of your normal send size, to a segment of your most engaged contacts. Monitor the bounce rate and inbox placement on this test send closely before scaling back up. If you have Google Postmaster Tools set up, watch your domain reputation trend over the first two to three days after resuming.
Scale volume back up gradually. A 30 to 50 percent increase per campaign is a safe scaling rate. Jumping back to full volume immediately after removal, even with a fully cleaned list, can look like the same problematic behaviour pattern to automated monitoring systems and can trigger re-listing faster than you expect.
ISP-Specific Private Blacklist Recovery
Private ISP blocks are the most frustrating type of email blacklist problem to deal with, and they are the most commonly misdiagnosed. A sender runs every public blacklist check, finds nothing, and cannot understand why Gmail delivery is still failing. The answer is that the block lives inside Gmail’s infrastructure, not on any public database. There is no form to submit, no case number to track, and no confirmation when the block is lifted. Recovery is a matter of demonstrating consistently improved sending behaviour over time until the ISP’s internal reputation signals shift in your favour.
The good news is that each major ISP has specific monitoring tools and, in some cases, support channels that give you visibility into the process. Here is the recovery path for each one.

Recovering from a Gmail Deliverability Block
How to confirm it is a Gmail-specific block
The clearest indicator is delivery failures or spam folder placement concentrated specifically on Gmail and Google Workspace addresses, while delivery to Yahoo, Outlook, and other providers looks normal. Google Postmaster Tools will show this directly: a “Low” or “Bad” domain reputation band means Gmail’s internal systems are filtering your mail aggressively.
What causes Gmail internal blocks
Gmail’s reputation system weights the following signals most heavily:
- Spam complaint rate from Gmail users, measured against their 0.10% daily threshold
- Engagement rate from Gmail recipients, including opens and not-spam actions
- Authentication pass rate, specifically whether SPF, DKIM, and DMARC are all passing and aligned
- Sending consistency, erratic volume patterns score worse than consistent ones
- Spam trap hits within Gmail’s infrastructure
The recovery path
There is no delisting form. The path is behavioural and takes time. Here is the sequence to follow:
- Temporarily reduce send volume to Gmail addresses. Do not pause entirely, as zero sending history during the recovery period can itself create issues when you resume. Send at 20 to 30 percent of your normal Gmail volume.
- Prioritise sending only to Gmail contacts who have engaged in the past 60 days. High engagement from the first sends post-recovery is the signal that starts moving your reputation band upward.
- Confirm all authentication records are passing. Run a test send to a Gmail address and check the Authentication-Results header. You need to see spf=pass, dkim=pass, and dmarc=pass. Anything less needs to be fixed before recovery can progress.
- Monitor Google Postmaster Tools daily during the recovery period. Watch the domain reputation band and the spam rate chart. Recovery is not linear but you should see the band improve within two to four weeks of consistent clean sending.
- Do not send any campaigns to Gmail contacts with low engagement during the recovery period. Each complaint from a disengaged Gmail contact resets the recovery clock.
Expected timeline: Two to six weeks for a “Low” reputation band to recover to “Medium” or “High” with consistent clean behaviour. A “Bad” reputation may take longer.
Recovering from a Microsoft Outlook Block
How to confirm it is a Microsoft-specific block
Delivery failures or spam folder placement concentrated on Outlook.com, Hotmail.com, Live.com, and Microsoft 365 corporate addresses. The SMTP codes will frequently include 550 5.7.606 for IP range blocks or 550 5.7.1 with Microsoft-specific text for reputation-based blocks. Unlike Gmail, Microsoft is more likely to produce specific, readable error codes that point directly to the block type.
Microsoft’s specific recovery tools
Microsoft provides more structured recovery options than Gmail for senders facing delivery problems:
Microsoft SNDS (Smart Network Data Services): Enrol your sending IPs at sendersupport.olc.protection.outlook.com to see your IP reputation, complaint rate, and trap hit data specifically from Microsoft’s perspective. This data is invaluable for diagnosing exactly what is triggering the block and tracking whether your remediation is working.
The Outlook Delisting Portal: Also at sendersupport.olc.protection.outlook.com, this self-service portal handles delisting requests for Outlook.com and Hotmail delivery problems. It works specifically for IP-level blocks (550 5.7.606 type issues). Submit your sending IP, provide your contact details, and Microsoft reviews the request against your sending history. Approval typically takes 24 to 48 hours if the IP’s recent behaviour shows genuine improvement.
The Junk Mail Reporting Programme (JMRP): Microsoft’s feedback loop for bulk senders. When Outlook users mark your email as junk, JMRP sends a notification to your registered address. Enrolling gives you individual complaint data, which is essential for identifying the specific segments generating Outlook complaints.
The recovery path
For a 550 5.7.606 block: submit through the delisting portal and ensure SNDS is enrolled so you can monitor reputation signals during recovery.
For broader Microsoft reputation-based blocks: the same behavioural recovery applies as for Gmail. Reduce volume to Microsoft-hosted addresses, prioritise engaged contacts, confirm authentication is fully passing, and monitor SNDS weekly. Microsoft’s reputation recovery tends to be somewhat faster than Gmail’s, often showing improvement within one to three weeks of consistently clean sending.
Recovering from a Yahoo and AOL Block
How to confirm it is a Yahoo-specific block
Delivery failures or spam folder placement concentrated on Yahoo.com, AOL.com, and Verizon Media addresses. Yahoo’s rejection codes are less consistently descriptive than Microsoft’s, which makes them harder to diagnose from the code alone. The provider-specific failure pattern is the most reliable indicator.
Yahoo’s specific recovery tools
Yahoo Sender Hub (senders.yahooinc.com): Yahoo’s programme for bulk senders includes a complaint feedback loop (FBL) that sends individual complaint notifications when Yahoo recipients mark your mail as junk. Enrolling in the FBL transforms Yahoo complaint data from an invisible aggregate into an actionable per-message signal. You can see exactly which sends and which segments are generating complaints, which makes the fix much more precise.
The recovery path
Yahoo’s internal filtering is more heavily weighted toward complaint rate than Gmail or Microsoft, which makes complaint reduction the central priority in Yahoo recovery.
- Enrol in Yahoo Sender Hub and activate the FBL if not already done.
- Using FBL data, identify the specific segments generating Yahoo complaints and suppress them immediately.
- Suppress all Yahoo contacts who have not engaged in the past 90 days. Yahoo’s filtering responds quickly to sending behaviour improvement, but only if the disengaged contacts generating complaints are removed first.
- Reduce sending frequency to Yahoo addresses temporarily during the recovery period.
- Monitor delivery rates to Yahoo addresses across the following three to four campaigns. You should see progressive improvement as complaint rates fall and engagement rates improve.
Expected timeline: Yahoo’s internal reputation recovery tends to be faster than Gmail’s when complaint reduction is achieved quickly. Two to four weeks of clean, low-complaint sending to engaged Yahoo contacts typically produces visible delivery improvement.
How to Avoid Email Blacklisting: Prevention as a System
Getting removed from an email blacklist is manageable. Getting removed for the second or third time, from the same list or a different one, is the sign of a sending programme that has not addressed the underlying conditions that make blacklisting likely. Prevention is not a checklist of things to avoid. It is a set of ongoing practices that, when running consistently, make blacklisting structurally unlikely rather than just occasionally avoided.
The senders who rarely deal with blacklisting are not necessarily the ones with the most technically sophisticated setups. They are the ones who have built systems around the three layers that matter most: list quality, authentication, and sending behaviour. Each layer addresses a different root cause category from the previous section. Together they cover the overwhelming majority of blacklisting scenarios.
List Quality as the Primary Prevention Layer
The majority of email blacklist triggers trace back to list quality problems. Spam trap hits, high bounce rates, and elevated complaint rates from disengaged contacts are all fundamentally list quality issues. Fixing them after a listing is reactive. Building the practices that prevent them from accumulating in the first place is the prevention layer.
Real-time verification at the point of capture
The most cost-effective list quality intervention happens at the moment an address enters your database, not weeks or months later when it has already done damage. Real-time verification at your sign-up forms, landing pages, and checkout flows checks each address as it is submitted and blocks invalid, disposable, and high-risk addresses before they enter your list.
What this catches:
- Typos that would become immediate hard bounces (gmal.com, yahooo.com)
- Disposable addresses from temporary inbox services
- Addresses with invalid syntax that should never have been accepted
- Known high-risk domains
The user experience impact is minimal. A prompt asking someone to check their email address when they have typed it incorrectly is not friction. It is helpful. What it prevents is years of that invalid address sitting in your database generating bounces and, if it gets recycled as a spam trap, generating blacklist risk.
Recurring bulk verification cadence
Real-time verification handles new addresses. Bulk verification handles the existing database, where address decay happens continuously regardless of your capture practices.
The cadence to follow depends on your list type:
| List Type | Recommended Verification Frequency |
|---|---|
| Active B2B list | Every 3 months |
| Active B2C list, organic acquisition | Every 6 months |
| Any list with recent third-party imports | Before the next send, without exception |
| Lists inactive or unmailed for 6 or more months | Before reactivation |
| Post-blacklisting recovery | Immediately, before any sending resumes |
B2B lists need more frequent verification than B2C because corporate email addresses decay faster. An employee who leaves their company has their address deactivated, sometimes within days. A B2B list that has not been verified in six months can easily have 10 to 15 percent address decay, which is well above the bounce rate threshold that creates blacklisting risk.
Engagement segmentation as ongoing hygiene
Disengaged contacts are a blacklisting risk in two specific ways. First, contacts who have stopped engaging but remain on your list are statistically more likely to mark as spam when they eventually see your email, particularly if they have forgotten opting in. Second, abandoned accounts that have been inactive for an extended period are the primary source of recycled spam traps.
The practical framework for managing this is the engagement tier system covered in our guide on reducing your email bounce rate. The core principle is withholding regular campaign sends from contacts inactive for 180 days or more, routing them through re-engagement before suppression, and removing them from the active list before they become complaint sources or trap risks.
Acquisition source discipline
Not all acquisition sources produce equal list quality. A contact collected through an organic double opt-in form has a very different risk profile from a contact imported from a third-party lead generation service, a trade show badge scan, or a content syndication campaign.
The single most effective acquisition-side prevention practice is tagging every contact with their source at the point of entry, and then monitoring bounce rate, complaint rate, and engagement by source. When a source consistently produces contacts with above-average bounce rates or complaint rates, the fix is at the acquisition level, not the cleaning level.
For a comprehensive look at how list hygiene practices connect to long-term deliverability, our email list hygiene guide covers the full framework.
Authentication as the Infrastructure Prevention Layer
Authentication prevents blacklisting in two ways, and both matter.
Direct protection: Properly configured SPF, DKIM, and DMARC signal to spam filters and blacklist monitoring systems that your sending infrastructure is legitimate and properly managed. Unauthenticated mail is treated with significantly more suspicion, and that suspicion translates into elevated filtering risk that feeds into blacklist scoring systems over time.
Spoofing protection: Without DMARC enforcement, anyone can send email that appears to come from your domain. Phishing campaigns, spam runs, and fraud emails using your domain name generate spam trap hits and complaints that get attributed to your domain by blacklist operators. You end up on an email blacklist for mail you never sent.
DMARC at p=reject is the configuration that closes the spoofing attack vector completely. Once your domain has DMARC enforced at p=reject, unauthenticated mail claiming to be from your domain is rejected before delivery. Spam trap hits and complaints from spoofed mail cannot accumulate against your domain because the spoofed mail never reaches anyone.
The full setup process for SPF, DKIM, and DMARC, including the staged rollout sequence that gets you to p=reject safely, is in our email authentication guide.
Sending Behaviour Best Practices
Beyond list quality and authentication, your sending patterns themselves signal to ISPs and blacklist monitoring systems whether your infrastructure looks like a legitimate sender or a potential threat.
Consistent sending volume
Spam senders tend to send in bursts: large volumes sent quickly, often from new or recently acquired infrastructure. Legitimate senders tend to have relatively consistent cadences. ISPs and blacklist systems have learned to treat sudden volume spikes with suspicion, even from senders with established histories.
The practical guideline is to keep volume changes gradual. If you need to increase your sending volume significantly, such as for a major campaign or a seasonal send, build up to the increased volume over several sends rather than doubling or tripling in a single campaign. If you have been dormant for a period and are resuming sending, treat it like a warm-up and start at a fraction of your normal volume.
IP and domain warm-up for new infrastructure
Any new sending IP or domain needs a warm-up period before it can send at full volume without blacklisting risk. A brand new IP has no sending history with any ISP. From their perspective, it looks identical to an IP registered specifically for a spam campaign. The email warm-up ramp process builds a sending history by starting at low volume and increasing gradually over four to eight weeks.
If your ESP manages IPs on your behalf through a shared pool, warm-up is handled automatically. If you are using dedicated IPs, the warm-up responsibility is yours.
Complaint rate management
The 0.10% daily spam rate threshold for Gmail is the most widely publicised benchmark, but the practical target is to stay well below it consistently rather than managing to stay just under it on average.
The most effective complaint rate management practices are:
- Make the unsubscribe link large, visible, and one-click. Every recipient who struggles to unsubscribe and gives up marks as spam instead.
- Send content that matches what subscribers signed up for. Scope drift, where the content shifts away from the original value proposition, is one of the most common causes of complaint rate increases in established lists.
- Suppress disengaged contacts before they become complainers. A contact who has not opened in six months is far more likely to mark as spam than one who engaged last week.
- Monitor complaint rates per segment and per campaign type. A sudden complaint rate spike on a specific campaign type or segment identifies the problem precisely enough to fix it.
Easy and prominent unsubscribe
This one warrants its own mention because it is frequently underweighted. An email with a tiny unsubscribe link buried in the footer of small grey text is not providing a genuine unsubscribe option in the way recipients expect it. Recipients who want to stop receiving mail and cannot easily do so have one remaining option: the spam button. Every spam report that could have been an unsubscribe is a complaint that counts against your sender reputation and feeds into blacklist risk.
One-click unsubscribe, implemented as a List-Unsubscribe header in the email, is now required by Gmail and Yahoo for bulk senders. It also appears as a visible unsubscribe option in Gmail’s interface above the email body, making it the first thing recipients see when they want to stop receiving your mail. Implementing it correctly reduces complaint rates measurably.
Monitoring as the Early Warning System
Prevention does not eliminate blacklisting risk entirely. What it does is reduce it significantly and ensure that when a listing does occur, you catch it early enough that the damage is limited rather than compounding across multiple campaigns.
Proactive monitoring is what turns a blacklisting from a weeks-long crisis into a days-long fix.
Automated blacklist monitoring
Several tools offer automated daily checks against major blacklists and alert you by email when a new listing appears:
- HetrixTools monitors your IPs and domains against over 1,000 blacklists and sends real-time alerts. The paid tiers offer monitoring frequency as short as every 15 minutes.
- MXToolbox monitoring offers scheduled blacklist checks with email alerts as part of their paid plans.
- Debouncer provides blacklist monitoring alongside email verification features.
The value of automation here is response time. A listing discovered within an hour of appearing means you can pause sending immediately before a second or third campaign goes out through blocked infrastructure. A listing discovered three weeks later means three weeks of damaged reputation and potentially tens of thousands of emails that never reached anyone.
Google Postmaster Tools weekly review
Even when everything is running normally, spending five minutes per week in Google Postmaster Tools is one of the highest-value monitoring habits for any bulk sender. The domain reputation band, the spam rate chart, and the delivery error data together give you an early picture of deteriorating Gmail standing before it becomes an active block.
A domain reputation band moving from High to Medium is not yet an emergency. It is an early warning that something in your sending behaviour is trending in the wrong direction, and catching it at that stage gives you time to correct course before it becomes a “Low” or “Bad” band that requires the full recovery process.
Microsoft SNDS weekly review
The same logic applies to Microsoft SNDS. A rising complaint rate or increasing trap hit count in SNDS data is a leading indicator of a Microsoft-specific delivery problem. Reviewing it weekly alongside Google Postmaster Tools gives you visibility into the two largest corporate and consumer inbox ecosystems simultaneously.
ESP delivery reports after every campaign
After every campaign, a quick review of the bounce report for any 5.7.x codes, any sudden changes in bounce rate, or any bounce message text referencing blacklists takes about two minutes and catches problems at the campaign level before they accumulate into a pattern that triggers a listing.
The monitoring cadence to follow:
| Action | Frequency |
|---|---|
| Automated blacklist scan (IP and domain) | Daily, via monitoring tool |
| Google Postmaster Tools review | Weekly |
| Microsoft SNDS review | Weekly |
| ESP bounce report review | After every campaign |
| Full manual blacklist check (MXToolbox, Spamhaus, MultiRBL) | Monthly, or immediately when warning signals appear |
| Bulk list verification | Per the cadence table above |
The Email Blacklist Prevention Checklist
Use this checklist to verify that every layer of your sending setup is working to keep your domain off an email blacklist. Work through it quarterly as a routine audit, and immediately after any blacklisting event before resuming full sending volume.

List Quality Layer
- Real-time email verification is active on all sign-up forms and capture points
- Contacts are tagged by acquisition source at the point of entry
- Bounce rates are monitored per acquisition source and high-bounce sources have been addressed
- Bulk verification has been run on the full active list within the current quarter
- Any third-party imports have been verified before sending
- Engagement segmentation is in place: contacts inactive for 180 or more days are not receiving regular campaigns
- Re-engagement sequence is running for at-risk contacts before suppression
- Master suppression list is up to date across all sending tools
Authentication Layer
- One SPF record is published at the root domain and covers all sending sources
- SPF record has fewer than 10 DNS lookups (verified via MXToolbox)
- DKIM is configured in every ESP with your own domain in the d= field
- DMARC record is published and policy is at p=quarantine or p=reject
- DMARC aggregate reports are being received and reviewed
- Authentication pass rate across legitimate sending sources is 95 percent or above
Sending Behaviour Layer
- Sending volume changes between campaigns are gradual, not sudden spikes
- New IPs and domains have been warmed up before full volume sending
- Unsubscribe link is prominent, one-click, and List-Unsubscribe header is implemented
- Complaint rates are monitored per campaign and per segment
- Campaign content matches the original value proposition subscribers opted in for
- Sending frequency has not increased significantly without a corresponding engagement increase
Monitoring Layer
- Automated blacklist monitoring is active for all sending IPs and domains
- Google Postmaster Tools is enrolled and reviewed weekly
- Microsoft SNDS is enrolled and reviewed weekly
- Yahoo Sender Hub and FBL are enrolled for senders with significant Yahoo audience
- Bounce report is reviewed after every campaign for 5.7.x codes and blacklist references
What Happens When You Ignore a Blacklisting
Most guides end with prevention best practices and leave it there. It is worth being direct about what actually happens when a blacklisting goes unaddressed, because the consequences extend beyond the obvious “some emails do not get delivered.”
When you keep sending through a listed infrastructure without fixing the underlying cause, several things happen simultaneously. The reputation damage with ISPs compounds because every send through a blocked IP or domain adds new failure data to your reputation history. The blacklist listing itself often becomes harder to remove because the pattern of continued sending after listing is a negative signal in the delisting review process. Some blacklists automatically extend or re-list more aggressively when they detect that a sender has continued sending without addressing the cause.
Meanwhile, the contacts on your list who are receiving nothing from you are not waiting. They are unsubscribing through other channels, contacting your support team, or simply losing trust in your brand. The revenue impact of sustained delivery failure compounds just as the reputation damage does.
The recovery timeline for a blacklisting caught early and addressed immediately is typically days to a few weeks. The recovery timeline for a blacklisting discovered weeks later, with multiple campaigns of compounding damage, can extend to months. The difference is entirely in how quickly the problem is identified and acted on, which is why the monitoring layer in the checklist above is not optional.
You Know How to Handle This. Here Is What to Do Next.
An email blacklist is one of the more stressful email deliverability problems a sender can face, particularly the first time it happens. But it is also one of the most systematic to resolve. Every public blacklisting has a defined process, every root cause has a specific fix, and every ISP recovery path has clear behavioural signals to follow. None of it requires guesswork once you know what you are looking at.
The two things that cause most blacklisting problems to drag on longer than they should are acting before the root cause is fixed, and not having the monitoring in place to catch new listings early. Both are addressable with the tools and cadences in this guide.
For most senders, the list quality layer is where the most meaningful prevention work happens. Invalid addresses, spam trap risk contacts, and unverified imports are the raw material that blacklistings are made of. Running your list through bulk verification removes that material before it causes any damage. MailCleanup is built specifically for this, processing lists of any size and returning risk-scored output that tells you which addresses are safe, which are risky, and which need to be suppressed before your next send.
Once list quality is addressed, the authentication layer and the monitoring layer are the ongoing systems that keep the problem from recurring. Our email authentication guide covers the full SPF, DKIM, and DMARC setup, and when you are ready to go deeper on the sender reputation signals that inform blacklisting decisions, our guide on email sender reputation covers how ISPs score and respond to sending behaviour over time.
FAQs on Email Blacklist Check & Removal
What is an email blacklist?
An email blacklist is a real-time database of IP addresses and domains flagged as sources of spam. Receiving servers query these databases during delivery and use the results to reject, filter, or accept incoming mail. There are two types: public blacklists like Spamhaus and Barracuda, which have lookup tools and removal processes, and private blacklists maintained internally by Gmail, Outlook, and Yahoo, which require a different recovery approach entirely.
How do I check if my domain is on an email blacklist?
Start with MXToolbox’s blacklist checker, which scans over 100 public DNS-based blacklists simultaneously. Also run a separate check directly at check.spamhaus.org for both your IP and domain. For Gmail-specific delivery problems, Google Postmaster Tools shows your domain reputation and surfaces Gmail internal blocks that no public tool will detect. For Outlook, enrol in Microsoft SNDS. A complete check requires all of these, not just one.
What is the difference between a public and a private email blacklist?
Public blacklists like Spamhaus and Barracuda have published criteria, lookup tools, and formal delisting processes. Private blacklists are internal reputation databases maintained by Gmail, Outlook, and Yahoo. They have no lookup tool and no removal form. Recovery from a private block means demonstrating consistently clean sending behaviour over weeks until the provider’s internal reputation signals improve.
How do I get my domain removed from an email blacklist?
Fix the root cause first, then request removal. Never in the other order. Once the underlying issue is resolved, each blacklist has its own process: Spamhaus requires a case submission, Barracuda has a self-service form at barracudacentral.org, SpamCop listings expire automatically, and Microsoft Outlook blocks can be addressed through the delisting portal at sendersupport.olc.protection.outlook.com.
Why do domains get blacklisted even without sending spam intentionally?
Several causes have nothing to do with intentional spam. High bounce rates from unverified lists signal poor hygiene to blacklist operators. Spam trap hits occur when lists contain old abandoned addresses reactivated as traps. Without DMARC enforcement, attackers can spoof your domain to send phishing emails, generating blacklist listings for mail you never sent. A compromised sending account can also result in spam leaving your infrastructure without your knowledge.
How long does email blacklist removal take?
It depends on the blacklist. Barracuda typically resolves within 12 to 24 hours. Spamhaus SBL cases take one to several days with manual review. SpamCop listings expire automatically with no new complaints. Microsoft Outlook delisting takes 24 to 48 hours through their portal. Gmail internal reputation recovery takes two to six weeks of consistently clean sending. All timelines assume the root cause is fixed before requesting removal.
Which email blacklists matter most?
Spamhaus is the most impactful, used by Gmail, Yahoo, and most enterprise filters globally. Barracuda is widely used in B2B environments. SpamCop affects complaint-sensitive ISP filtering. UCEPROTECT Level 1 is worth addressing, but Levels 2 and 3 are hosting-level blocks with minimal real-world impact that most deliverability professionals deprioritise. Google Postmaster Tools and Microsoft SNDS give visibility into Gmail and Outlook internal reputation, which matter more than most public blacklists for day-to-day deliverability.
How do I avoid being blacklisted in the future?
Three layers cover most blacklisting scenarios. List quality: verify your list regularly, use real-time verification at capture, and suppress disengaged contacts before they become complaint sources. Authentication: configure SPF, DKIM, and DMARC correctly, with DMARC at p=reject to prevent spoofing-driven blacklisting. Monitoring: run automated daily blacklist checks, review Google Postmaster Tools and Microsoft SNDS weekly, and check your bounce report after every campaign for 5.7.x codes.