If you send more than 5,000 emails a day to Gmail or Yahoo inboxes, your emails are now being actively checked against a set of DNS-based authentication standards before they’re allowed anywhere near the inbox. Gmail and Yahoo made this mandatory in February 2024. Microsoft followed with its own enforcement in May 2025. This is not a future consideration anymore. It’s the current reality of bulk email sending.
And yet, a surprising number of senders still have incomplete or broken authentication setups. Some have SPF configured but nothing else. Some have all three protocols in place but have DMARC sitting permanently at p=none, which means it’s doing absolutely nothing to protect their domain. Some are using multiple ESPs and have no idea their SPF record is failing the 10-lookup limit on every single send.
So what is email authentication, exactly? It’s the system of DNS-based protocols that lets receiving mail servers verify that an email claiming to come from your domain actually did. Without it, any server anywhere in the world can send an email that appears to come from your domain. Your customers can be phished using your brand name. Your domain reputation can be destroyed by someone else’s behaviour. And your legitimate emails get treated with the same suspicion as the fakes.
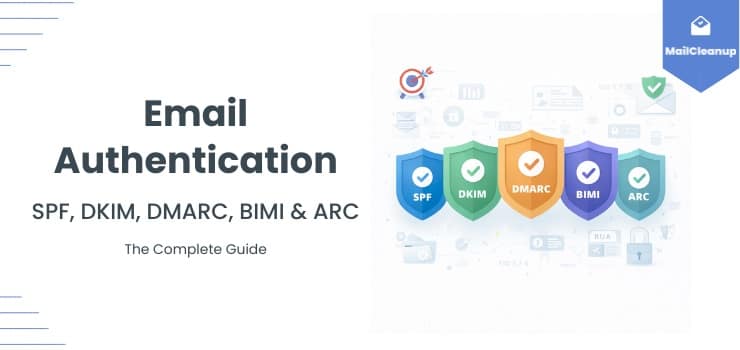
This guide covers every layer of email authentication in the depth it deserves. SPF, DKIM, DMARC, BIMI, and ARC are all here, along with ISP-specific setup guidance for Gmail, Outlook, and Yahoo, a full troubleshooting section for when authentication fails, and a clear explanation of how authentication failures show up in your bounce reports. If you’ve been meaning to get your authentication in order, this is the guide to work through.
For the broader picture of how authentication fits into your deliverability and bounce management system, our email bounce management guide covers the operational side in full. And if you want to understand why authentication failures cause bounces in the first place, what causes email bounces has the full breakdown by category.
TL;DR – Email Authentication: What You Need to Know
- Email authentication is the DNS-based system that proves your emails genuinely came from your domain, and without it, ISPs including Gmail, Yahoo, and Microsoft will filter or reject your messages.
- SPF (Sender Policy Framework) authorises which IP addresses can send email on behalf of your domain, but it breaks on forwarding and has a hard 10-DNS-lookup limit that catches out most senders using multiple ESPs.
- DKIM (DomainKeys Identified Mail) adds a cryptographic signature to every outgoing message that receiving servers use to verify the content has not been altered in transit.
- DMARC (Domain-based Message Authentication, Reporting, and Conformance) ties SPF and DKIM together, enforces a policy for failures, and sends detailed reports back to the domain owner.
- Gmail and Yahoo made SPF, DKIM, and DMARC mandatory for bulk senders in February 2024. Microsoft enforced the same requirement in May 2025.
- BIMI (Brand Indicators for Message Identification) is the optional fourth layer, displaying your verified logo in supporting inboxes once DMARC enforcement is in place.
- Authentication failures show up in bounce reports as SMTP codes 550 5.7.1, 550 5.7.26, and 554 5.7.9. List cleaning does not fix them. Infrastructure fixes do.
What Is Email Authentication & Why Does It Matter Now
Email authentication is the process of verifying that an email claiming to come from your domain actually did. It sounds simple. The reason it took decades to become a mandatory standard is that the original email protocol, SMTP, was designed in a more trusting era. Sender identity was never built into it. Any server could send any email claiming to be from any address, and the receiving server had no standardised way to check.
That design gap is the root cause of most email-based fraud. And the email authentication methods that exist today, SPF, DKIM, DMARC and their successors, are the industry’s answer to closing it.
The Problem Email Authentication Solves
Here is what happens without email authentication in place. A scammer sets up a mail server and sends a phishing email that appears to come from yourcompany.com. The email lands in your customer’s inbox, looks completely legitimate, and asks them to click a link or provide credentials. Your customer gets defrauded. Your domain gets flagged as a phishing source. Your legitimate emails start getting filtered. And you had nothing to do with any of it.
This is not a hypothetical. Business email compromise (BEC) attacks, which rely heavily on domain spoofing, cost organisations billions of dollars annually. The attack surface exists specifically because email was not designed with sender verification in mind.
Email authentication protocols fix this by publishing verifiable information about your sending infrastructure in your DNS records. When a receiving server gets an email claiming to be from yourcompany.com, it checks those DNS records and either confirms that the email is legitimate or identifies it as suspicious. The check happens automatically, at the server level, before the message ever reaches a human inbox.
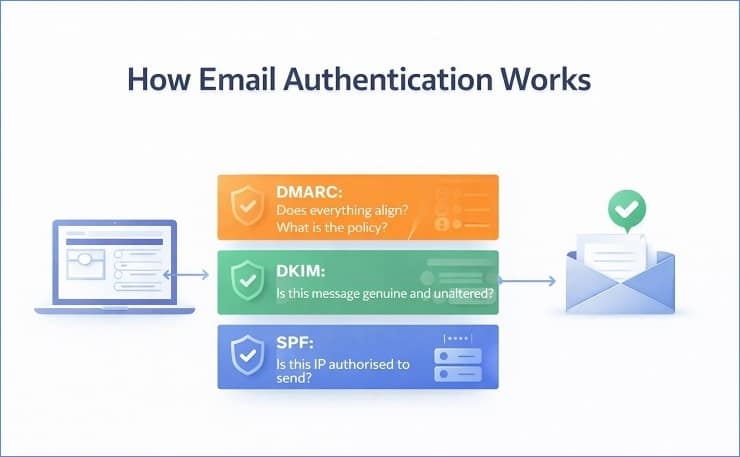
The three core email authentication methods each cover a different part of this verification process. SPF checks whether the sending IP is authorised. DKIM checks whether the message content is genuine and unaltered. DMARC ties the two together and enforces a policy when either check fails. Together, they create a verification chain that is very difficult to fake without access to the domain owner’s DNS records and private keys.
The 2024 to 2025 Mandate: What Changed & What the Consequences Are Now
For most of the history of email authentication, the protocols existed but compliance was voluntary. ISPs would factor authentication results into their spam filtering decisions, but there was no hard enforcement. A sender without SPF or DKIM configured would lose some deliverability points but wouldn’t necessarily see their emails rejected outright.
That changed in February 2024, when Google and Yahoo simultaneously announced and implemented mandatory email authentication requirements for bulk senders. Microsoft followed in May 2025 with its own enforcement. Between the three of them, these providers cover the overwhelming majority of consumer and business email addresses.
Here is what each provider requires and what happens when you don’t comply:
| Provider | Bulk Sender Threshold | Requirement | Enforcement Since | Consequence for Non-Compliance |
|---|---|---|---|---|
| Gmail | 5,000 emails/day | SPF or DKIM (minimum); DMARC at p=none minimum | February 2024 | Rejection or spam filtering depending on violation |
| Yahoo | 5,000 emails/day | SPF and DKIM; DMARC at p=none minimum | February 2024 | Rejection or spam filtering |
| Microsoft 365 / Outlook | No published threshold | SPF, DKIM, and DMARC enforced | May 2025 | 550 5.7.515 rejection for non-compliant senders |
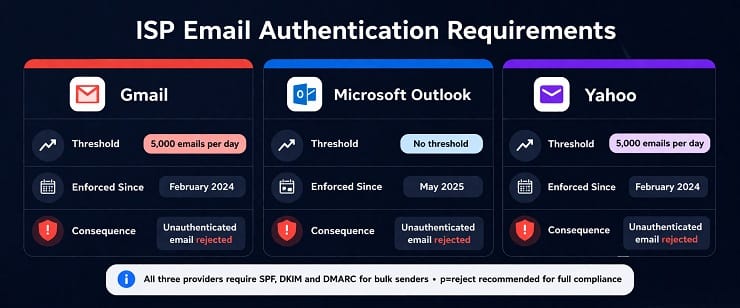
A few things are worth noting about this table. First, the 5,000 emails per day threshold for Gmail and Yahoo is a cumulative count across your entire sending domain, not per campaign. Once you hit 5,000 emails to Gmail or Yahoo addresses in a single day, you are permanently classified as a bulk sender for the purposes of these requirements. You don’t get reclassified if your volume drops.
Second, “minimum” compliance and genuine compliance are not the same thing. Having DMARC at p=none meets Google’s minimum requirement, but it provides zero protection and no enforcement. The target state for any serious sender is p=reject, and the rollout to get there is covered in full in the DMARC section of this guide.
Third, Microsoft’s enforcement is stricter in one meaningful way. Microsoft does not use a volume threshold. Any domain sending to Microsoft-hosted inboxes without proper authentication is subject to the 550 5.7.515 rejection code, regardless of send volume.
How Email Authentication Affects Bounce Rate and Deliverability
This is the connection that most email authentication guides miss entirely, so it’s worth making explicit here.
Authentication failures do not show up in your ESP dashboard as “authentication failures.” They show up as hard bounces. And if you don’t know what’s causing them, you might spend weeks cleaning your list looking for invalid addresses while the actual problem sits in your DNS records.
The SMTP codes that authentication failures generate are in the 5.7.x range. A 550 5.7.1 means your message was rejected by the receiving server’s policy, which could be an SPF failure, a DKIM failure, or a DMARC rejection. A 550 5.7.26 means specifically that your message failed DMARC authentication. A 554 5.7.9 means authentication wasn’t passing at all when the server checked.
The critical diagnostic distinction is this: 5.1.x SMTP codes point to list quality problems (invalid or non-existent addresses). 5.7.x SMTP codes point to infrastructure and authentication problems. Suppressing addresses that generated 5.7.x codes is the right thing to do for your bounce rate in the short term. But it doesn’t fix the underlying problem. Every send through the same broken infrastructure will generate the same codes on different addresses. Our SMTP error codes guide covers every authentication-related code and what it means in full detail, and for the relationship between authentication failures and sender reputation, the guide on email sender reputation covers how the two connect.
What is SPF: Sender Policy Framework
SPF is the first layer of email authentication. It tells receiving servers which IP addresses are authorised to send email on behalf of your domain. When a message arrives at a receiving server, that server looks up the SPF record for the domain in the email’s Return-Path (the envelope sender address, which is not always the same as the visible From address) and checks whether the sending IP is on the approved list. If it is, the SPF check passes. If it isn’t, it fails.
SPF has been around since 2003 and it’s the most widely deployed email authentication protocol. It’s also the one most commonly misconfigured. Understanding not just how SPF works but where it breaks down is essential for anyone managing a sending domain.
How SPF Works: The Mechanism
The SPF check happens entirely at the DNS level. Here is the sequence:
Your domain has a DNS TXT record published at the root domain (yourcompany.com) that lists every IP address and sending service authorised to send email from that domain. When a receiving server gets an email that claims to be from yourcompany.com, it looks up that DNS record. It then compares the IP address that actually sent the email against the list of authorised IPs in the record. Based on the comparison, it generates one of four results.
- Pass: The sending IP is in the authorised list. SPF authentication succeeded.
- Fail: The sending IP is not in the authorised list. The record explicitly says to reject unauthorised senders.
- Softfail: The sending IP is not in the list, but the record says to treat this as a soft warning rather than a hard failure. Most receiving servers treat softfail as suspicious but don’t automatically reject.
- Neutral: The domain owner has explicitly stated they are not making a claim about the sending IP. Rarely used in practice.
The result of the SPF check feeds into the DMARC evaluation, which then determines what actually happens to the message. SPF on its own doesn’t enforce anything. It reports a result. DMARC acts on it.
Reading and Writing an SPF Record
An SPF record is a DNS TXT record published at your root domain. It always starts with v=spf1 and ends with an all mechanism that defines the default policy for IPs not listed in the record.
Here is what a typical SPF record looks like for a sender using Google Workspace, Mailchimp, and a custom transactional SMTP service:
v=spf1 include:_spf.google.com include:servers.mcsv.net include:mail.customservice.com ip4:203.0.113.45 ~all
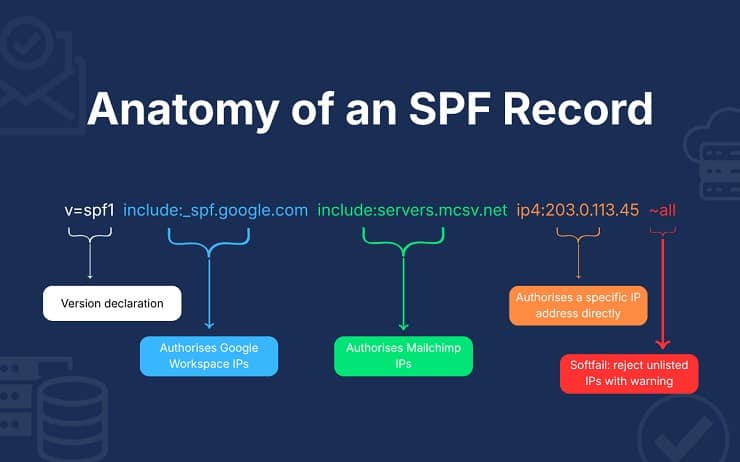
Breaking this down element by element:
v=spf1 declares that this is an SPF record using version 1. Required at the start of every SPF record.
include:_spf.google.com authorises all IP addresses that Google Workspace uses to send email. Each ESP and sending service you use will have their own include mechanism to add here.
include:servers.mcsv.net authorises Mailchimp’s sending IPs. You get this value from your ESP’s documentation.
ip4:203.0.113.45 directly authorises a specific IP address. Use this for servers you control directly. ip6: is the equivalent for IPv6 addresses.
~all at the end is the softfail catch-all. It tells receiving servers that any IP not listed in the record should be treated as a soft failure. The alternative is -all, which is a hard fail. Most senders use ~all during initial setup and move to -all once they are confident their SPF record is complete.
One rule to memorise: you can only have one SPF record per domain. If you publish two, both are invalidated and SPF will fail for every send. If you need to authorise multiple services, put them all in a single record.
To check your current SPF record, run your domain through MXToolbox’s SPF lookup at mxtoolbox.com. It will show you the record as published and flag any obvious errors.
SPF Limitations Every Email Marketer Must Understand
This is where most guides stop being useful. They explain how SPF works and leave out the part about where it breaks. These limitations are not edge cases. They affect a significant proportion of senders, and understanding them is what separates a properly configured authentication setup from one that looks correct but fails intermittently.
The 10-DNS-lookup limit
Every time an SPF record uses an include: mechanism, it requires a DNS lookup to resolve the included record. SPF has a hard limit of 10 DNS lookups per evaluation. If your record requires more than 10 lookups to fully resolve, the evaluation fails with a “permerror” result, which most receiving servers treat as an SPF failure.
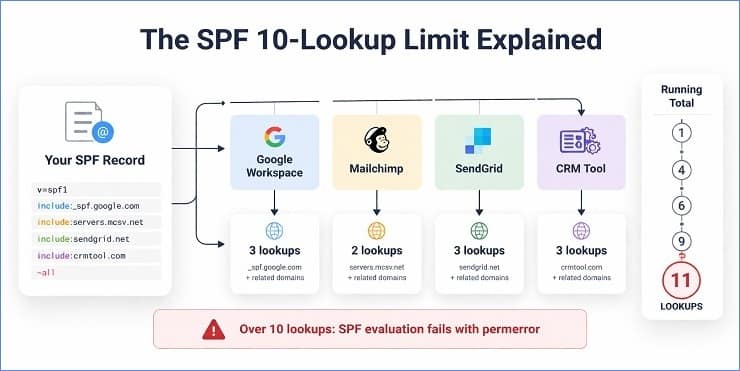
The problem is that this limit is surprisingly easy to hit. If you use Gmail Workspace, Mailchimp, a transactional email service, and a CRM that also sends email, you can be at or over the limit before you’ve finished configuring the record. And each include: can itself reference other includes, so the lookup count compounds in ways that aren’t obvious from reading the record directly.
The fix is SPF flattening. A flattened SPF record replaces all the include: mechanisms with the actual IP addresses they resolve to, eliminating the DNS lookups entirely. The tradeoff is that flattened records need to be updated manually whenever an ESP changes their IP ranges. Some tools automate this process. MXToolbox’s SPF lookup will tell you your current lookup count. If it’s at or near 10, flattening is worth doing.
SPF breaks on forwarding
When an email is forwarded from one address to another, the sending IP changes to the forwarding server’s IP. The SPF check at the final destination checks the envelope sender domain against the forwarding server’s IP, which is not in the original sender’s SPF record. The check fails, even though the original email was legitimate.
This is a genuine limitation of the protocol. It’s also why DKIM and DMARC exist alongside SPF rather than as replacements. DKIM’s cryptographic signature travels with the message and survives forwarding in most cases. We’ll cover that in the DKIM section.
SPF validates the envelope sender, not the visible From address
This is probably the most misunderstood aspect of SPF. When you read an email, the From address you see in the header is the visible From (also called the header From). The SPF check does not validate this address. It validates the Return-Path, which is the envelope sender, an address used for bounce handling that is often different from the visible From.
The practical implication is that SPF alone cannot prevent domain spoofing in the visible From field. An attacker can set a Return-Path that passes SPF while using a completely different address in the visible From. This is the exact gap that DMARC’s alignment requirement closes, by requiring that the authenticated domain (the one SPF or DKIM validated) aligns with the visible From domain.
Duplicate SPF records invalidate authentication
If your domain has two TXT records starting with v=spf1, both records are invalid under the SPF specification. The SPF check will return a permerror result, which most receiving servers treat as a failure. This happens more often than you’d expect, usually when someone adds a new SPF record without checking whether one already exists.
Before making any changes to your SPF setup, check MXToolbox to see how many SPF records are currently published for your domain.
Multi-ESP SPF Configuration
Most senders eventually reach a point where they’re sending from more than one platform. A marketing email tool for campaigns, a transactional email service for receipts and notifications, and sometimes a CRM or sales tool that sends on behalf of the business. Each of these services needs to be included in your SPF record for authentication to pass when they send on your behalf.
The challenge is doing this without exceeding the 10-lookup limit.
Here is the correct approach for a sender using three services:
v=spf1 include:_spf.google.com include:servers.mcsv.net include:sendgrid.net ~all
This works as long as the total DNS lookups across all three includes stays under 10. Before adding any new ESP to your SPF record, check your current lookup count. Most ESP documentation pages list their include mechanism value and the number of lookups it consumes.
When the lookup count becomes a problem, there are two solutions. The first is SPF flattening, replacing includes with resolved IPs as described above. The second is subdomain sending. Rather than sending all mail from yourcompany.com, you configure separate subdomains for different sending streams. Marketing campaigns go from marketing.yourcompany.com, transactional emails from send.yourcompany.com, and each subdomain has its own clean SPF record with only the services relevant to that stream. This approach also has DMARC reporting benefits, as you can see authentication results for each stream separately.
One important point on DKIM when using multiple ESPs: each ESP should sign outgoing mail with a DKIM key for your domain, not their own. If Mailchimp signs your email with mailchimp.com in the d= field of the DKIM signature, that signature won’t align with your visible From domain (yourcompany.com) and DMARC alignment will fail even if the DKIM check technically passes.
What is DKIM: DomainKeys Identified Mail
DKIM is the second core email authentication protocol, and it solves a problem that SPF simply cannot. Where SPF checks whether the sending IP is authorised, DKIM checks whether the message itself is genuine. It does this by adding a cryptographic signature to every outgoing email, a signature that receiving servers can verify against a public key published in your DNS.
The practical significance of this is substantial. Because the DKIM signature travels with the message rather than being tied to the sending IP, it survives forwarding in most cases. It also proves that the message content has not been altered between the moment it left your server and the moment it arrived at the recipient’s inbox. Any modification to the message in transit, even a single character change in the headers, will cause the DKIM signature to fail verification.
DKIM has been a standard since 2011. Like SPF, it is widely supported across all major ISPs and ESPs. And like SPF, it is frequently misconfigured in ways that only become apparent when you look closely at the DMARC alignment results rather than just the raw DKIM pass or fail.
How DKIM Works: The Public and Private Key Mechanism
DKIM uses asymmetric cryptography. There are two keys involved, and they work as a matched pair.
The private key is stored securely by your ESP or sending server. It is used to generate the DKIM signature that gets added to each outgoing email. You never share this key with anyone. If the private key is compromised, anyone who has it can generate valid DKIM signatures for your domain, so it needs to stay protected.
The public key is published in your DNS as a TXT record. It is freely accessible to anyone, including every receiving mail server in the world. Receiving servers use the public key to verify the signature that was created by the private key. Because the two keys are mathematically paired, a signature created by the private key can only be successfully verified by its corresponding public key. This makes it cryptographically impossible to forge a valid DKIM signature without access to the private key.
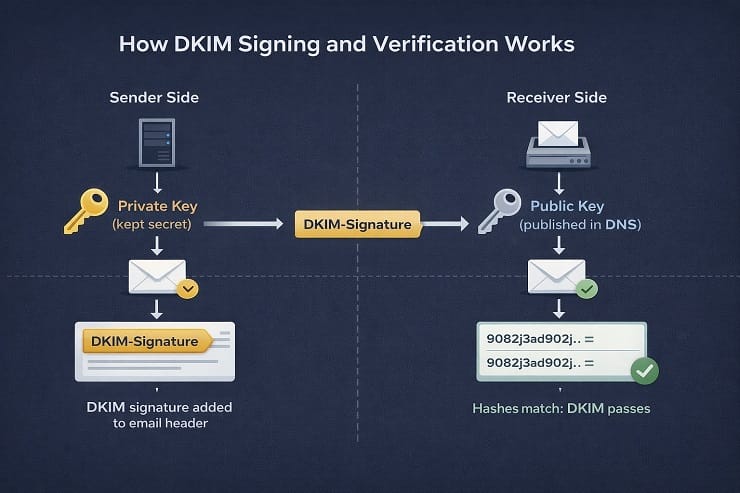
Here is the full sequence when a DKIM-signed email is sent and received.
Your ESP generates a hash of specific parts of the email, typically the message body and selected headers. It encrypts that hash using your private key. The resulting encrypted hash is the DKIM signature, and it gets added to the email as a DKIM-Signature header.
When the receiving server gets the email, it reads the DKIM-Signature header and finds the d= value (the signing domain) and the s= value (the selector, which identifies which public key to use). It then looks up the public key in your DNS at the address constructed from the selector and domain. It decrypts the signature using that public key, which produces the original hash. It then independently generates a hash of the same parts of the message. If the two hashes match, the signature is valid, the message is genuine and unaltered, and DKIM passes.
If anything in the message was modified in transit, the independently generated hash will not match the decrypted hash from the signature, and DKIM fails.
The d= and s= values in the DKIM signature are worth understanding because they become important in the alignment section that follows. The d= value is the domain the signature is associated with. The s= value is the selector, a label that tells the receiving server which of potentially several public keys to use for verification. A domain can have multiple selectors active simultaneously, one per ESP for example, and each selector corresponds to a different key pair.
Reading a DKIM Record and Signature
A DKIM public key is published as a DNS TXT record at a specific address constructed like this:
selector._domainkey.yourdomain.com
So if your selector is “mailchimp1” and your domain is yourcompany.com, the public key lives at:
mailchimp1._domainkey.yourcompany.com
The record itself looks something like this:
v=DKIM1; k=rsa; p=MIGfMA0GCSqGSIb3DQEBAQUAA4GNADCBiQKBgQC…
Breaking this down:
v=DKIM1 declares the record version. Required.
k=rsa specifies the key type. RSA is standard. Some newer configurations use ed25519 for stronger security at smaller key sizes.
p= is the public key itself, encoded in base64. This is the value that receiving servers use for signature verification. Your ESP generates both keys and provides you with the value to publish in your DNS.
The DKIM-Signature header in an outgoing email looks something like this:
DKIM-Signature: v=1; a=rsa-sha256; d=yourcompany.com; s=mailchimp1; c=relaxed/relaxed; q=dns/txt; t=1710000000; bh=abc123…; h=From:To:Subject:Date; b=XYZ789…
The key values to read here are d= (the signing domain), s= (the selector), h= (the headers that were signed), and b= (the signature itself). The bh= value is the hash of the message body.
To verify your DKIM record is correctly published, use MXToolbox’s DKIM lookup. You’ll need to enter your domain and the selector value, which you can find in your ESP’s settings or in the DKIM-Signature header of a test email sent from your domain.
DKIM Alignment: The Distinction That Trips Everyone Up
This is the part of DKIM that causes the most confusion, and it causes the most confusion because most guides don’t explain it clearly.
There is a difference between DKIM passing and DKIM aligning with DMARC. A message can pass the DKIM cryptographic check and still fail DMARC. Understanding why this happens is essential for diagnosing authentication problems, so let’s work through it carefully.
DKIM alignment means that the d= domain in the DKIM signature (the signing domain) must match the domain in the visible From address. Not just any domain, specifically the domain the recipient sees when they open the email.
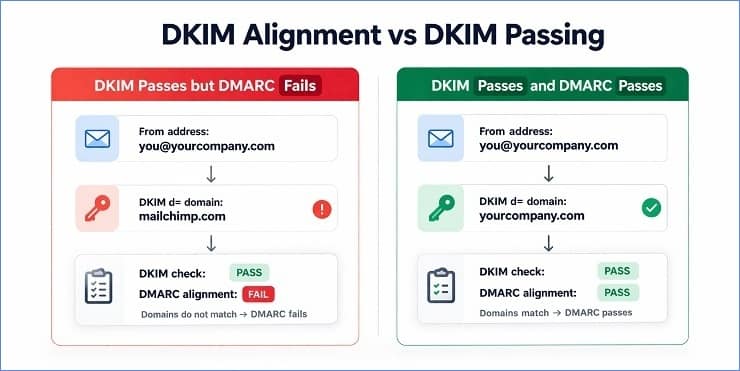
Here is the scenario that catches people out. You set up Mailchimp to send email on behalf of yourcompany.com. Mailchimp generates a DKIM key pair for you, but unless you specifically configure Mailchimp to sign with yourcompany.com in the d= field, it will sign with mailchimp.com or one of its subdomains. The DKIM signature passes verification perfectly. The cryptographic check is valid. But the d= domain is mailchimp.com. The visible From address is yourcompany.com. The two domains don’t match. DMARC alignment fails.
To fix this, you need to set up custom DKIM signing in your ESP. This involves generating a key pair within your ESP’s settings, publishing the public key in your own DNS under your own domain, and configuring the ESP to use that key when signing outgoing mail. The result is that the d= value in the DKIM signature becomes yourcompany.com, which aligns with your visible From address, and DMARC alignment passes.
Every major ESP supports custom DKIM signing. The setup process varies by platform, but the principle is the same across all of them. Your ESP signs with your domain. Not theirs.
DMARC allows two alignment modes for DKIM, specified by the adkim= tag in your DMARC record.
Relaxed alignment (adkim=r) is the default. Under relaxed alignment, the d= domain only needs to be an organisational domain match with the From domain. So if your From domain is yourcompany.com and the d= domain is mail.yourcompany.com, they align under relaxed mode even though they are technically different.
Strict alignment (adkim=s) requires an exact match between the d= domain and the From domain. mail.yourcompany.com would not align with yourcompany.com under strict mode.
Most senders use relaxed alignment. Strict alignment is appropriate for organisations with specific security requirements where subdomain spoofing is a concern.
DKIM and Email Forwarding
One of the genuine advantages DKIM has over SPF is its behaviour under forwarding. Because the DKIM signature is part of the message itself rather than a property of the sending IP, it travels with the message when it is forwarded. The receiving server at the final destination can verify the original signature against the original signer’s public key, and if the message content hasn’t been altered, the verification passes.
This is why DKIM is more resilient than SPF in forwarding scenarios. SPF checks the sending IP, which changes on forwarding. DKIM checks the message signature, which doesn’t.
However, DKIM does break on forwarding in one specific scenario. If the forwarding server modifies the message, either by changing headers, adding footer text, or altering the message body in any way, the hash that the receiving server generates independently will no longer match the hash in the signature. The verification fails.
This is exactly what mailing list servers do. They typically add unsubscribe footers, modify the subject line, and change certain headers. Every one of these modifications breaks the DKIM signature. A message that was perfectly DKIM-authenticated when it left the original sender arrives at the final destination with a broken signature.
ARC (Authenticated Received Chain) was developed specifically to address this problem. It allows intermediate servers like mailing list processors to preserve a record of the original authentication results so that the final receiving server can evaluate whether the message was legitimately authenticated before it was modified. ARC gets its own dedicated section later in this guide.
What is DMARC: Domain-Based Message Authentication, Reporting, and Conformance
DMARC is the policy layer that ties email authentication together. It takes the results of the SPF and DKIM checks and applies a rule to them. That rule is defined by the domain owner and published in DNS, and it tells receiving servers what to do when authentication fails.
But DMARC does something equally important alongside enforcement. It creates a reporting channel. When receiving servers evaluate your DMARC record, they send reports back to the address you specify, showing you which servers are sending email that claims to be from your domain, how those sends are performing against SPF and DKIM, and whether any sources are failing authentication. This reporting layer is what makes DMARC genuinely powerful for a domain owner who uses it actively rather than just publishing a record and forgetting about it.
DMARC has been published as a standard since 2015 and is now mandatory for bulk senders sending to Gmail, Yahoo, and Microsoft inboxes. It is also the prerequisite for BIMI, covered in the next section.
How DMARC Works: The Policy and Alignment Check
DMARC evaluates two things when it processes an incoming message: the authentication results from SPF and DKIM, and the alignment of those results with the visible From domain.
Authentication results alone are not enough. A message can pass both SPF and DKIM checks using domains that have nothing to do with the visible From address. DMARC’s alignment requirement closes that gap by requiring that at least one of the authenticated domains (the Return-Path domain for SPF or the d= domain for DKIM) matches the visible From domain.
For DMARC to pass, a message needs to meet this condition: at least one of SPF or DKIM must both pass its authentication check AND align with the From domain. Both passing is better, but DMARC requires only one to pass and align.
When DMARC evaluates an incoming message, it produces one of three outcomes.
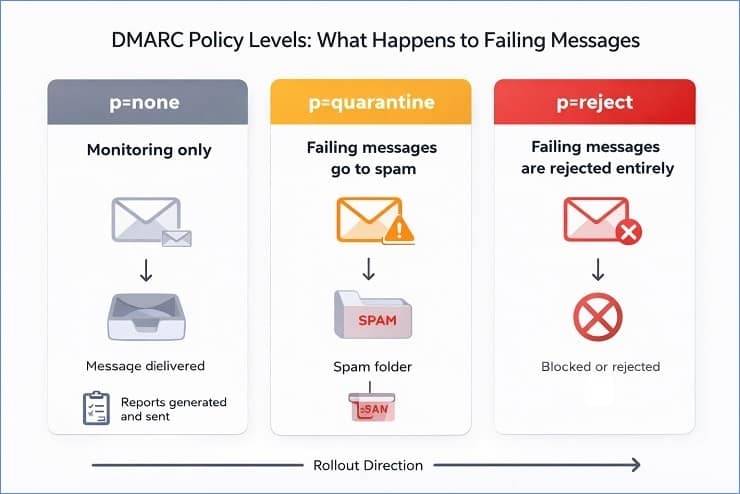
Pass: At least one of SPF or DKIM passed and aligned with the From domain. No action from DMARC.
Fail, p=none: Authentication failed, but the domain owner has instructed receiving servers to take no action. The message is delivered normally. Reports are still generated.
Fail, p=quarantine: Authentication failed and the domain owner has instructed receiving servers to quarantine suspicious messages. In practice, this typically means delivery to the spam folder rather than the inbox.
Fail, p=reject: Authentication failed and the domain owner has instructed receiving servers to reject the message entirely. It does not get delivered.
The pct= tag in the DMARC record allows domain owners to apply the policy to only a percentage of failing messages. Setting pct=10 means the policy applies to 10% of failures, with the remaining 90% treated as if the policy were one level lower (quarantine at pct=10 treats 90% of failures as p=none). This is the mechanism that makes the staged rollout from none to reject possible without catastrophic risk to legitimate sending.
Reading a DMARC Record
A DMARC record is a DNS TXT record published at a specific subdomain:
_dmarc.yourdomain.com
A basic DMARC record at p=none (monitoring mode) looks like this:
v=DMARC1; p=none; rua=mailto:[email protected]
A quarantine-level record looks like this:
v=DMARC1; p=quarantine; pct=25; rua=mailto:[email protected]; ruf=mailto:[email protected]
A full enforcement record looks like this:
v=DMARC1; p=reject; rua=mailto:[email protected]; adkim=r; aspf=r; sp=reject
Breaking down the tags:
v=DMARC1 declares the record version. Required.
p= is the policy. none, quarantine, or reject. Required.
rua= is the email address where aggregate (RUA) reports are sent. Strongly recommended.
ruf= is the email address where forensic (RUF) reports are sent. Optional but useful during troubleshooting.
pct= applies the policy to a percentage of failing messages. Defaults to 100 if not specified.
adkim= sets DKIM alignment mode. r for relaxed (default), s for strict.
aspf= sets SPF alignment mode. r for relaxed (default), s for strict.
sp= sets the policy for subdomains. If not specified, subdomains inherit the root domain policy. Setting sp=reject while keeping the root at p=quarantine gives you tighter subdomain control during rollout.
To check your existing DMARC record, look it up at mxtoolbox.com using the DMARC lookup tool.
The DMARC Rollout Sequence: How to Move from None to Reject Safely
The single most common DMARC mistake is treating p=none as a permanent configuration. It isn’t. It’s a monitoring state, a temporary window during which you gather data and fix problems before turning on enforcement. Staying at p=none permanently provides the reporting benefits but none of the protection, and it does not meet the intent of the 2024 to 2025 ISP mandates.
The correct rollout follows three stages. Working through them carefully is what separates a clean transition to full enforcement from the kind of scenario where a sender jumps to p=reject and suddenly finds that a third of their legitimate sends are being rejected because an ESP they forgot about wasn’t in their SPF record.
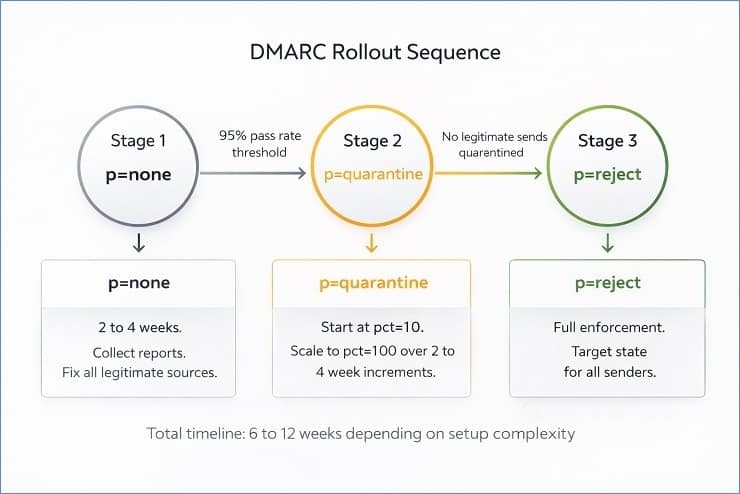
Stage 1: p=none (monitoring mode)
Publish your DMARC record with p=none and your rua= reporting address. Send as normal. Review the aggregate reports that come in over the next two to four weeks. You are looking for two things: sources you recognise that are failing authentication (an ESP with no DKIM configured, a service you forgot to add to SPF), and sources you don’t recognise that are sending email claiming to be from your domain (potential spoofing or unauthorised sending).
Fix every legitimate source that is failing authentication before moving to the next stage. The target is a 95% or higher authentication pass rate across all your legitimate sending sources, with all authorised senders showing as passing in your DMARC reports.
Stage 2: p=quarantine at low pct, scaling to 100
Once your legitimate sending sources are all passing, move to p=quarantine with pct=10. This applies quarantine treatment to 10% of failing messages. Monitor your DMARC reports and your ESP’s delivery statistics for the next one to two weeks. If you see legitimate emails being quarantined (indicated by complaints from recipients that emails are going to spam, or by a drop in engagement on specific segments), you have a source that still needs fixing.
If the pct=10 quarantine is clean, increase to pct=25, then pct=50, then pct=100 in one to two week increments. By the time you reach pct=100 at p=quarantine, every failing message from your domain is going to the spam folder rather than the inbox. This is where most senders discover the last remaining misconfigured sending sources, because the consequences of missing one become visible.
Stage 3: p=reject
Once you have been at p=quarantine pct=100 for at least two weeks with no legitimate sends being caught, move to p=reject. At this point, any message claiming to be from your domain that fails DMARC is permanently rejected by receiving servers. This is the target state. It is what actually protects your domain from spoofing.
The full rollout from p=none to p=reject typically takes six to twelve weeks when done properly. Senders with complex multi-ESP setups or subdomains used by third-party services sometimes take longer. The timeline is not the point. Getting to p=reject with all legitimate sending sources properly authenticated is the point.
DMARC Reporting: RUA, RUF, and How to Read the Data
DMARC reports are one of the most underused tools in email deliverability, primarily because most senders publish a DMARC record, receive the reports, and never open them because the raw format is an XML file that is genuinely difficult to read without tooling.
Here is what the two report types contain and what to do with them.
RUA: Aggregate Reports
Aggregate reports are sent once per day by every receiving server that processes mail claiming to be from your domain. Each report covers a 24-hour period and contains a summary of every message that server evaluated against your DMARC record during that window.
The data in an aggregate report includes the source IP address of the sending server, the number of messages sent from that IP, the SPF authentication result and alignment result, the DKIM authentication result and alignment result, and the DMARC disposition (whether the policy was applied). Essentially, it tells you exactly which IP addresses are sending email from your domain, whether those sends are passing authentication, and how many messages each source is sending.
This is the data you use during the p=none monitoring stage to identify every legitimate and illegitimate sending source. It is also the ongoing monitoring tool that tells you when a new sending service has been added to your stack without having authentication configured.
RUF: Forensic Reports
Forensic reports are generated per-message for individual authentication failures rather than as daily aggregates. They contain the full message header and sometimes partial message content, which makes them useful for diagnosing specific authentication failures but also means they can contain sensitive information. Not all receiving servers send forensic reports, and some senders choose not to enable them for privacy reasons.
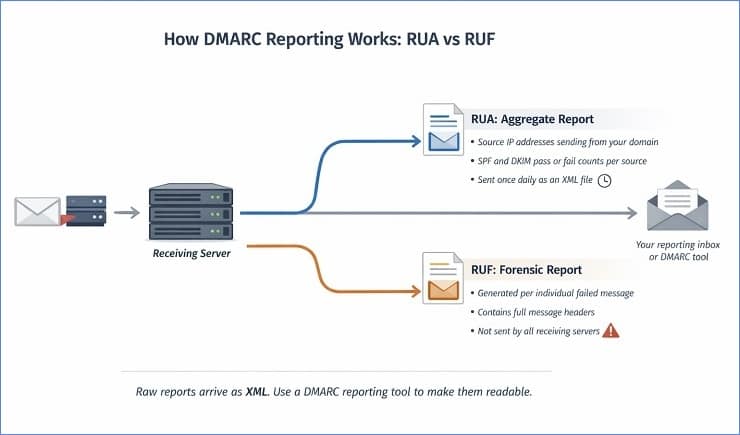
Making DMARC reports readable
The raw aggregate report is an XML file. It is technically readable but not practically useful for ongoing monitoring. The standard approach is to forward your rua= address to a DMARC reporting tool that parses the XML and presents the data in a usable dashboard.
The options range from free to enterprise-level. Google Postmaster Tools provides domain-level reputation and delivery data for Gmail specifically, and it’s free. MXToolbox has a DMARC monitoring feature. DMARC Analyzer, Valimail, and Dmarcian are purpose-built DMARC reporting platforms with free tiers that are more than adequate for most senders. For senders at high volume with complex multi-domain setups, the paid tiers of these tools are worth the cost.
The key metrics to watch in your aggregate reports during rollout are the authentication pass rate per source (you want 95% or higher across all legitimate sources before moving to the next policy level), any sources with a high message count that you don’t recognise (potential spoofing), and any sources with low pass rates that you do recognise (ESP configuration that needs fixing).
What is BIMI: Brand Indicators for Message Identification
BIMI is the fourth layer of email authentication, and it is the one that has a visible, tangible reward attached to it. While SPF, DKIM, and DMARC all work invisibly in the background, BIMI does something your recipients can actually see. It displays your brand logo directly in the inbox next to your sender name, in the spot where a generic initial or placeholder avatar would otherwise appear.
The business case for BIMI is straightforward. A verified brand logo signals to recipients that the email is genuine before they’ve even opened it. It reinforces brand recognition, it builds trust at the inbox level, and according to research from the BIMI working group, it measurably improves open rates. For brands that have already done the hard work of getting to DMARC enforcement, BIMI is the next logical step.
It is worth being clear about one thing upfront. BIMI is not a security protocol in the same sense as SPF, DKIM, and DMARC. It doesn’t prevent phishing or authenticate message content. What it does is create a visual trust signal at the inbox level that is tied to verified domain ownership. The verification requirement is what gives it value. Anyone can put a logo in an email. Only a sender with proper DMARC enforcement and, in most cases, a verified certificate can get that logo displayed by the receiving provider.
What BIMI Does and How It Works
BIMI works by linking a brand logo to your domain through a combination of a DNS record and a certificate. When a receiving server that supports BIMI processes an email from your domain, it checks your DMARC record to confirm enforcement is in place, then looks up your BIMI DNS record to find the logo file, then verifies the certificate, and if everything checks out, it instructs the email client to display your logo.
The BIMI DNS record is a TXT record published at a specific subdomain:
default._bimi.yourdomain.com
A basic BIMI record looks like this:
v=BIMI1; l=https://yourcompany.com/logo.svg; a=https://yourcompany.com/certificate.pem
The v= tag declares the record version. The l= tag points to your logo file, which must be hosted at a publicly accessible HTTPS URL. The a= tag points to your Verified Mark Certificate (VMC) or Common Mark Certificate (CMC), which is the credential that confirms your ownership of the logo.
As of early 2026, BIMI is supported by Gmail, Yahoo Mail, Apple Mail, and Fastmail. Microsoft Outlook has not announced BIMI support, which is a meaningful limitation given Outlook’s share of the B2B inbox market.
BIMI prerequisites
BIMI has a strict set of prerequisites that must all be in place before the record will function. Getting the DNS record published without meeting these prerequisites produces nothing. The receiving server checks each condition before displaying the logo.
You need DMARC at p=quarantine or p=reject. A DMARC policy of p=none does not qualify for BIMI, regardless of what your BIMI record says. The policy must also be applied to 100% of messages, so pct=100 is required.
You need SPF and DKIM both configured and aligning with your From domain. Not just one of them.
Your logo must be in SVG Tiny P/S format, a specific SVG profile with restrictions on what elements and features can be used. Standard SVG files created in most design tools will not meet this requirement without conversion. Several online tools convert standard SVG files to the SVG Tiny P/S profile. The logo must be square (1:1 aspect ratio), must have a solid background rather than a transparent one, and must be hosted at a stable HTTPS URL.
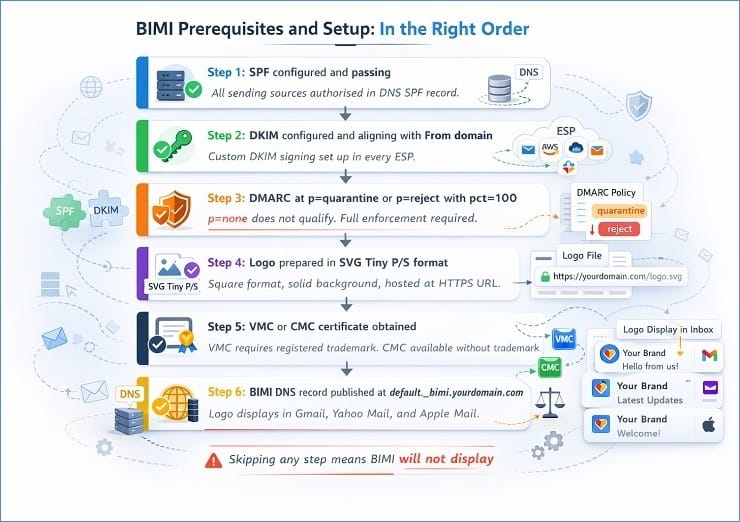
VMC, CMC, and the Certificate Question
This is where BIMI gets complicated for some senders, and it is worth explaining clearly because the certificate requirement is the part that most guides either gloss over or get wrong.
There are two types of certificates that satisfy the a= requirement in a BIMI record.
VMC (Verified Mark Certificate) is the original BIMI certificate type. It requires that your logo is a registered trademark in the jurisdictions where you want the certificate to be valid. The certification process involves a recognised certification authority (DigiCert and Entrust are the two approved VMC issuers as of 2026) verifying your trademark registration, which takes several weeks and costs between $1,000 and $1,500 per year. The VMC is also the only certificate type that unlocks Gmail’s blue verified checkmark next to the sender name. Without a VMC, you do not get the checkmark even if your logo displays.
CMC (Common Mark Certificate) was introduced in 2023 and became more widely available through 2024 and into 2025. The CMC does not require a registered trademark. It requires proof of legitimate logo usage and business identity, which is a significantly lower bar than trademark registration. CMCs are available from the same issuers as VMCs and cost less, though pricing varies by provider. CMCs support logo display in Yahoo, Apple Mail, and other BIMI-supporting providers, but as of early 2026, Gmail requires a VMC for logo display and the blue checkmark feature.
For most small and mid-sized senders, the practical path to BIMI is to get DMARC to p=reject first, then assess whether the certificate investment makes sense for their audience. If a significant proportion of your list is on Gmail and brand recognition at the inbox level is a meaningful goal, the VMC investment is justifiable. If your list skews toward Yahoo and Apple Mail, a CMC achieves most of the same visibility at lower cost.
What is ARC: Authenticated Received Chain
ARC is the protocol most email marketers have never heard of, which is understandable because it operates entirely in the background and most senders will never need to configure it directly. But understanding what it does matters, because the problem it solves is one that affects a specific and growing category of senders, and misidentifying it as a list quality problem or an authentication misconfiguration wastes a lot of diagnostic time.
ARC stands for Authenticated Received Chain. It is an advanced email authentication mechanism that preserves the authentication results from earlier in a message’s delivery path, so that a receiving server can evaluate those results even after the message has been modified by an intermediate server.
Why Forwarding Breaks Authentication
To understand why ARC exists, you need to understand the specific scenario it addresses.
Imagine a contact on your list has set up email forwarding on their corporate address. Every email sent to [email protected] gets automatically forwarded to [email protected]. When your marketing email reaches the company’s mail server, SPF passes (your sending IP is in your SPF record) and DKIM passes (your signature is intact). The message looks authentic.
The company’s mail server then forwards the message to [email protected]. Two things happen in this process. The sending IP changes from your ESP’s IP to the company mail server’s IP. And if the mail server adds any content to the message, for example a forwarding notice or a footer, the DKIM signature breaks.
When the message arrives at [email protected]’s provider, the SPF check fails because the sending IP is now the company mail server, not your authorised ESP. The DKIM check may also fail if the message was modified. DMARC sees both checks failing, applies the policy, and the message ends up quarantined or rejected. A completely legitimate email to a genuinely subscribed contact gets treated as potentially fraudulent.
This exact scenario plays out with mailing list processors, email security gateways that sit in front of inboxes and re-send filtered mail, and any third-party service that relays email through its own infrastructure before final delivery.
How ARC Preserves Authentication Through the Chain
ARC addresses this by creating a verifiable record of the authentication state at each point in the delivery chain.
When an intermediate server (the forwarding server or mailing list processor) receives a message that passed SPF and DKIM authentication, it adds three ARC headers to the message before forwarding it.
ARC-Authentication-Results records the authentication results as the intermediate server observed them, SPF pass, DKIM pass, and so on, at that point in the chain.
ARC-Message-Signature is a new signature applied by the intermediate server to the message as it currently exists, including any modifications the intermediate server made.
ARC-Seal seals the ARC headers themselves, preventing them from being tampered with by later servers in the chain.
The final receiving server can then read this chain of ARC headers and evaluate whether the message was properly authenticated at an earlier stage before it was modified. If the chain is intact and the intermediate servers that created it are trusted, the receiving server can choose to honour the original authentication results rather than applying DMARC policy based on the broken SPF and DKIM checks at the final hop.
ARC does not override DMARC. The final receiving server decides whether to honour ARC results based on its own trust policies for the intermediate servers in the chain. Major providers including Gmail recognise and act on valid ARC chains from trusted intermediaries.
What this means practically for email marketers
Most senders do not need to configure ARC themselves. It is typically implemented by the intermediate servers in the delivery chain, such as mailing list services, email security gateways, and forwarding services. Google’s Gmail infrastructure generates ARC headers on forwarded mail. Microsoft Exchange Online does as well.
Where ARC matters for your diagnostic work is in understanding why certain segments of your list may be producing unexpected authentication failures. If you are seeing authentication-related SMTP codes on a specific segment and those contacts are known to use corporate email addresses that may have forwarding configured, ARC-related issues are worth investigating before concluding the problem is in your own authentication setup. The distinction between a broken authentication configuration and a forwarding-chain authentication failure requires looking at the full bounce message text rather than just the SMTP code.
How to Set Up Email Authentication: ISP-Specific Guidance
Setting up email authentication correctly means configuring three separate DNS records, and the exact steps vary depending on your primary email platform. The principles are the same across all of them. SPF authorises your sending sources, DKIM signs your messages, and DMARC enforces and reports. But the specific menus, values, and verification steps differ between Google Workspace, Microsoft 365, and Yahoo’s hosted infrastructure.
This section covers the setup process for each major provider and then addresses the more complex scenario of sending from multiple ESPs simultaneously.
Email Authentication for Gmail and Google Workspace
Google Workspace is one of the most straightforward platforms to configure authentication on, largely because Google has built the setup workflow directly into the Admin Console and provides Google Postmaster Tools for ongoing monitoring.
SPF for Gmail and Google Workspace
Google’s SPF include mechanism is include:_spf.google.com. This single include covers all of Google’s sending IPs for Workspace accounts. Your SPF record should look like this at minimum:
v=spf1 include:_spf.google.com ~all
If you send from additional services alongside Google Workspace, add their include mechanisms to the same record, keeping the total DNS lookup count under 10.
DKIM for Gmail and Google Workspace
DKIM setup for Google Workspace happens in the Admin Console. Go to Apps, then Google Workspace, then Gmail, then Authenticate email. Google will generate a 2048-bit RSA key pair. The Admin Console shows you the TXT record value to publish in your DNS, including the selector (Google uses “google” as the default selector, producing a DNS record at google._domainkey.yourdomain.com). Publish the record in your DNS, wait for propagation (up to 48 hours), then return to the Admin Console and click Start Authentication.
One important note: Google recommends rotating DKIM keys annually as a security best practice. The rotation process generates a new key pair and requires publishing a new DNS record before deactivating the old one, to avoid a gap in authentication during the transition.
DMARC for Gmail and Google Workspace
There is no DMARC configuration inside the Google Admin Console. DMARC is a DNS record you publish yourself regardless of your email provider. For Gmail senders, Google Postmaster Tools is the monitoring layer you pair with DMARC reporting. Set your rua= address and enrol your sending domain in Google Postmaster Tools to get domain reputation data, spam rate monitoring, and delivery error breakdowns alongside your aggregate DMARC reports.
Google Postmaster Tools is free and genuinely useful. If you send any significant volume to Gmail addresses and are not using it, setting it up should be on your immediate to-do list.
Verification for Gmail senders
After publishing all three records, send a test email to a Gmail address and check the full message headers. In Gmail, click the three-dot menu and select “Show original.” Look for the Authentication-Results header. You should see spf=pass, dkim=pass, and dmarc=pass alongside your domain. If any show as fail, the value after it will tell you why.
Email Authentication for Outlook and Microsoft 365
Microsoft’s authentication setup is slightly more involved than Google’s because it spans two separate admin portals and because Microsoft’s May 2025 enforcement changes added specific requirements that weren’t in place for earlier Microsoft 365 configurations.
SPF for Microsoft 365
Microsoft’s SPF include mechanism for Microsoft 365 is include:spf.protection.outlook.com. For custom domains sending through Microsoft 365, your SPF record should be:
v=spf1 include:spf.protection.outlook.com ~all
If your domain was originally set up through Microsoft’s domain verification wizard, Microsoft may have already published an SPF record for you. Check MXToolbox before adding a new one. If a record exists, modify it rather than creating a second one.
DKIM for Microsoft 365
DKIM configuration for Microsoft 365 is done through the Microsoft Defender portal (previously the Exchange Admin Center). Navigate to Email and Collaboration, then Policies and Rules, then Threat Policies, then Email Authentication Settings, then DKIM. Select your domain and enable DKIM signing.
Microsoft generates two CNAME records for you to publish in your DNS rather than a single TXT record. This is different from most other providers and catches people out. The two CNAMEs look like this:
selector1._domainkey.yourdomain.com pointing to selector1-yourdomain-com._domainkey.yourtenantname.onmicrosoft.com
selector2._domainkey.yourdomain.com pointing to selector2-yourdomain-com._domainkey.yourtenantname.onmicrosoft.com
Publish both CNAME records, wait for DNS propagation, then return to the Defender portal and enable DKIM signing for the domain. Microsoft handles the key rotation automatically on a schedule, which is one advantage of the CNAME approach over a direct TXT record.
DMARC for Microsoft 365 and the May 2025 changes
As with Google, the DMARC record is published in your DNS, not configured within Microsoft’s portals. Microsoft’s enforcement change in May 2025 introduced the 550 5.7.515 rejection code for inbound mail that fails authentication. For outbound mail from your domain, the requirement is the same as Google and Yahoo: SPF, DKIM, and DMARC configured and passing.
Microsoft SNDS (Smart Network Data Services) is Microsoft’s equivalent of Google Postmaster Tools for IP-level reputation monitoring. Pair it with your DMARC aggregate reports for full visibility into your authentication performance with Microsoft’s infrastructure. SNDS is free to enrol and provides complaint rate data, trap hits, and sending IP reputation scores.
Verification for Outlook senders
Send a test email to an Outlook.com address. Open the message, click the three-dot menu, and select View message source. Look for the Authentication-Results header in the raw message source. You should see compauth=pass alongside your SPF, DKIM, and DMARC results. Microsoft uses a composite authentication result (compauth) that combines multiple signals, so this value is worth checking specifically for Outlook recipients.
Email Authentication for Yahoo and AOL
Yahoo’s authentication requirements align closely with Google’s in terms of what is required. SPF and DKIM are mandatory for bulk senders, and DMARC at p=none minimum is required. Yahoo also operates the AOL Mail infrastructure under the same requirements following Verizon Media’s consolidation of those brands.
SPF for Yahoo
Yahoo does not host email sending infrastructure that requires its own SPF include mechanism in the way Google and Microsoft do. For senders using Yahoo Mail for Business or sending to Yahoo recipients through a third-party ESP, your SPF record should include whatever services you use to send, using those services’ include mechanisms. There is no Yahoo-specific include to add.
DKIM for Yahoo
DKIM setup for Yahoo is done through your ESP rather than through Yahoo directly, since Yahoo is primarily a receiving provider for most senders rather than a sending infrastructure provider. Configure your ESP to sign outgoing mail with a DKIM key for your domain, publish the public key in your DNS, and verify that the d= value in the signature matches your From domain. The same custom DKIM signing process described in the DKIM alignment section applies here.
Yahoo’s complaint feedback loop
One Yahoo-specific feature worth knowing about is their complaint feedback loop (FBL). When a Yahoo recipient marks your email as spam, Yahoo can send a notification to an address you register with their Sender Hub programme. This gives you complaint data at the individual message level rather than just the aggregate complaint rate you can infer from DMARC reports. Enrolling in Yahoo’s FBL alongside DMARC reporting gives you a more complete picture of your reputation with Yahoo’s infrastructure than either source alone.
Yahoo is notably more aggressive than Gmail or Microsoft in responding to elevated complaint rates. A complaint rate above 0.3% to Yahoo addresses can trigger filtering responses that persist well beyond the campaign that generated them, and authentication quality is one of the signals Yahoo uses in evaluating whether to apply those restrictions. Keeping authentication clean is a prerequisite for managing your Yahoo complaint rate effectively.
Verification for Yahoo senders
Send a test email to a Yahoo Mail address. Open the message, click More, then View Raw Message. The Authentication-Results header should show spf=pass, dkim=pass, and dmarc=pass. Yahoo’s raw message view also shows a specific received-spf result that is useful for diagnosing SPF-specific issues.
Configuring Email Authentication When Using Multiple ESPs
Multi-ESP sending is the configuration scenario that produces the most authentication problems, primarily because it requires coordinating SPF, DKIM, and DMARC alignment across several platforms simultaneously, and the interactions between them are not always obvious.
Here is how to approach each protocol when sending from multiple platforms.
SPF across multiple ESPs
Every ESP that sends email on behalf of your domain needs to be included in your SPF record. The challenge, as covered in the SPF section, is the 10-lookup limit. With three or more ESPs, each consuming between one and three lookups, the limit is reachable quickly.
The cleanest solution for multi-ESP senders is subdomain isolation. Assign each sending stream its own subdomain. Your transactional emails go from send.yourcompany.com, your marketing campaigns from marketing.yourcompany.com, and your sales sequences from crm.yourcompany.com. Each subdomain has its own SPF record with only the ESP relevant to that stream. The root domain SPF record stays clean and well under the lookup limit.
Each subdomain also needs its own DMARC record, or it inherits the root domain DMARC policy via the sp= tag. Either approach works, but explicit subdomain DMARC records give you more granular reporting visibility.
DKIM across multiple ESPs
Every ESP should be configured to sign outgoing mail with a DKIM key for your domain. Not their domain. This means setting up custom DKIM signing in each ESP, generating a separate key pair per ESP, and publishing each public key in your DNS under a different selector.
So if you use Klaviyo, Mailchimp, and SendGrid, your DNS will have three DKIM records, something like:
klaviyo._domainkey.yourcompany.com mailchimp._domainkey.yourcompany.com sendgrid._domainkey.yourcompany.com
Each record holds the public key for that ESP’s signing. Each ESP signs with your domain in the d= field. Every outgoing message from any of the three platforms has a DKIM signature that aligns with your From domain. DMARC alignment passes for all three streams.
If any one of your ESPs is not configured to sign with your domain, that stream will have DKIM alignment failures and your DMARC reports will show failures specifically from that source. This is one of the most common things the monitoring stage of the DMARC rollout reveals.
DMARC alignment across multiple streams
The DMARC alignment check is domain-level, so as long as each ESP is signing with your domain (or its subdomain) in the DKIM d= field, and the From address in your campaigns uses the matching domain, alignment will pass. The subdomain approach simplifies this further: each stream sends from a specific subdomain with its own DKIM key, so alignment is clean by design.
The one scenario to watch for is when an ESP sends on behalf of a different From domain than the one it is configured to sign with. This happens when teams run campaigns for multiple brands or subsidiaries from a single ESP account without configuring separate DKIM signing for each domain. Each brand domain needs its own DKIM setup in the ESP, its own SPF record, and its own DMARC record.
Email Authentication Failed: Diagnosing and Fixing Common Failures
When email authentication fails, it shows up in your bounce reports as specific SMTP codes, and each code points to a different part of your authentication setup. This is the diagnostic layer that most guides skip entirely, probably because it requires connecting two separate areas of knowledge: authentication protocols on one side and bounce report interpretation on the other. But for anyone managing a sending domain actively, this connection is where the practical value lives.
The good news is that authentication failures are among the most fixable problems in email deliverability. Unlike list quality issues, which require ongoing verification and suppression work, authentication problems are usually one-time fixes. You identify the misconfiguration, correct the DNS record or ESP setting, and the failures stop. The challenge is identifying the right misconfiguration in the first place, because the same SMTP code can point to several different causes depending on what the accompanying bounce message text says.
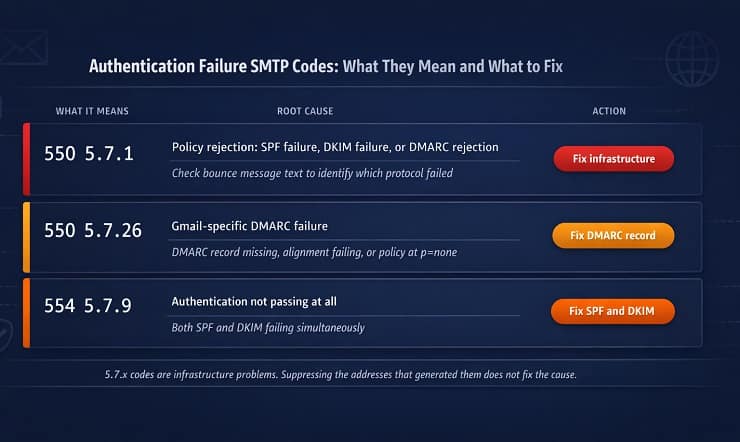
Reading Authentication Failure Signals in Your Bounce Report
Authentication failures appear in the 5.7.x range of SMTP enhanced status codes. If you see 5.1.x codes in your bounce report, those are address-level failures, invalid or non-existent addresses that need to be suppressed. If you see 5.7.x codes, those are policy and infrastructure failures, and suppressing the addresses that generated them does not fix the underlying problem. The same failures will appear on the next campaign through the same infrastructure.
Here are the three authentication-related SMTP codes you are most likely to encounter and what each one tells you.
550 5.7.1
This is a policy rejection. It is one of the broadest codes in the 5.7.x range because it covers several different failure types, and the accompanying bounce message text is what distinguishes them. A 550 5.7.1 with text saying “SPF check failed” points to an SPF configuration problem. The same code with text saying “DMARC policy violation” points to a DMARC alignment or enforcement issue. The code with text referencing a reputation block or blacklisting points to an infrastructure problem unrelated to authentication records specifically.
The diagnostic habit to develop is reading the full bounce message text alongside the code. The code tells you the rejection category. The text tells you the specific cause within that category.
550 5.7.26
This code is specific to Gmail and indicates a DMARC authentication failure. It is more precise than 550 5.7.1 because it points specifically to DMARC rather than a broader policy rejection. When you see 550 5.7.26 in your bounce data, one of three things is happening. Your DMARC record is missing entirely. Your DMARC record exists but neither SPF nor DKIM is aligning with your From domain. Or your DMARC record is present and alignment is technically passing, but the pct= value is applying the policy to a percentage of messages and some are being caught.
A 550 5.7.26 appearing in volume on a campaign is a signal to check your DMARC record immediately and review your DMARC aggregate reports for the authentication pass rate across all sending sources.
554 5.7.9
This code means authentication was not passing at all when the receiving server evaluated the message. It typically appears when both SPF and DKIM are failing simultaneously, which usually indicates either a fundamental setup problem (neither protocol is configured) or a sending source that is not included in either record. Yahoo uses this code specifically for spam-related rejections tied to authentication and reputation signals together.
For the complete reference covering every authentication-related SMTP code, what each one means, and the exact action each requires, our SMTP error codes guide has the full breakdown. For the broader process of reducing the bounce rate that authentication failures contribute to, our guide on reducing your email bounce rate covers the full fix sequence.
The Most Common Authentication Failure Causes and Fixes
Most authentication failures trace back to a small set of root causes. Working through this list systematically is usually faster than trying to diagnose from the SMTP code alone, particularly when the code is a broad one like 550 5.7.1.
SPF failure causes and fixes
The most common cause of SPF failure is a sending source that isn’t included in the SPF record. This happens most often when a new ESP or sending service is added to the stack without updating the SPF record to include it. The fix is straightforward: identify the sending IP that failed, find the include mechanism for the service it belongs to, and add it to your SPF record.
The second most common SPF cause is the 10-lookup limit. If your record exceeds 10 DNS lookups, the SPF evaluation produces a permerror, which receiving servers treat as a failure. MXToolbox’s SPF record checker shows your current lookup count. If it is at or above 10, SPF flattening or subdomain isolation (as described in the multi-ESP section) is the fix.
A missing SPF record is less common but still happens, particularly with newer domains or subdomains that have been set up for sending without anyone configuring authentication. The fix is publishing a record. A duplicate SPF record invalidates both, so the fix is merging them into one.
DKIM failure causes and fixes
The most common DKIM failure cause for established senders is misalignment rather than a broken signature. The DKIM check passes but the d= domain doesn’t match the From domain, so DMARC alignment fails. The fix is configuring custom DKIM signing in the ESP so it signs with your domain rather than its own.
A DKIM record that simply doesn’t exist is the starting point failure. If your ESP is configured to sign messages but the public key isn’t published in your DNS, verification will fail on every message. Publish the record and verify it propagated using MXToolbox’s DKIM lookup before your next send.
DNS propagation delays catch people out during initial setup. Publishing a DKIM record does not mean it is immediately available to receiving servers. Allow 48 hours after publishing before sending campaigns and expecting DKIM to pass. Sending too soon after publishing is a common source of early-stage DKIM failures that resolve on their own.
If DKIM is breaking specifically on forwarded messages and only on those, that is the forwarding chain problem described in the DKIM and ARC sections. It is not a misconfiguration on your end. ARC handling by the intermediate server is the relevant solution.
DMARC failure causes and fixes
The most common DMARC failure for senders who have all three protocols configured is alignment failure. SPF and DKIM are both passing their respective checks, but neither domain aligns with the visible From domain, so DMARC fails despite technically valid authentication. This is fixed by ensuring at least one of the authenticated domains matches your From domain, which in practice means configuring custom DKIM signing and ensuring your SPF Return-Path domain is consistent with your From domain.
A missing DMARC record does not cause outright rejection if the receiving server has no record to evaluate against. But it means you have no enforcement and no reporting. Publishing a DMARC record at p=none is the first step, and it carries no risk to deliverability since p=none takes no enforcement action.
The scenario that causes the most disruption is moving to p=reject before all legitimate sending sources are properly authenticated. A legitimate ESP that signs with its own domain rather than yours will start having its sends rejected once p=reject is enforced. The staged rollout process covered in the DMARC section exists precisely to surface these problems at p=none and p=quarantine before they become hard rejections at p=reject.
The Email Authentication Audit Checklist
Use this checklist to verify your complete authentication setup at any point. It covers every element of a correctly configured SPF, DKIM, and DMARC implementation. If you are working through authentication failures, start here and work through each item before moving to more complex diagnosis.
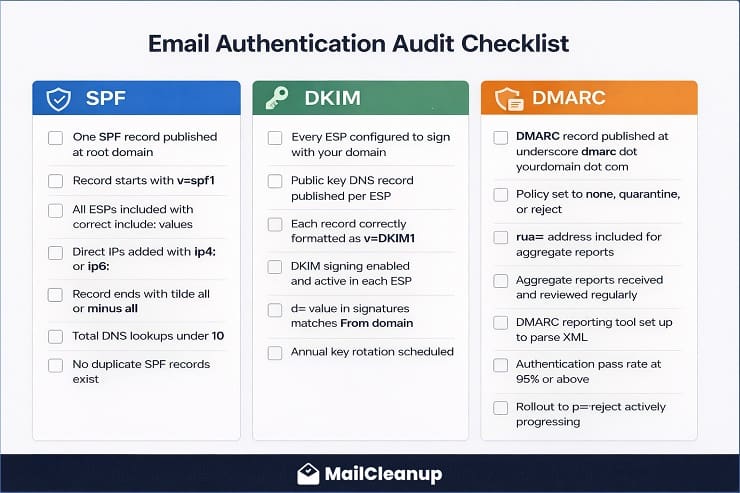
SPF Checklist
- Your domain has exactly one SPF record published as a DNS TXT record at the root domain.
- The record starts with v=spf1.
- Every ESP and sending service you use has its include mechanism in the record.
- Direct IP addresses for servers you control are included using ip4: or ip6: mechanisms.
- The record ends with ~all or -all (not +all).
- The total DNS lookup count is under 10 (verify using MXToolbox SPF checker).
- No duplicate SPF records exist for your domain.
DKIM Checklist
- Every ESP you send from is configured to sign outgoing mail with a DKIM key for your domain (not their domain).
- A DKIM public key DNS record is published for each ESP, using a unique selector per ESP.
- Each public key record is correctly formatted: v=DKIM1; k=rsa; p=[public key].
- DKIM signing is enabled and active in each ESP’s settings.
- You have verified that the d= value in outgoing DKIM signatures matches your From domain (check by viewing full headers on a test email).
- DKIM keys are scheduled for annual rotation.
DMARC Checklist
- A DMARC record is published at _dmarc.yourdomain.com.
- The record includes p= (none, quarantine, or reject based on your rollout stage).
- The record includes rua= with a valid email address for aggregate reports.
- Your DMARC aggregate reports are being received and reviewed regularly.
- A DMARC reporting tool is set up to parse the XML reports into a readable format.
- The authentication pass rate across all legitimate sending sources is at or above 95% (visible in aggregate reports).
- If your domain has active subdomains used for sending, each has its own DMARC record or inherits the correct policy via the sp= tag.
- The rollout to p=reject is actively progressing rather than permanently stalled at p=none.
Tools to verify each element
MXToolbox covers SPF lookup, DKIM lookup, and DMARC lookup all in one place and is free for basic checks. Google Postmaster Tools provides ongoing Gmail-specific reputation and delivery data. Microsoft SNDS does the same for Microsoft’s infrastructure. A dedicated DMARC reporting platform (DMARC Analyzer, Valimail, or Dmarcian) makes the aggregate report data actionable without requiring you to parse XML files manually.
Email Authentication Best Practices for 2026 and Beyond
Email authentication best practices have shifted significantly since 2024. What was considered good practice before the ISP mandates, having SPF and maybe DKIM, is now simply the minimum. And what was considered advanced, p=reject DMARC, BIMI, subdomain isolation, is now the target standard for any sender who wants reliable inbox placement and brand protection.
Here is what the baseline and the advanced standard look like in 2026.
The Non-Negotiable Baseline for Every Sender
These are the requirements that every sending domain needs in place, without exception. Not because of ISP mandates alone, but because sending without them is operationally irresponsible given what the alternatives are.
SPF, DKIM, and DMARC, all three: Not SPF and DKIM without DMARC. Not DMARC without DKIM. All three, configured correctly, with DMARC at least at p=quarantine and actively progressing toward p=reject. The 2024 to 2025 ISP mandates made p=none the minimum floor, but treating p=none as a destination rather than a starting point leaves your domain unprotected and your reputation data unused.
Custom DKIM signing with your own domain: Your ESP should sign outgoing mail with a DKIM key published under your domain, not their subdomain. This is the most commonly skipped step in DKIM setup, and it is the one that causes DMARC alignment failures for senders who believe their authentication is complete.
One SPF record per domain, under the 10-lookup limit: Check your lookup count with MXToolbox. If it is at or near 10, fix it before adding any new sending services.
DMARC aggregate reporting actively monitored: Publishing a DMARC record without reading the reports is like installing a security camera and never looking at the footage. The reports tell you who is sending mail from your domain, whether your authentication is working, and whether anyone is attempting to spoof your domain. Check them at minimum monthly, weekly during the rollout stages.
Advanced Best Practices for High-Volume Senders
Once the baseline is solid, these practices are what separate senders who occasionally have deliverability problems from those who rarely do.
Subdomain isolation for separate sending streams: Transactional email, marketing campaigns, and internal communications each have different sending patterns, complaint profiles, and volume characteristics. Separating them into subdomains means that a spike in complaint rate from a marketing campaign does not damage the reputation of your transactional sending domain. It also simplifies SPF management and makes DMARC reporting more granular.
Dedicated IPs for high-volume streams: Senders pushing more than 100,000 emails per month benefit from dedicated IPs that give them full control over their sending reputation rather than being influenced by the behaviour of other senders sharing a pool. The caveat is that dedicated IPs require a proper warm-up before sending at full volume, which typically takes four to eight weeks.
DKIM key rotation on an annual schedule: Rotating DKIM keys annually reduces the risk exposure if a private key is ever compromised. Most major ESPs either handle this automatically (Microsoft 365) or provide a rotation workflow (Google Workspace). For ESPs that require manual rotation, set a calendar reminder and follow the process: publish the new key, update the ESP to use it, verify it is working, then remove the old key.
BIMI as the next milestone after p=reject: Once DMARC enforcement is stable at p=reject and has been running cleanly for at least 30 days, BIMI is the logical next step for senders with a registered trademark or the budget for a VMC. The logo display benefit is real and measurable, particularly for brands with high Gmail audience concentration.
Quarterly authentication audits: DNS records get changed, ESPs get added, subdomains get created, and configurations drift over time. A quarterly run through the authentication audit checklist above catches problems before they show up in your bounce data or DMARC reports.
What Happens If You Don’t Authenticate
This section exists not as a scare tactic but as a clear statement of the actual consequences, because “your emails might go to spam” understates the real risk considerably.
Hard rejection from Gmail and Microsoft for bulk senders: If you send more than 5,000 emails per day to Gmail or Yahoo addresses without SPF, DKIM, and DMARC configured, your emails are being rejected with 5xx SMTP codes. They are not reaching the spam folder. They are not reaching the inbox. They are being returned to your sending infrastructure as permanent failures. The same is true for Microsoft 365 inboxes following the May 2025 enforcement, with the 550 5.7.515 rejection code as the specific signal.
Domain spoofing exposure: Without DMARC enforcement, your domain can be used in phishing attacks and you will not know about it unless someone reports it to you directly. A spoofed email claiming to be from yourcompany.com goes to your customers, asks them to click a link or enter credentials, and the damage to your customer relationships and brand reputation is real regardless of whether you were involved. DMARC at p=reject makes this attack vector effectively unusable against your domain.
Damaged sender reputation that compounds over time: Authentication failures appear as hard bounces in your sending metrics. A sustained pattern of authentication-related hard bounces signals to ISPs that your sending infrastructure is poorly managed, which feeds into the reputation scoring that determines inbox placement for all your sends, not just the ones generating failures. The reputation damage from ignoring authentication is not isolated to individual failed deliveries. It spreads across your entire sending domain.
The irony of the non-authentication position: is that the senders who avoid setting up authentication because it seems complicated are the ones who end up dealing with far more complicated problems as a result. Bounce rate investigations that turn out to be authentication failures. Reputation problems that resist every list-cleaning fix. Phishing complaints from customers pointing back to their own domain. Setting up authentication properly, once, eliminates all of these as ongoing concerns.
You Now Speak Authentication: What to Do Next
Email authentication is the foundation that the rest of your deliverability system stands on. List quality matters, engagement segmentation matters, content quality matters. But all of those variables exist above the authentication layer. If the foundation isn’t solid, the work you put into the layers above it produces less than it should. In fact, it is the first failure mode to diagnose if you find that your emails are not being delivered.
The path from where most senders are today to a properly authenticated sending domain is not as complex as it looks from the outside. SPF and DKIM are one-time DNS record configurations that rarely need to change once they are set up correctly. DMARC takes more active management during the rollout, but once you reach p=reject and your legitimate sending sources are all passing, it runs on its own with periodic report reviews.
The checklist in this guide gives you the complete audit framework. The ISP-specific sections give you the exact steps for your platform. The troubleshooting section gives you the diagnostic framework for anything that breaks along the way.
Once your authentication is in order, the primary remaining variable in your bounce rate is list quality. Invalid addresses, disposable emails, role-based addresses, and contacts whose mailboxes have been deactivated all generate hard bounces regardless of how clean your authentication setup is. That is where bulk list verification makes the difference, and it is what MailCleanup is built for. Run your list through verification after fixing authentication and you will have addressed the two root causes that account for the vast majority of bounce rate problems in a single workflow.
For the complete guide to what each bounce type means and how to act on it, email bounce management is the right next step. And if you are working through a blacklist problem alongside your authentication setup, our email blacklist removal guide covers that process from start to finish.
FAQs on Email Authentication
1. What is email authentication?
Email authentication is the system of DNS-based protocols that allows receiving mail servers to verify that an email claiming to come from your domain actually did. The three core protocols are SPF, which authorises sending IP addresses; DKIM, which adds a cryptographic signature to outgoing messages; and DMARC, which ties the two together and enforces a policy when either check fails. Without email authentication in place, any server can send email that appears to come from your domain, making your brand a target for spoofing and phishing attacks.
2. What are the main email authentication protocols?
The four main email authentication protocols are SPF (Sender Policy Framework), DKIM (DomainKeys Identified Mail), DMARC (Domain-based Message Authentication, Reporting, and Conformance), and BIMI (Brand Indicators for Message Identification). SPF and DKIM are the foundational authentication layers. DMARC builds on both by adding policy enforcement and reporting. BIMI is the optional visual layer that displays a verified brand logo in supporting inboxes once DMARC enforcement is in place. ARC (Authenticated Received Chain) is a fifth protocol that preserves authentication results through email forwarding chains.
3. Is email authentication mandatory in 2026?
Yes. Gmail and Yahoo made SPF, DKIM, and DMARC mandatory for bulk senders (those sending 5,000 or more emails per day to their platforms) in February 2024. Microsoft followed with its own enforcement in May 2025, introducing the 550 5.7.515 rejection code for non-compliant senders. Senders who do not meet these requirements face hard rejection or spam filtering from the three providers that collectively handle the majority of consumer and business email addresses.
4. What is the difference between SPF, DKIM, and DMARC?
SPF checks whether the IP address that sent an email is authorised to send on behalf of the sending domain. DKIM checks whether the message content is genuine and unaltered in transit by verifying a cryptographic signature attached to the message. DMARC ties both checks together, requires that at least one passes and aligns with the visible From domain, and enforces a policy (none, quarantine, or reject) when authentication fails. All three work together as a layered system. SPF and DKIM each cover a different aspect of authentication, and DMARC provides the enforcement and reporting layer that makes both meaningful.
5. What does email authentication failed mean?
Email authentication failed means that one or more of the SPF, DKIM, or DMARC checks did not pass when a receiving server evaluated an incoming message. In practice, authentication failures show up in bounce reports as SMTP codes in the 5.7.x range. A 550 5.7.1 indicates a policy rejection that could be an SPF failure, DKIM failure, or DMARC rejection. A 550 5.7.26 indicates a specific DMARC failure on Gmail. A 554 5.7.9 indicates authentication was not passing at all. Authentication failures are infrastructure problems, not list quality problems, and suppressing the addresses that generated them does not fix the underlying cause.
6. How do I authenticate my email for Gmail, Outlook, and Yahoo?
For Gmail and Google Workspace, configure SPF by adding include:_spf.google.com to your DNS SPF record, set up DKIM signing in the Google Admin Console under Apps, Google Workspace, Gmail, Authenticate email, and publish a DMARC record at _dmarc.yourdomain.com. For Microsoft 365, add include:spf.protection.outlook.com to your SPF record, enable DKIM signing in the Microsoft Defender portal under Email Authentication Settings, and publish a DMARC record in your DNS. For Yahoo, configure your ESP to sign outgoing mail with a DKIM key for your own domain, ensure your SPF record includes your ESP’s sending IPs, and publish a DMARC record. All three providers require the same three protocols. The setup steps vary by platform.
7. What is DMARC and what policy should I use?
DMARC (Domain-based Message Authentication, Reporting, and Conformance) is the protocol that ties SPF and DKIM together, enforces a policy when authentication fails, and sends reports back to the domain owner. The three DMARC policy levels are p=none (monitoring only, no enforcement), p=quarantine (failing messages go to spam), and p=reject (failing messages are rejected entirely). The recommended approach is to start at p=none to collect reports and identify all sending sources, progress to p=quarantine in stages using the pct= tag to control what percentage of failures are affected, and ultimately reach p=reject, which is the target state that provides full domain protection and satisfies ISP requirements.
8. What is BIMI and how does it work?
BIMI (Brand Indicators for Message Identification) is an email authentication standard that displays a verified brand logo in the inbox next to the sender name. It works by linking a logo file and a certificate to your domain through a DNS record. For BIMI to function, your domain must have DMARC enforced at p=quarantine or p=reject with pct=100, and both SPF and DKIM must be passing and aligned with your From domain. Two certificate types are supported: a VMC (Verified Mark Certificate), which requires a registered trademark and unlocks Gmail’s blue verified checkmark, and a CMC (Common Mark Certificate), which has lower requirements and no trademark requirement. As of 2026, BIMI is supported by Gmail, Yahoo Mail, and Apple Mail.