
When an email campaign underperforms, the list is usually the first place to look. Not the subject line, not the send time. A list carrying invalid addresses, abandoned inboxes, and unverifiable domains generates hard bounces, suppresses your engagement metrics, and sends the kind of signals to inbox providers that are difficult to recover from. The problem compounds.
Every campaign you send to a degraded list makes the next one harder to deliver, and email list decay is a natural process that affects every database that is not actively maintained.
This is a step-by-step guide on how to clean email lists from start to finish: from exporting your CSV to acting on every result category your verification tool returns, building a suppression list that holds over time, and knowing when a cleaning run is the right move versus when something different is needed.
If you are looking for the ongoing programme that keeps your list healthy between cleaning runs, the full framework is in our email list hygiene guide. This post covers the execution.
TL;DR: How to Clean Your Email List
- How to clean email lists starts with a bulk verification pass, not manual removal. A verification tool checks every address against syntax, domain, MX record, and SMTP-level validity in a single automated run.
- Invalid, hard-bounce, disposable, and duplicate addresses should be removed from your clean email list immediately after a verification run, with no exceptions and no re-engagement attempt.
- Catch-all, risky, and unknown results require a judgment call based on your sending volume and bounce rate tolerance, not a blanket removal.
- Role-based addresses such as info@, support@, and admin@ carry elevated complaint risk and should be removed from marketing sends regardless of their verification status.
- Suppression is not the same as deletion. Adding a removed address to your suppression list prevents future sends without erasing the contact record from your system.
- Cleaning your email list removes technical problems but does not rebuild sender reputation, fix authentication gaps, or resolve high complaint rates on its own.
- The two triggers for a cleaning run are a scheduled pre-campaign clean and an emergency pass when you have received or inherited a list with no verification history.
What Cleaning Your Email List Actually Means (and What It Does Not)
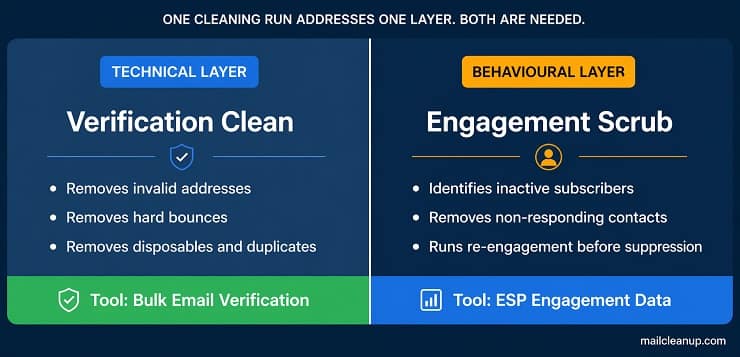
Understanding how to clean email lists correctly starts with knowing what a cleaning run addresses and what it leaves untouched. A cleaning run is a technical verification pass. You take your full list, run it through a bulk email verification tool, and receive a categorised result file showing which addresses are deliverable, which are undeliverable, and which fall into a grey zone that requires a judgment call. The process targets technical problems in your list: invalid syntax, non-existent domains, closed or suspended mailboxes, disposable addresses, and duplicate entries.
What a cleaning run does not address is the behavioural layer. Subscribers who have valid, deliverable email addresses but have not opened a campaign in six months are invisible to a verification tool. Their addresses pass every check. Identifying and handling those contacts is a separate process involving engagement segmentation, re-engagement campaigns, and suppression thresholds. That process is covered in full in our guide on email list scrubbing. Both matter, but they solve different problems and run on different schedules.
The practical framing to keep in mind: a verification clean removes addresses that cannot receive your emails. An engagement clean removes addresses that choose not to respond to them. Running one without the other is common. Running both on a consistent cadence is what produces lasting improvement in deliverability and campaign performance.
Before You Start: What You Need to Run a Proper Clean
The approach to how to clean email lists is straightforward in principle, but knowing how to clean your email list correctly depends on getting two pre-run steps right. The first is exporting your list from your ESP in the right format. The second is recording your current performance baseline. Both take under 15 minutes combined. Skipping either one leaves you with no meaningful comparison point once the clean is done and your first post-clean campaign goes out.
Export Your List From Your ESP
The starting point when learning how to clean email lists is pulling your data in the right format for a bulk verification run. Every major ESP allows you to export your contacts as a CSV file. In Mailchimp, the export option sits in the Audience dashboard. In Klaviyo, it is under Lists and Segments. In ActiveCampaign, you export through the Contacts section. In HubSpot, you export from Contact Lists. The exact navigation varies, but the output is consistent: a CSV file with email addresses as the primary column.
Export only your subscribed contacts. If your ESP already separates contacts by status (subscribed, unsubscribed, cleaned, hard bounced), exclude the non-subscribed segments from the export entirely. Contacts your ESP has already cleaned or suppressed are not active sends. Running them through an email list cleaner is unnecessary and skews your result data. You want the subscribed list: the addresses you are actively mailing and whose deliverability you are responsible for managing.
Keep your original export file untouched before uploading anything to a verification tool. You will need it to match result statuses back to individual contact records in your ESP when you come to act on what the run returns. Working from a copy and preserving the original is a simple step that prevents a significant headache later.

Capture Your Baseline Metrics Before You Run
Before you begin the process of how to clean email lists, spend five minutes recording your current performance data from your ESP dashboard. These numbers are your before-clean baseline. Without them, the outcome of the clean has no benchmark and no way to be measured accurately.
Pull the following figures based on your last three to five campaigns, or your most recent major send:
- Bounce rate: the percentage of sends that returned a hard or soft bounce
- Spam complaint rate: the percentage of recipients who marked your email as spam
- Open rate and click rate: so you can track engagement change after the clean
- Current list size at the point of export: so you know what percentage of your list was removed
A successful clean typically produces a measurable drop in bounce rate within the first campaign you send after the run. If bounce rate does not improve after you clean up your email list, the problem is likely upstream. Your acquisition sources are consistently delivering low-quality addresses, and the cleaning run buys you one campaign before the degradation returns. The email list hygiene guide covers how to address that at the source rather than treating the symptom repeatedly with each send.
Step 1: Run a Bulk Verification Pass
The first active step in how to clean email lists is uploading your exported list to a bulk verification tool and running the full pass. This is not a manual process. At any meaningful list size, individual address review is not viable. You upload your CSV, the tool runs every address through a sequence of automated checks, and you download a result file with a status assigned to each record.
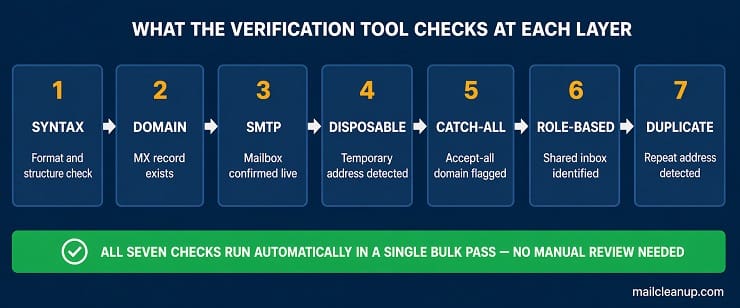
What the verification tool is checking at each stage matters, because it tells you why a specific address is being flagged and what the flag actually means for your decision. The sequence typically runs as follows:
- Syntax validation catches formatting errors: missing @ symbols, invalid domain constructions, double dots, and malformed patterns that cannot receive mail by definition.
- Domain validation checks whether the domain exists and has functioning mail exchange (MX) records. An address at a domain with no MX records cannot receive email regardless of whether any mailbox is real.
- SMTP-level verification opens a connection with the receiving mail server and checks whether the specific mailbox exists. This is the check that catches closed accounts, deleted inboxes, and addresses that were never real. It is also the step that distinguishes genuine email verification from basic format checking.
- Disposable address detection flags temporary email addresses created through services designed to avoid sharing a real address. These addresses are deliverable at the moment they were added to your list but expire within hours or days.
- Catch-all detection identifies domains configured to accept all incoming mail regardless of whether the specific mailbox exists. Mail delivered to a catch-all domain does not bounce at the SMTP level, but it may not reach an actual person.
- Role-based address detection flags shared inboxes such as info@, support@, admin@, contact@, and similar addresses that are not tied to a specific individual. These require a separate decision from individual-mailbox addresses and are covered in Step 2.
- Duplicate detection identifies instances of the same address appearing more than once in your list, which inflates send volume and distorts engagement metrics if left in.
For a detailed breakdown of what each verification layer is doing technically, see our guide on email verification vs email validation. And, to learn more about email verification features in detail, see our guide.
On timing: at 10,000 addresses, most tools return results in 10 to 30 minutes. At 100,000 addresses, expect one to four hours depending on the tool and the composition of your list. Lists with a high proportion of catch-all domains take longer because each address requires a live connection attempt rather than a DNS lookup. At one million addresses, plan for an overnight run. If you are running a clean email list verification pass against a campaign deadline, factor the processing window into your send preparation timeline so you are not waiting on results the morning of a scheduled send.
Once the run completes, download the full result file and do not remove anything yet. Every status category in that file requires a specific response, and the decisions are not uniform. Step 2 covers how to read and act on each one. For a comparison of the bulk verification tools available at different volume tiers and price points, our review of the best email list cleaning services covers the options available.
Step 2: Read Your Results and Act on Every Address Category
Once the bulk verification run completes, the next phase in how to clean email lists is reading the result file correctly. This is where most email list cleaning guides stop short. They tell you to remove invalid addresses. That instruction covers one category. Your result file contains between five and eight distinct status categories depending on the tool, and each one requires a different response. Acting on them uniformly, whether removing everything that is not marked valid or keeping everything above hard bounce, produces a partially cleaned list that will underperform in the next campaign.
Work through the categories in order of clarity. Start with the decisions that are unambiguous, then move to the grey zone where judgment is required.
The Clear Removals: Invalid, Hard Bounce, Disposable, and Duplicate
When learning how to clean email lists, the clear removals are the first and easiest category to act on. These addresses offer no path to delivery and no legitimate engagement value. The decision is immediate removal and suppression. There is no re-engagement attempt warranted for this group, no grace period, and no hold segment.
- Invalid: Failed syntax or domain validation. The address cannot receive mail and produces a hard bounce on every send attempt. This is the most straightforward remove invalid email addresses decision in the entire run.
- Hard bounce: Already confirmed through a previous campaign. Your ESP will have flagged these separately. The verification tool result confirms the status. Suppress immediately.
- Disposable: A temporary address created at the point of sign-up through a service designed to avoid sharing a real inbox. Even if the address was deliverable when it entered your list, it is now expired or near expiry. It represents no real subscriber and no engagement signal you can rely on.
- Duplicate: The same address appearing more than once in your database. Duplicate entries inflate your send volume, distort your per-address engagement metrics, and serve no purpose. Retain one instance only and suppress or delete the rest.
For a list of 50,000 contacts that has not had a clean email list pass in the past 12 months, finding 8 to 15 percent of addresses in these four categories combined is normal. Email list decay runs at roughly 22 to 25 percent per year, so the longer the gap since the last clean, the larger this group will be. If more than 20 percent of your list falls into the clear-removal categories, that is not simply an ageing problem. It is a signal that your acquisition sources are consistently producing low-quality addresses. The email list hygiene guide covers how to address that at the source rather than cleaning the same degradation out of your database on every run.
The Role-Based Address Decision
Role-based addresses are one of the most overlooked categories in how to clean email lists, and skipping this step is a consistent source of elevated complaint rates in bulk marketing sends. These are shared inbox addresses tied to a function rather than a specific person: info@, support@, admin@, contact@, sales@, help@, and noreply@ are the most common. Most email list cleaner tools flag them in the result file as a distinct category. Some pass as technically valid because the mailbox does exist and accepts mail at the SMTP level.
The issue is not deliverability. It is complaint risk and engagement quality. A shared inbox is monitored by multiple people or processed by a ticketing system. The individual who signed up for your marketing emails is not the person reading the shared queue. The recipient who encounters your campaign in that inbox has no context for the subscription, which drives spam reports even when your content is perfectly legitimate and your consent practices are sound.
For bulk marketing sends, remove role-based addresses as a discrete step in the cleaning run. This is not a grey zone decision. If you are running B2B outbound sequences where the role address is the correct and intentional point of contact for a specific organisation, the risk calculus is different. For any campaign deployed to a broad list, remove them before the send.
The Grey Zone: Catch-All, Unknown, and Risky Results
The most judgment-dependent part of how to clean email lists is the grey zone. These addresses are not clearly deliverable and not clearly invalid. A blanket removal of the entire grey zone wastes addresses that may be perfectly valid. A blanket retention sends you into deliverability risk you could have avoided. The right response is calibrated by your current sender health.
Catch-all addresses belong to domains configured to accept all incoming mail regardless of whether the specific mailbox behind the address actually exists. SMTP-level verification cannot confirm individual mailbox validity at a catch-all domain because the server accepts every query. These addresses may deliver to a real person. They may drop silently after acceptance. They may generate a deferred bounce at the inbox provider level after the domain-level server has already accepted the message.
Unknown addresses returned no result from the verification attempt. The receiving server timed out, refused the connection, or returned a temporary error during the run. The address may be valid or it may not. A single verification pass cannot resolve this with certainty, and running the verification again immediately rarely changes the outcome.
Risky addresses are flagged based on signals suggesting elevated complaint probability or deliverability instability, even when the address passes other validation checks. The specific signals vary by tool.
The decision on each category should be calibrated against your current bounce rate:
| Category | Bounce Rate Under 1% | Bounce Rate 1–2% | Bounce Rate Above 2% |
|---|---|---|---|
| Catch-all | Test a small segment first. Suppress on any bounce result. | Move to a low-frequency segment. Monitor closely before scaling. | Suppress until bounce rate recovers below 1%. |
| Unknown | Send once to a test segment. Suppress immediately on any bounce. | Suppress for now. Re-test in 30 days after a scheduled clean. | Suppress until bounce rate recovers. |
| Risky | Send with caution. Monitor complaint rate closely each campaign. | Move to a separate segment. Test before full deployment. | Remove from all active sends. |

If your bounce rate is already above 2 percent, no grey zone address should be an active send. Get the rate back below threshold using the clear-removal decisions first, then reassess whether the grey zone is worth re-introducing at your recovered standing. The full bounce rate recovery process is in our guide on how to fix email bounce rate.
Step 3: Address the Engagement Layer
A verification pass in the process of how to clean email lists handles the technical side of your list: the addresses that are invalid, unverifiable, or carry elevated delivery risk before a single email is sent. Once that layer is handled, a second group remains in your database. These are technically valid addresses, addresses that pass every verification check, belonging to subscribers with real, active inboxes who have simply stopped engaging with your campaigns. They have not opened or clicked in 90 days, or 180 days, or longer. A verification tool cannot see this. Only your ESP’s engagement data can.
Identifying inactive subscribers requires filtering your list by last-open date and last-click date within your ESP. The threshold for what counts as inactive depends on your sending frequency. A list that sends weekly applies a tighter window than one that sends monthly. The response to identified inactive subscribers is not immediate deletion. It is segmentation into a re-engagement sequence, which gives legitimately interested subscribers a chance to confirm they want to stay before they are suppressed. The full process, including sunset thresholds, re-engagement campaign structure, and suppression logic for non-responders, is covered in our email list scrubbing guide.
In the context of a cleaning run, sequencing matters. Run the technical verification pass first. Then address the engagement layer. Making engagement decisions on a list that still contains invalid and bounce-generating addresses means your engagement data is skewed by contacts that were never going to produce an open or click regardless of content. Clean the technical layer first. Your engagement segmentation will then be based on accurate data from addresses that are actually capable of receiving your emails.
Step 4: Rebuild Your Suppression List
The step that completes how to clean email lists properly is not deletion. It is suppression. This distinction is absent from most cleaning guides, and it has real consequences for both deliverability management and compliance with data regulations that apply to email marketing across most jurisdictions.
What Suppression Means and Why the Distinction Matters
In the context of how to clean email lists, understanding the difference between suppression and deletion is not a technical detail. It is a compliance and reputation management foundation.
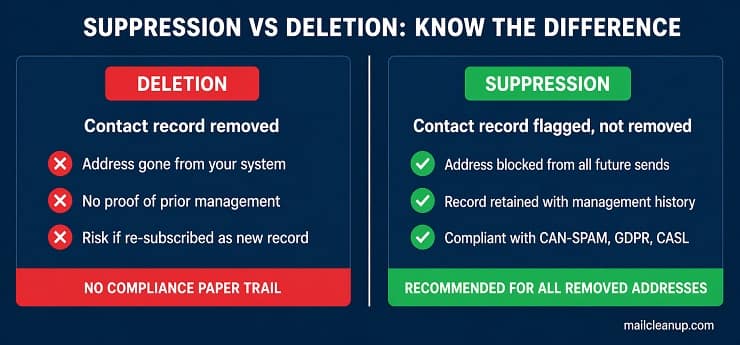
Deletion removes a contact record from your system. The address is gone. If the contact re-subscribes at a later date, they enter as a new record with no history attached to them.
Suppression flags an address as do-not-send while retaining the contact record in your database. All future sends to that address are blocked automatically. The record remains. Under CAN-SPAM, GDPR, and CASL, the ability to demonstrate that an address was already on your suppression list before a complaint was filed is a form of protection that deletion cannot replicate. A deleted record leaves no evidence. A suppression record shows the address was managed correctly before the problem arose.
After a clean email list verification run, the following belong on your suppression list:
- All hard bounce and invalid addresses returned by the verification tool
- All previously unsubscribed contacts (your ESP should maintain these automatically, but confirm after every list import or migration)
- All contacts who have filed a spam complaint, whether identified through an ESP feedback loop or through manual complaint review
- Any catch-all or unknown addresses that produced a bounce on the test segment you sent after the verification run
Upload your updated suppression list to your ESP before any send following a cleaning run. If you manage multiple sending domains or more than one ESP, maintain a single master suppression file and apply it across all sending environments simultaneously. A suppression record that exists in one ESP but not another creates an unprotected send path, and that gap is precisely where the next bounce spike will appear.
When to Clean: Two Triggers That Both Matter
Understanding when to run a verification pass is the part of how to clean email lists that most guidance reduces to a single instruction: clean quarterly. That baseline is correct. It misses a second trigger with a different logic that applies in specific high-risk scenarios, and conflating the two means you either over-react to routine situations or under-react to the ones that genuinely require immediate action.
The Scheduled Clean: Building It Into Your Send Calendar
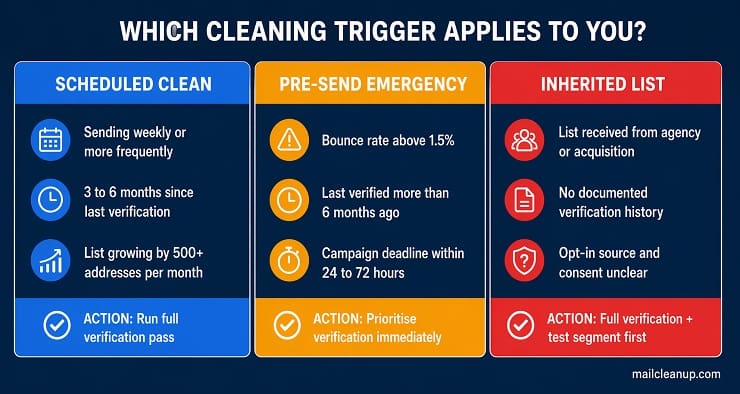
How to clean your email list on a routine cadence depends on two variables: your sending frequency and your list growth rate. For most programmes, the right rhythm for a full verification pass is every three to six months. If you are sending weekly to a list that grows by 500 to 1,000 new addresses per month, quarterly is the right cadence for how to clean email lists consistently. If your send frequency is lower and your list is relatively stable, a bi-annual clean is sufficient.
Between scheduled runs, monitor three threshold metrics in your ESP dashboard. Bounce rate crossing 2 percent, spam complaint rate exceeding 0.08 percent, and any ESP-issued deliverability warning are all signals to run an unscheduled pass before your next major send. Waiting for the next scheduled clean when these thresholds are already breached allows an additional campaign to worsen a sender reputation that is already under pressure. The monitoring thresholds, the cadence framework, and the trigger points for an emergency response are covered in full in our email list hygiene guide.
The Pre-Send Emergency Clean: Acting Before a Specific Campaign
The pre-campaign trigger is a different situation from routine maintenance, and knowing how to clean email lists quickly before a specific send is a scenario that operates on a different decision logic. The question is not when to schedule the next clean. It is whether this list is safe to use in the next 24 to 72 hours.
The criteria are specific. If your last verified bounce rate on this list was above 1.5 percent and more than six months have passed since the last verification pass, run a clean before this send. If the list was received from a third party, migrated from a legacy system, or has no documented verification history, run a clean before the send regardless of what the stated bounce history shows. The risk profile of sending to an unverified list at scale is materially higher than the time cost of an overnight run.
When a campaign deadline is fixed and you need to know how to clean email fast, prioritise the bulk verification pass over the engagement-layer review. Hard bounce removal and clearing invalid addresses from the list protects your sender reputation from the most damaging category of result a single send can produce. The engagement layer can follow in the next send cycle without causing significant harm if the technical clean has been completed first.
The Inherited List Protocol: When the List Did Not Come From You
The inherited list is one of the most under-addressed scenarios in guidance on how to clean email lists, and it carries some of the highest deliverability risk a sender will encounter. An inherited list is any list you did not build yourself through your own acquisition channels: an agency handover at the end of a client engagement, a database transferred as part of a business acquisition, a legacy CRM migration, or a list received from another team within a larger organisation.
The risk is not that the previous owner was negligent. The risk is that their opt-in practices, complaint history, verification recency, and suppression management are all unknowns unless you have documentation confirming every point. Sending to an inherited list without running a fresh verification pass on a clean email database is one of the most consistent causes of hard bounce spikes and simultaneous spam trap exposure.
The protocol for an inherited list is as follows:
- Run a full verification pass before any send: No exceptions, and no deferral based on the previous owner’s assurances about list quality. Even a recently verified list may have decayed since the last run was completed.
- Remove all clear-category results immediately: Invalid, hard bounce, disposable, duplicate. No sends to any of these under any conditions.
- Treat catch-all and unknown results as suppress-first: You have no engagement history with this audience. The grey zone tolerance you apply to a list built on your own acquisition sources does not transfer to a list whose collection history is opaque.
- Send to a test segment before deploying to the full list: Send to 5 to 10 percent of the verified addresses first. Monitor bounce rate and complaint rate against your ESP’s sending thresholds before scaling to the remainder.
- Consider a re-confirmation campaign where consent provenance is unclear: If you cannot confirm the opt-in mechanism used to collect the addresses, a re-confirmation email asking recipients to actively confirm they want to hear from you is the cleanest path to a sendable list with verified consent.
Knowing how to clean emails from an inherited database takes longer than a routine verification run because the unknowns at every decision point require more conservative thresholds. The additional time is the cost of managing a list whose history belongs to someone else. The email sender reputation guide covers what the recovery process looks like if you are already managing the fallout from an unvetted inherited list send.
What a Single Cleaning Run Cannot Fix
How to clean email lists correctly includes knowing where the process ends and where a different kind of work begins. A verification pass removes the addresses that cannot receive your emails. What it does not do is repair the sender reputation signals your domain has already accumulated, resolve authentication gaps that cause your emails to fail DMARC or SPF checks, or address the complaint patterns that have built up over months of sending to an unresponsive audience.
Three problems fall outside what even a thorough clean email list verification pass can resolve:
- Sender reputation damage already recorded: Inbox providers score your domain against your full historical sending behaviour, not just your most recent send. A clean email list improves your inputs going forward: fewer bounces, better engagement rates, reduced complaint signals. But the repair is gradual, accumulating across subsequent campaigns as the cleaner pattern replaces the older signals. One pass does not reset a reputation your sending history has spent months building. The full recovery framework, including timeline estimates by scenario, is in our email sender reputation guide.
- Authentication configuration failures: If your SPF record is misconfigured, your DKIM signature is failing, or your DMARC policy is sitting in none mode with no enforcement, those problems persist regardless of how clean your email database is before each send. A verified list delivered without correct authentication still lands in spam folders or gets rejected outright at the receiving server. These are DNS and protocol configuration issues, not list quality issues. Our email authentication guide covers the setup and troubleshooting for each protocol.
- High complaint rates from valid, deliverable addresses: Complaints come from real, active subscribers who do not want your emails, not from invalid addresses that fail verification. If your complaint rate is already elevated, the problem is with consent quality at the point of acquisition or with content and frequency misalignment against what subscribers expected when they signed up. A verification pass removes the technical dead weight but leaves the complaint-generating segment intact unless the engagement layer has also been addressed through the process in Step 3.
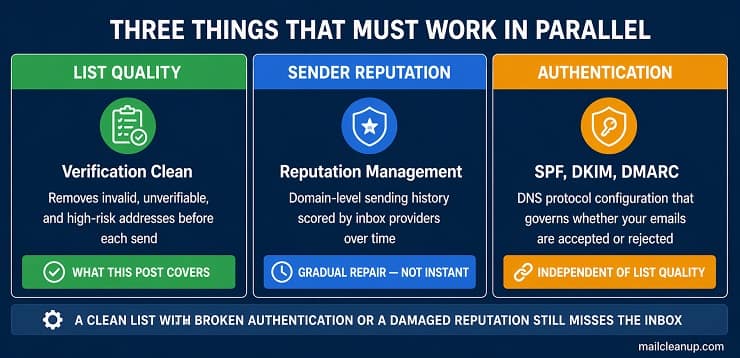
The relationship between these three areas is not a hierarchy with list cleaning at the top. It is a system. A clean email database, correct authentication, and managed sender reputation operate in parallel. Gaps in any one of them limit what the other two can achieve. Understanding this is what distinguishes a sender who runs a one-time clean from one who consistently gets emails delivered.
A Clean Run Is the Start. What Keeps Your List Clean Is the Practice.
Running a full verification pass is the single most effective action you can take for how to clean your email list before a campaign. It removes the addresses that were never going to deliver, resets your baseline metrics, and gives you an accurate picture of the list you are actually working with. That picture is only accurate at the moment the run completes. From the day your verification pass finishes, new addresses are entering your database, existing subscribers are abandoning inboxes, domains are expiring, and the natural process of email list decay continues at roughly 22 to 25 percent per year. The list you just cleaned starts degrading the moment you stop paying attention to it.
Knowing how to clean email lists is not a one-time project. The execution run documented in this guide is a single point in a continuous cycle. Between verification passes, what protects your list is the acquisition discipline that prevents low-quality addresses from entering it, the monitoring cadence that catches threshold breaches before they become deliverability incidents, and the engagement management process that identifies and handles inactive subscribers before they drag down your sender score.
If you are ready to run a clean email list verification pass on your list now, MailCleanup handles the bulk verification at any volume. Upload your CSV, receive a cleaned and categorised result file delivered directly to your inbox. No account required, no third-party dependencies. The process takes minutes to start and your result file is ready before your next send window closes.
FAQs on How To Clean Email Lists
How often should I clean my email list?
For most sending programmes, every three to six months is the right cadence. If your bounce rate crosses 2 percent, or if your list has not been verified in more than six months before a major send, run an unscheduled pass immediately. High-growth lists sending weekly warrant quarterly cleaning as a minimum.
What happens if you never clean your email list?
Bounce rates climb as invalid and abandoned addresses accumulate, and inbox providers treat elevated bounces as a spam signal against your domain. Engagement metrics become distorted, spam trap risk increases as abandoned addresses are recycled by inbox providers, and your sender reputation degrades with every campaign you send to an uncleaned list.
Does cleaning your email list improve open rates?
Yes, by removing addresses that were never going to produce an open from your total send count. Open rate is calculated as a percentage of emails sent, so removing invalid and unverifiable addresses improves your measured rate immediately. Better engagement signals from a cleaner list also improve inbox placement for the subscribers who remain.
How do I clean my email list for free?
Use your ESP’s built-in tools to suppress hard bounces and filter inactive segments at no cost. Most bulk verification tools offer a free tier covering lists under 1,000 addresses. For larger lists, verification typically costs a fraction of a cent per address, and the deliverability protection the run provides justifies the spend.
How long does it take to clean a large email list?
At 10,000 addresses, most tools complete a run in 10 to 30 minutes. At 100,000 addresses, expect one to four hours. At one million addresses, plan for an overnight run. Schedule your verification pass at least 24 hours before any campaign send deadline to ensure the result file is ready in time.
What is the difference between email list cleaning and email list scrubbing?
Email list cleaning removes technically invalid and undeliverable addresses through a bulk verification pass. Email list scrubbing addresses the engagement layer: identifying valid subscribers who no longer open or click and running re-engagement sequences before suppressing non-responders. Cleaning handles email delivery failure. Scrubbing handles engagement failure. Both are needed for a fully maintained list.
Should I remove catch-all email addresses from my list?
Not automatically. If your bounce rate is below 1 percent, test catch-all addresses in a small segment first and suppress any that return a bounce result. If your bounce rate is already above 2 percent, suppress all catch-all addresses until your overall sender health recovers before reintroducing them.
Can I clean my email list without sending any emails?
Yes. Bulk email verification uses SMTP-level connections that simulate a receiving server handshake without delivering any content. No emails reach any inbox, no engagement signals are triggered, and nothing is counted against your sending metrics. Catch-all domains remain partially unresolvable without a real send due to their accept-all server configuration.