If your bounce rate is higher than it should be, you already know something is wrong. What you might not know yet is exactly what to do about it – and in what order.
That’s the gap this guide fills.
Here’s the thing most bounce rate guides miss entirely. How to fix email bounce back isn’t a single answer. It depends on why the bounce is happening in the first place. Apply the wrong fix to the wrong problem and your bounce rate stays exactly where it is – or gets worse. Apply the right fix in the right sequence and you can reduce email bounce rate significantly within a matter of weeks.
This guide is built around two modes. The first is recovery – what to do when your bounce rate is already above threshold and you need to bring it down fast. The second is prevention – the ongoing system that keeps it low so you’re not fighting the same battle three months from now.
Before we get into either mode, a quick note on causes. If you’re not sure why your emails are bouncing, our guide on what causes email bounces breaks down the four root cause categories in full – including how to read your bounce error signals and identify which category you’re dealing with. This guide picks up where that one leaves off. You know what’s causing the problem. Now let’s fix it.
TL;DR – How to Fix Email Bounce Back and Reduce Email Bounce Rate
- Email bounce rates above 2% need attention; above 5% require an immediate sending pause and emergency diagnosis before any further campaigns go out.
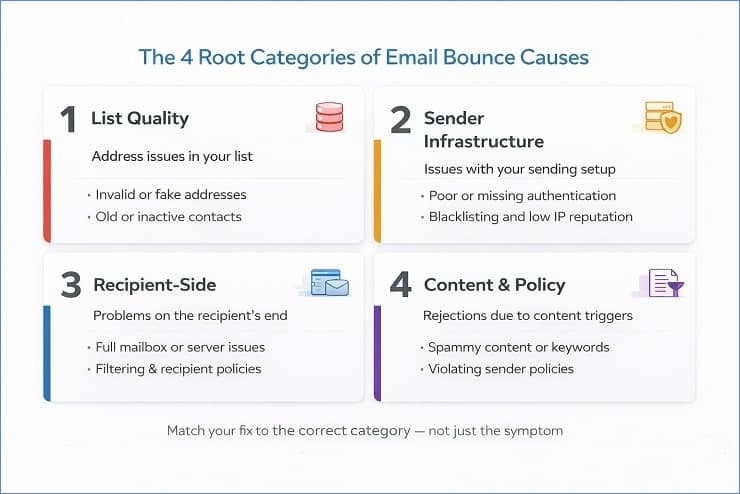
- Most bounce problems fall into four categories – list quality, sender infrastructure, recipient-side failures, and content policy rejections – and matching the fix to the correct category is what determines whether it works.
- The fastest way to reduce email bounce rate is bulk email verification combined with correctly configured sender authentication (SPF, DKIM, and DMARC) – list cleaning alone won’t fix an infrastructure problem.
- A master suppression list sitting above individual ESPs, combined with engagement segmentation for contacts inactive beyond 180 days, prevents bounce problems from recurring after the initial fix.
- Bounce rate typically recovers within one to two campaigns after the right fix is applied; full inbox placement recovery takes two to four weeks of consistent clean sending.
Before You Fix Anything – Diagnose First
Nobody talks about the diagnosis first. And it’s the reason so many senders apply the right fixes in the wrong order – or fix something that isn’t actually the problem.
The truth is, knowing how to reduce email bounce rate correctly starts before you touch your list, your DNS records, or your email content. It starts with understanding exactly what you’re dealing with. So before you do anything else, run through these three diagnostic checks. They take five minutes and they save you from wasting hours fixing the wrong thing.
Check Your Bounce Rate Against the Right Threshold
The first step to reduce email bounce rate effectively is knowing where your current rate sits – because the urgency level determines where you start in the fix sequence. Not every bounce rate problem demands the same response.
Here’s a simple three-zone framework to help you decide:
| Zone | Hard Bounce Rate | What It Means | Where to Start |
|---|---|---|---|
| Monitoring Zone | Below 2% | Healthy – watch for trends | Prevention system |
| Action Zone | 2%–5% | Problem developing – fix proactively | Fixes 1–6 in order |
| Emergency Zone | Above 5% | Crisis – act immediately | Emergency Protocol (next section) |
If you’re unsure what a healthy benchmark looks like for your industry or sending volume, our acceptable email bounce rate guide covers the full breakdown. We won’t repeat those numbers here. But knowing where you sit relative to the threshold is the essential first step before anything else.
One important distinction: the zone thresholds above apply to your hard bounce rate specifically. Soft bounce rates are tracked and managed differently. If your total bounce rate is elevated but the majority are soft bounces, your starting point and urgency level will differ. Always separate hard and soft bounce counts before you decide how to act. And, if you don’t know the difference between soft bounce and hard bounce, feel free to check out this guide.
Identify the Dominant Bounce Category in Your Data
The most common reason efforts to reduce email bounce rate fail is applying the wrong fix to the wrong problem. A list quality problem and an infrastructure problem can look almost identical in a campaign report – both show up as elevated bounce rates, both produce 5xx errors – but they require completely different responses.
So the second diagnostic step is identifying which bounce category is dominating your data. Go into your ESP’s bounce report and look at the SMTP error codes and reason strings on your recent failures. Then group what you’re seeing:
- Category 1 – List Quality: Codes like 550 5.1.1, reason strings like “user unknown” or “mailbox not found.” The addresses themselves are the problem.
- Category 2 – Infrastructure: Codes like 550 5.7.26 or 550 5.7.1, reason strings like “DMARC policy violation”, “unauthenticated”, or “blacklisted.” Your sending setup is the problem.
- Category 3 – Recipient Side: Codes like 452 4.2.2 or 421 4.7.0, reason strings like “mailbox full” or “rate limit exceeded.” Temporary conditions outside your control.
- Category 4 – Content and Policy: Codes like 550 5.7.1 or 552 5.3.4, reason strings like “content policy” or “message size exceeded.” What’s inside the email is the problem.
Look at your bounce data and ask: which of these four patterns makes up the majority of your failures? If 70% of your bounces are Category 1, you start with Fix 1. If they’re primarily Category 2, you go straight to Fix 2. The dominant category tells you exactly where to direct your effort first – and that focus is what makes the difference between a fix that moves the number and one that doesn’t.
For the full diagnostic walkthrough – including how to find raw SMTP data in your ESP and a complete signal pattern reference – see our what causes email bounces guide. That post covers everything you need to correctly read your bounce error signals before you start applying fixes. Additionally, there’s a separate post that teaches you about why emails are not delivered in detail.
Separate the Emergency From the Ongoing
The third diagnostic step is about timing – and it’s just as important as the other two when it comes to how to reduce email bounce rate effectively. Because the right starting point depends not just on what kind of bounce problem you have, but on how it developed.
A spike is a single campaign that came back with a bounce rate significantly higher than your previous sends. This usually points to a specific, contained cause: a bad list import, a segment that hadn’t been mailed in months, a sudden blacklisting, or an authentication failure that broke on a particular campaign. Spikes need emergency response. Jump straight to the Emergency Protocol in the next section.
A trend is a bounce rate that has been rising gradually across multiple campaigns over weeks or months. This points to a systemic issue – list decay, a weak acquisition source, a suppression gap, or a slow-building infrastructure problem. Trends don’t need emergency action, but they do need the full fix sequence applied methodically. Work through Fixes 1 to 6 in order.
Knowing which situation you’re in saves you from two equally common mistakes. The first is overreacting to a contained spike by overhauling systems that were working fine. The second is underreacting to a gradual trend by treating it as a one-off problem when it needs a structural fix.
It’s also worth noting that a rising trend almost always has early warning signs in other metrics before the bounce rate itself becomes alarming. Declining open rates, drifting inbox placement, creeping spam complaint rates – these typically appear weeks before the bounce rate spikes visibly. The monitoring system mentioned later in the blog post is specifically designed to catch these signals early so you can act before a trend becomes a crisis.
The Emergency Protocol – What to Do When Bounce Rate Spikes Above 5%
Most guides jump straight into tips. But if your bounce rate has spiked above 5% on a recent campaign, tips aren’t what you need right now. You need a clear, ordered sequence of actions – and you need to move through them before sending anything else.
This section is specifically for senders in the Emergency Zone. If you’re in the Action Zone (2%–5%), skip ahead to Fix 1. Come back to this section if you ever need it.
The good news is that knowing how to fix email bounce back when it spikes is very manageable once you follow the right sequence. The damage is almost always containable – provided you stop sending first and diagnose second. Most senders do it the other way around, which is what turns a contained crisis into a lasting reputation problem.

Step 1 – Pause Sending Immediately
The single most important step to reduce email bounce rate after a spike is also the one most senders resist. Stop sending.
It feels counterintuitive. You have campaigns scheduled. Deadlines exist. Revenue depends on getting emails out. But every send you push out while your bounce rate is elevated adds another layer of reputation damage on top of what’s already happened. ISPs are already watching you more closely. Sending more before you’ve identified the problem compounds that scrutiny in ways that take weeks to recover from.
Pause all active campaigns. Pause any scheduled sends. Set a clear internal review window – 24 to 48 hours is usually enough to run through the remaining steps and identify the cause. The short pause is worth it. The alternative is digging a deeper hole with every send.
Step 2 – Isolate the Campaign and the Segment
Once sending is paused, the next step to reduce email bounce rate from a spike is finding exactly where the spike came from. Not all of your contacts caused the problem – a specific segment, import, or list source almost certainly did.
Go into your bounce report for the affected campaign and look for patterns:
- Was this a new list import? Newly imported contacts bouncing at a high rate almost always points to a list quality problem – invalid addresses, a poor acquisition source, or a list that wasn’t verified before import.
- Was this a previously unmailed segment? Contacts who haven’t been emailed in six months or more accumulate address decay. Addresses that were valid when collected may have since been deactivated.
- Was the bounce rate consistent across all segments, or concentrated in one? If the rate is uniform across your entire list, that points to a Category 2 infrastructure problem rather than a list quality problem. If it’s concentrated in one segment, the segment is the source.
This step tells you whether you’re dealing with a contained problem – a specific segment that needs to be cleaned – or a systemic one that affects your entire sending infrastructure. That distinction determines your next move.
Step 3 – Check Infrastructure Before Touching the List
This is the step most senders skip – and it’s the most important one. Before you touch a single contact on your list, verify that the spike wasn’t caused by a Category 2 infrastructure problem.
Here’s why this matters. If your bounce spike was caused by an authentication failure or a blacklisting, cleaning your list will do absolutely nothing. The same addresses will bounce again on your next send because the problem isn’t the list – it’s your sending setup. Fixing email bounce back caused by infrastructure issues requires infrastructure action first.
Check three things quickly:
- Authentication status: Log into your DNS provider and confirm your SPF, DKIM, and DMARC records are intact and correctly configured. Sometimes DNS records get accidentally overwritten during a domain update or migration without anyone noticing.
- Blacklist status: Run your sending domain and IP through MXToolbox’s blacklist checker. This takes about 60 seconds and checks against the major blacklist databases simultaneously. If you’re listed, that’s your cause.
- ESP sending status: Check your ESP’s sending logs for any platform-level alerts, IP reputation warnings, or authentication errors around the time of the affected campaign.
If you find a Category 2 problem, fix that first before doing anything else. For the full blacklist removal process, see our guide on removing your domain from blacklisting. Once the infrastructure problem is resolved, continue through the remaining steps.
Step 4 – Run Emergency Verification on the Affected Segment
With infrastructure cleared, now it’s time to look at the list itself. This is where you can genuinely fix email bounce back problems caused by list quality – and do it quickly.
Export the affected segment – the specific contacts that bounced, plus any other contacts from the same source or import batch. Run that segment through bulk email verification before sending to any of them again.
Bulk verification checks each address against syntax validation, DNS and domain checks, and SMTP-level mailbox confirmation without sending an actual email. The output tells you which addresses are valid and safe to send to, which are invalid and should be suppressed immediately, which are risky or disposable and should be treated with caution, and which are catch-all addresses that need careful handling.
This single step is the fastest way to reduce email bounce rate on the affected segment. You’re not guessing which addresses caused the spike – you’re getting a verified risk score for every address in the batch and making suppression decisions based on data rather than instinct.
MailCleanup is built specifically for this kind of bulk verification task. Upload the affected segment, run it through the verification process, and get a clean, risk-scored output that tells you exactly which addresses to suppress before your next send – typically within minutes for smaller lists, a few hours for larger ones.
Step 5 – Resume at Reduced Volume to Your Best Segment
Once the affected segment has been cleaned and suppressed addresses removed, don’t go straight back to full-volume sending. Resume cautiously.
Start by sending to your most engaged segment – contacts who have opened or clicked within the last 60 to 90 days. Keep the initial post-recovery send volume at 20% to 30% of your normal campaign size. Monitor the bounce rate on that smaller send closely before scaling back up.
Why? Because ISPs are watching your behaviour after a bounce spike. A clean, well-engaged send at reduced volume tells them your sending quality has improved. It starts rebuilding the trust signal that the spike damaged. Jumping straight back to full volume, even with a cleaned list, can look like the same problematic behaviour continuing – and some ISPs will respond accordingly.
Scale back up gradually over the following two to three campaigns, increasing volume by 30% to 50% each time as long as the bounce rate stays in the Monitoring Zone. This graduated recovery is how to reduce email bounce rate back to healthy levels without triggering additional scrutiny from ISPs in the process.
Fix 1 – Clean and Verify Your List
For most senders, list quality is the dominant bounce cause. So this is where the fix sequence starts – and it’s where the biggest, fastest improvements to reduce email bounce rate usually come from.
But before we get into the how, there’s an important distinction to make that almost nobody explains clearly. Suppression and verification are not the same thing. Treating them as interchangeable is one of the most common list management mistakes we see – and it’s one that keeps bounce rates higher than they need to be.
The Difference Between Suppression and Verification
Both suppression and verification are essential tools to reduce email bounce rate. But they solve different problems at different points in the process.
Suppression is reactive. It takes addresses that have already bounced, already complained, or already unsubscribed – and prevents your ESP from sending to them again. Suppression deals with known bad addresses. It’s backwards-looking.
Verification is proactive. It checks addresses before they produce a bounce – identifying invalid, risky, disposable, and role-based addresses that haven’t failed yet but will. Verification deals with unknown bad addresses. It’s forward-looking.
Here’s the practical implication. Your ESP’s automatic suppression handles addresses that have already bounced. But it does nothing about the addresses in your list that haven’t been mailed yet and are quietly invalid. Those addresses will produce bounces on your next campaign – and the one after that – until verification surfaces and removes them.
To genuinely reduce bounce rate, you need both working together. Suppression cleans up what’s already happened. Verification prevents what hasn’t happened yet.
How to Run a Full List Verification
Running a full list verification is one of the most impactful single actions you can take to reduce email bounce rate quickly. Here’s how to approach it systematically:
Step 1 – Export your full active list Export every contact that isn’t already on your suppression list. Include contacts from all sources – organic signups, imports, CRM syncs, API integrations. The goal is a complete picture of every address you’re currently capable of sending to.
Step 2 – Upload to a bulk verification tool Run the exported list through bulk email verification. MailCleanup processes lists of any size and checks each address across multiple validation layers – syntax, domain and DNS validity, mailbox existence, disposable address detection, and role-based address identification.
Step 3 – Understand the output categories A verification result doesn’t just tell you valid or invalid. It gives you a risk profile for each address:
| Result Category | What It Means | Recommended Action |
|---|---|---|
| Valid | Address exists and is deliverable | Safe to send |
| Invalid | Address does not exist | Suppress immediately |
| Risky | Address exists but has deliverability risk factors | Suppress or send with caution |
| Disposable | Temporary address – will expire or has expired | Suppress |
| Role-based | Shared inbox (info@, admin@, support@) | Suppress from bulk sends |
| Catch-all | Domain accepts all mail – individual existence unconfirmed | Handle separately (see below) |
Step 4 – Make suppression decisions and update your list Suppress invalid, disposable, and role-based addresses immediately. For risky addresses, use judgment based on engagement history – a risky address with strong historical engagement may be worth retaining in a low-frequency segment. For catch-all addresses, see the dedicated section below.
Here’s a list of the best email verification and email list cleaning services.
The Verification Cadence – How Often Is Enough?
Running a one-time verification is a good start. But to reduce email bounce rate consistently over time, verification needs to become a recurring process rather than a one-off fix. The right cadence depends on your list type, acquisition pace, and audience profile.
Use this as your reference:
| List Type | Recommended Verification Frequency |
|---|---|
| Active B2C list, organic acquisition | Every 6 months |
| Active B2B list, any acquisition | Every 3 months |
| High-volume B2C, mixed acquisition sources | Every 3 months |
| Any list with recent third-party imports | Before next send – without exception |
| Any list inactive or unmailed for 6+ months | Before reactivation send |
| Post-spike recovery | Immediately on affected segment, then resume normal cadence |
B2B lists need more frequent verification than B2C because corporate email addresses are tied to employment. As we covered in the causes guide, B2B lists can lose 15% to 25% of valid addresses every year purely through job changes. A verification cadence that would be fine for a consumer list will leave a B2B list significantly degraded within six months.
Catch-All Domains – The Hidden Bounce Risk
Catch-all domains deserve their own section because they represent one of the most commonly misunderstood list quality risks – and because standard verification can’t fully resolve them.
A catch-all domain is configured to accept all inbound email, regardless of whether the specific address exists at that domain. So when a verification tool checks [email protected] against a catch-all domain, the server says “yes, accepted” – even if john.smith doesn’t actually have a mailbox there. The address looks valid in your verification results. But when you send, it may bounce.
This is particularly common in B2B lists where contacts have corporate domains. It creates a situation where you can reduce email bounce rate through verification on most of your list but still carry a meaningful bounce risk from catch-all addresses that passed the check.
Here’s how to handle them:
- Option 1 – Conservative suppression: Remove all catch-all addresses from your main sending list and move them to a separate low-frequency segment. This is the safest approach if your bounce rate is already elevated.
- Option 2 – Test send at low volume: Send to a small sample of catch-all addresses from a low-risk campaign and use the actual delivery results to identify which ones bounce. Suppress the failures, retain the successes.
- Option 3 – Prioritise by engagement history: If a catch-all address has historical opens and clicks in your ESP, the mailbox is likely real – keep sending. If it has no engagement history at all, treat it as high risk and suppress.
Fix 2 – Repair Your Sender Infrastructure
Fix 1 addresses list quality problems. But if your bounce data points primarily to Category 2 – authentication failures, blacklistings, or reputation-based rejections – then no amount of list cleaning will reduce email bounce rate for you. The fix lives in your sending infrastructure, not your contact database.
This section gives you a practical, actionable checklist rather than an authentication deep-dive. If you want the full technical detail on SPF, DKIM, and DMARC setup, we’ll be covering that in a dedicated guide. For now, here’s what to check and how to check it.
The Authentication Audit Checklist
A clean authentication setup is foundational to reduce email bounce rate caused by Category 2 failures. Work through each of these checks in order:
SPF Record
- ✅ An SPF record is published for your sending domain
- ✅ The record includes the sending IP addresses or includes for every ESP and sending service you currently use
- ✅ The record has fewer than 10 DNS lookups – use an SPF record checker (MXToolbox works well) to confirm
- ✅ The record ends with ~all (softfail) or -all (hardfail) – not +all which authorises everyone
DKIM
- ✅ A DKIM key is published in your DNS for every ESP you send from
- ✅ The key matches what your ESP is currently signing with – log in to your ESP and check the DKIM selector and key details
- ✅ No recent DNS changes have accidentally removed or overwritten the record
DMARC
- ✅ A DMARC record is published for your sending domain
- ✅ The policy is set to at least p=quarantine – p=none provides no protection and p=none senders are increasingly treated with suspicion by major ISPs
- ✅ Alignment mode is set correctly (relaxed alignment is fine for most senders)
- ✅ A reporting email address (rua=) is included so you receive DMARC reports
MX Records
- ✅ Your domain’s MX records are correctly configured and pointing to the right mail server
- ✅ Use MXToolbox’s MX lookup to confirm – broken MX records affect your ability to receive bounce notifications, not just to send
Reverse DNS (PTR Record)
- ✅ Your sending IP has a matching PTR record – this is particularly important for dedicated IP senders
If you find any failures in this checklist, fix them before your next campaign. Authentication misconfigurations are one of the most straightforward fixes to reduce email bounce rate – the fix is typically a DNS record update that takes minutes to implement, with results visible within 24 to 48 hours once DNS propagates.
How to Check Your Blacklist Status
Blacklisting is one of the fastest-acting causes of a high bounce rate – and one of the most overlooked. To reduce email bounce rate caused by blacklisting, you first need to know if you’re listed.
Run your sending domain and sending IP through these tools:
- MXToolbox Blacklist Check – checks against 100+ blacklists simultaneously and is the fastest starting point
- Spamhaus – the most impactful blacklist; a Spamhaus listing affects deliverability across a large proportion of receiving servers globally
- Google Postmaster Tools – shows your domain reputation with Gmail specifically, including spam rate and delivery error trends
- Microsoft SNDS (Smart Network Data Services) – shows your IP reputation with Outlook and Hotmail
If you find a listing, don’t submit a delisting request immediately. First, identify the reason – most blacklists publish the cause of the listing alongside the entry. Fix the underlying behaviour (high complaint rate, spam trap hits, authentication failure) before requesting removal. Submitting a delisting request without fixing the cause results in re-listing, often with a longer review period the second time around.
When to Consider a Dedicated IP
Most senders use shared IP pools – your sending IP is shared with other customers of the same ESP, and your reputation is partially influenced by their behaviour. For most senders at moderate volume, this is fine. But at higher volumes, a dedicated IP gives you full control over your sending reputation – which can be a significant lever to reduce email bounce rate caused by shared IP reputation problems.
Here’s how to think about the decision:
| Situation | Recommendation |
|---|---|
| Sending fewer than 50,000 emails per month | Stay on shared IP – not enough volume to build dedicated reputation |
| Sending 50,000–100,000 per month with consistent schedule | Dedicated IP worth considering |
| Sending 100,000+ per month | Dedicated IP strongly recommended |
| Shared IP bounce rate high but your list is clean | Investigate shared IP reputation before switching |
| Recently blacklisted on shared IP | Dedicated IP won’t help until the cause is fixed |
One critical point: moving to a dedicated IP doesn’t instantly improve your situation. A new dedicated IP has no reputation history – which means you need to warm it up gradually, exactly like a new sending domain. Jumping to full volume immediately on a fresh dedicated IP will produce the same throttling and deferral problems as any new sending identity. The warm-up process typically takes four to eight weeks before you can send at full volume reliably. The complete process of email, domain & IP warm-up is covered in a dedicated guide.
Fix 3 – Tighten Your List Acquisition
Fixes 1 and 2 address the current state of your list and infrastructure. Fix 3 addresses the source of the problem – where the bad addresses are coming from in the first place. This is the fix that prevents you from needing to run Fix 1 again in six months.
To genuinely reduce email bounce rate on an ongoing basis, you need to close the acquisition gaps that keep feeding invalid or low-quality addresses into your database. Most senders never look here. They clean the list reactively, then watch the same problems reappear campaign after campaign without understanding why.
Audit Your Acquisition Sources by Bounce Rate
The first step to reduce email bounce rate at the source is finding out which acquisition channels are producing your bouncing contacts. This is one of the most actionable and most neglected fixes available – and it costs nothing but a bit of time in your data.
Here’s how to do it:
Step 1 – Tag your contacts by source If your contacts aren’t already tagged by acquisition source in your ESP or CRM, start now for all new contacts. Common source tags include: organic signup form, paid campaign lead, content download, webinar registration, third-party import, trade show, API integration, referral.
Step 2 – Segment your bounce data by source Filter your recent bounce data by acquisition source. Which source has the highest bounce rate? Which produces the cleanest addresses?
Step 3 – Act on what you find The action depends on what the data shows:
| Finding | What It Means | Action |
|---|---|---|
| One source has 3x+ higher bounce rate than others | That source has a data quality problem | Fix verification at that source or eliminate it |
| Third-party import bouncing at high rate | List was purchased, scraped, or poorly maintained | Stop using that source immediately |
| Organic signup form has elevated bounce rate | No validation at capture – typos entering freely | Add real-time verification to the form |
| All sources have similar bounce rates | Systemic issue – list hasn’t been verified in a long time | Run full list verification (Fix 1) |
This audit is how you reduce email bounce back at the root rather than just treating the symptoms. It’s the difference between fixing your list once and fixing it permanently.
Implement Double Opt-In Strategically
Double opt-in is one of the most reliable ways to reduce email bounce rate at the point of acquisition – but it comes with a trade-off that’s worth understanding clearly before implementing it.
Here’s how it works: when someone submits their email address, instead of adding them to your list immediately, you send a confirmation email. They only get added to your active list when they click the confirmation link. This process does two things. It confirms that the email address is real and accessible by that person. And it filters out typos, fake addresses, and disposable emails that can’t receive or won’t engage with the confirmation.
The trade-off is list size. Double opt-in typically reduces your signup conversion rate by 20% to 30% compared to single opt-in. Some of those unconfirmed contacts were legitimate people who just didn’t bother clicking the confirmation. So you’re accepting a smaller list in exchange for a cleaner one.
For most senders dealing with a bounce rate problem, that trade is absolutely worth making. A smaller list with a 0.5% bounce rate outperforms a larger list with a 4% bounce rate on every metric that matters – inbox placement, engagement rate, sender reputation, and ultimately revenue.
The strategic implementation point: if you can’t or won’t implement double opt-in site-wide, at minimum apply it to your highest-bounce acquisition sources identified in the audit above. Targeted double opt-in where it matters most gives you most of the benefit at a fraction of the conversion cost.
Real-Time Verification at Capture
Double opt-in confirms that a person can access the address they provided. Real-time verification confirms that the address itself is technically valid – catching typos, disposable addresses, and structurally invalid formats before they enter your database at all.
The two approaches are complementary. Double opt-in is a behavioural filter. Real-time verification is a technical filter. Together, they reduce email bounce back at the capture point more effectively than either one alone.
Real-time verification works through an API integration with your signup forms, landing pages, checkout flows, or any other capture point. When someone types an email address, the verification runs in the background – typically in under a second – and either accepts the address, flags it as risky, or rejects it with a prompt asking the user to check what they typed.
The user experience impact is minimal when implemented well. A gentle “please check your email address” prompt on a typo is not friction – it’s helpful. What it prevents is years of that typo-ed address sitting in your list producing bounces every campaign.
Fix 4 – Build Your Suppression List Architecture
This fix is one of the most operationally important things a high-volume sender can do to reduce email bounce rate on a sustained basis.
The problem it solves is this: most senders rely entirely on their ESP’s suppression list to keep bounced and unsubscribed addresses out of future campaigns. And for a sender using a single ESP consistently, that works reasonably well. But the moment you add a second sending tool, migrate to a new ESP, sync contacts from a CRM, or import a list from an external source – your ESP’s suppression list becomes incomplete. Addresses that were correctly suppressed in one place re-enter your active list through another. And they bounce again.
To reduce email bounce rate reliably across a multi-tool sending environment, you need a suppression architecture that lives above the individual ESP level.
Why ESP-Level Suppression Isn’t Enough
Your ESP’s suppression list is tied to that specific platform. It suppresses addresses from sends that originate within that ESP. But it doesn’t know about bounces from your transactional email tool. It doesn’t know about unsubscribes processed through your CRM. It doesn’t automatically carry over when you switch platforms. And it doesn’t get checked when someone imports a CSV of contacts from a trade show or a third-party database.
Every one of these gaps is a way that suppressed addresses re-enter your sending pipeline. And every time they do, they either bounce again – adding another failure to your reputation history – or trigger a spam complaint from someone who already unsubscribed.
This is an extremely common operational failure mode in growing teams. It’s not a malicious oversight – it just happens when sending infrastructure scales faster than the processes that govern it. But the fix is straightforward once you understand the problem.
Building a Master Suppression List
A master suppression list is a single, platform-agnostic record of every address that should never be sent to again – regardless of which tool, platform, or campaign is doing the sending.
Here’s what belongs on it:
- Every hard-bounced address – permanent failures only, not soft bounces
- Every spam complaint – anyone who has marked your email as spam
- Every manual unsubscribe – across every platform and tool, not just one
- Every address flagged as invalid by verification – addresses that verified as invalid before ever being sent to
- Every address you’ve chosen to suppress for quality reasons – role-based addresses, known catch-all failures, deliberate fakes
And here’s how to maintain it operationally:
Storage: Keep the master suppression list in a neutral location that isn’t tied to any single ESP – a dedicated spreadsheet, a database table, or a list management tool. The key requirement is that it’s accessible and updatable from every tool in your sending stack.
Update triggers: The list should be updated automatically (via webhook or API) whenever a hard bounce, complaint, or unsubscribe occurs in any sending tool. For teams without API capabilities, a manual weekly update is the minimum acceptable cadence.
Application: Before every list import – regardless of source – the imported contacts are checked against the master suppression list and any matches are removed before the import goes live. This is the step that prevents suppressed addresses from re-entering your active list.
Suppression List Maintenance Cadence
Building the master suppression list is a one-time setup. Maintaining it is an ongoing process – and the cadence matters if you want to reduce email bounce rate consistently over time.
Here’s the minimum maintenance schedule:
| Action | Frequency |
|---|---|
| Add new hard bounces and complaints | After every campaign – automated if possible |
| Add new unsubscribes | Real-time or daily sync from all sending tools |
| Check new imports against suppression list | Before every import – no exceptions |
| Audit suppression list for completeness | Quarterly – check that all sending tools are feeding into it |
| Check for suppression gaps after platform migration | Immediately post-migration – before first send on new platform |
The quarterly audit is particularly important for growing teams. As new sending tools get added, new integration gaps open up. A quarterly check that every sending tool is correctly syncing to the master suppression list catches these gaps before they produce bounce problems.
Fix 5 – Use Engagement Segmentation to Reduce Email Bounce Rate
Most senders think of engagement segmentation as a way to improve open rates. And it does do that. But framed correctly, it’s also one of the most effective and underused strategies to reduce email bounce rate – especially the kind of gradual bounce rate increase that creeps up over months without an obvious single cause.
Here’s the connection that most guides miss entirely. Inactive contacts don’t stay inactive forever. They go through a lifecycle. First they stop opening. Then their mailbox starts filling up and producing soft bounces. Then the account gets abandoned or deactivated – and every send to that address produces a hard bounce. The longer you keep sending to inactive contacts without intervention, the further along that lifecycle they progress. And every stage of that progression adds bounce risk to your list.
Engagement segmentation breaks that cycle before it reaches the hard bounce stage. By identifying contacts who are heading toward inactivity and either re-engaging them or suppressing them proactively, you reduce email bounce rate before the bounce even happens. That’s the framing shift that makes this fix genuinely powerful.
How Inactive Contacts Cause Soft Bounce Accumulation
To understand why engagement segmentation helps to reduce email bounce rate, it helps to understand the inactivity-to-bounce progression in detail. It’s more gradual than most senders realise – and more damaging.
Here’s how the typical lifecycle plays out:
| Stage | What’s Happening | Bounce Signal |
|---|---|---|
| Active | Contact opens, clicks, engages | No bounce |
| Disengaging | Opens declining, no clicks | No bounce yet – but engagement metrics deteriorating |
| Inactive | No opens or clicks for 180+ days | Occasional soft bounces beginning – full mailbox, server throttling |
| Abandoned | Account no longer checked | Frequent soft bounces – mailbox consistently full |
| Deactivated | Account shut down by provider or employer | Hard bounce – permanent failure |
The transition from inactive to abandoned to deactivated typically takes six to eighteen months depending on the email provider. Consumer accounts on Gmail or Outlook tend to stay accessible longer. Corporate accounts get deactivated faster – often within 30 to 90 days of employment ending.
What this means practically is that every contact who stopped engaging with you six to twelve months ago is a potential bounce waiting to happen. They may not be bouncing yet. But they’re progressing through the lifecycle every week you keep sending to them. Sending to disengaging and inactive contacts doesn’t just hurt your engagement metrics – it actively adds to your bounce risk over time.
This is why engagement segmentation is a proactive strategy to reduce email bounce rate, not just a reactive one.
The Engagement Segmentation Framework
The practical way to reduce email bounce rate through engagement segmentation is to build a simple tiered model based on recency of engagement – and apply a different sending strategy to each tier.
Here’s a framework you can implement in any ESP that tracks opens and clicks:
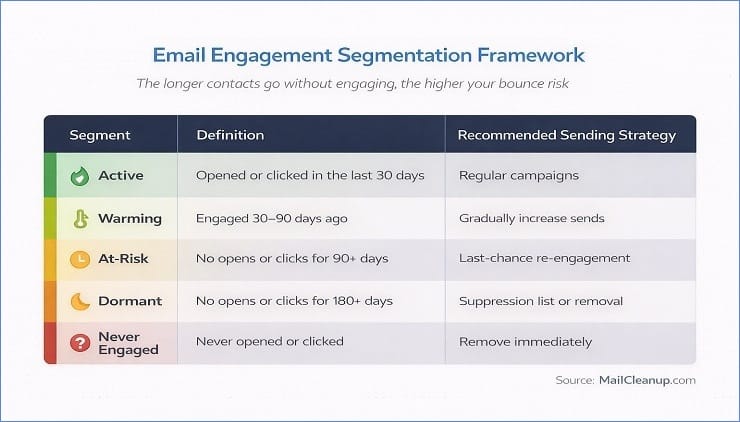
| Segment | Definition | Recommended Sending Strategy |
|---|---|---|
| Active | Opened or clicked in last 90 days | Send all campaigns – full frequency |
| Warming | Last engaged 90–180 days ago | Send all campaigns – monitor soft bounce rate |
| At-Risk | Last engaged 180–365 days ago | Re-engagement sequence only – no regular campaigns |
| Dormant | No engagement in 365+ days | Verify before sending – suppress if invalid |
| Never Engaged | No open or click since acquisition | Verify immediately – suppress invalid, re-engagement for valid |
The key discipline here is withholding regular campaign sends from the At-Risk and Dormant segments. This feels uncomfortable because it means sending to a smaller list. But the addresses you’re withholding from are either heading toward bounce territory or already there. Sending to them adds bounce risk without adding meaningful campaign performance.
Furthermore, improving bounce rate through this segmentation model has a compounding positive effect. As you remove low-engagement contacts from your regular sends, your engagement rate improves. Higher engagement rates signal to ISPs that your list is healthy and your sending is wanted – which improves inbox placement, which reinforces the positive cycle.
The Re-Engagement Sequence Before Suppression
Absolutely no one tells you what happens between “contact has gone inactive” and “contact gets suppressed.” Most guides say remove inactive contacts. What they skip is the important step in between – the re-engagement attempt.
Suppressing an inactive contact without attempting re-engagement means permanently losing someone who may still be a potential customer. Some of those contacts are valid, deliverable addresses belonging to real people who just haven’t opened recently. Maybe your subject lines haven’t been compelling. Maybe their inbox habits changed. Maybe life got busy. A well-executed re-engagement sequence recovers a meaningful percentage of these contacts before they need to be suppressed.
Here’s the correct sequence to reduce email bounce back from inactive segments:
Step 1 – Identify the re-engagement candidate segment Pull all contacts who fall into the At-Risk tier – last engaged 180 to 365 days ago. This is your re-engagement audience.
Step 2 – Send a single re-engagement email One email. Not a sequence of five. One clear, honest message that acknowledges the silence and gives the contact a simple reason to re-engage. Something like: “We haven’t heard from you in a while – are you still interested in [value proposition]? Click here to stay subscribed.” Keep it simple. The goal is a binary response – engage or don’t.
Step 3 – Segment the responses Contacts who open or click: move back to the Warming segment and resume normal sends. Contacts who don’t respond within seven to fourteen days: move to suppression.
Step 4 – Verify before suppressing Dormant contacts For the Dormant segment – no engagement in 365+ days – run the addresses through verification before the suppression decision. Some of these addresses will have already become invalid. Verification identifies those separately, which keeps your suppression data clean and your bounce cause analysis accurate.
This sequence lets you reduce email bounce rate proactively while preserving every recoverable contact. It’s a more precise approach than bulk removal – and it produces a list that’s both cleaner and more engaged.
Fix 6 – Review and Clean Your Email Content
Fix 6 is the shortest fix section because content-related bounces are the most straightforward to diagnose and correct. That said, they’re worth addressing clearly – because they’re also the most confusing bounce category for senders who can’t figure out why their list is clean and their authentication is correct but they’re still seeing failures.
The root of every content-triggered bounce is the same: something inside the email caused the receiving server to reject it on policy or content grounds. The address is valid. Your infrastructure is fine. It’s the message itself that’s the problem. Fixing email bounce back caused by content means changing what’s inside the email – not the list, not the DNS records.
Here’s how to approach it systematically to reduce email bounce rate from Category 4 failures.
Pre-Send Content Testing
The most effective way to reduce email bounce rate from content triggers is to catch content issues before the campaign goes out – not after. Pre-send content testing tools evaluate your email against spam filter criteria and content policies before a single send happens.
Tools worth using:
- Mail-Tester (mail-tester.com) – Free. Send a test email to a unique address it generates and get a spam score out of 10 with specific issue flags. Good for quick checks.
- GlockApps – Paid. Tests inbox placement across Gmail, Outlook, Yahoo, and others simultaneously. Shows you where the email lands (inbox, spam, missing) for each provider before you send.
- Litmus – Paid. Combines spam testing with rendering previews across 90+ email clients. Useful for teams sending HTML-heavy campaigns.
What to look for in the results:
- Spam score above 5 (on a 10-point scale) – investigate the flagged items before sending
- Authentication failures showing in the test results – fix in Fix 2 before addressing content
- Specific content flags – address these one by one using the checklist below
The HTML Content Audit
Beyond spam scoring, a direct HTML audit of your email template is one of the most reliable ways to fix email bounce back issues caused by content policy rejections. These are the specific things to check:
Structure and formatting:
- ✅ No hidden text (white text on white background, font-size: 0, display: none)
- ✅ No misleading link structures – display text and actual URL destination should match
- ✅ No broken HTML tags – run your template through an HTML validator
- ✅ Plain-text alternative version included alongside the HTML version
- ✅ Image-to-text ratio balanced – at minimum one paragraph of text for every image
Links:
- ✅ No third-party URL shorteners (bit.ly, tinyurl, etc.) – these are associated with spam and phishing
- ✅ No redirect chains of more than one hop – direct links to your own domain are always preferable
- ✅ Total number of links reasonable – more than 10 links in a single email raises filter flags for some providers
Subject line and preview text:
- ✅ No excessive capitalisation – “ACT NOW” or “FREE OFFER” in all-caps triggers filters
- ✅ No excessive punctuation – multiple exclamation marks in the subject line is a common trigger
- ✅ No misleading subject lines – subject must accurately reflect email content
Language patterns:
- ✅ Avoid high-frequency spam trigger phrases: “guaranteed”, “act now”, “limited time offer”, “you’ve been selected”, “no obligation”
- ✅ Moderate use of promotional language overall – one or two promotional phrases in context is fine; a subject and body both loaded with them is not
Size and Attachment Management
Message size limits are one of the most overlooked causes of content-triggered bounces – particularly in B2C campaigns with visually rich templates. To reduce email bounce rate from size-related rejections, keep these limits in mind at the template level:
| Provider | Maximum Incoming Message Size |
|---|---|
| Gmail | 25 MB |
| Yahoo Mail | 25 MB |
| Outlook / Exchange | 20 MB (often lower in corporate environments) |
| Apple iCloud Mail | 20 MB |
In practice, the total message size limit most email marketers should work within is significantly lower than these provider caps. A well-optimised HTML email should come in under 100KB of HTML code. Total message size including images should stay well under 1MB for reliable deliverability across all environments.
The practical rules:
- Compress images before embedding – use a tool like TinyPNG or Squoosh to reduce file size without visible quality loss
- Host images externally where possible – reference images from your CDN or website rather than embedding them directly in the email
- Never attach files directly to marketing campaigns – host PDFs, presentations, and documents on your website and link to them
- Check total message size in your ESP before sending – most platforms display the compiled message size in the preview or test send view
Your Ongoing Bounce Rate Monitoring System
Everything we’ve covered so far is about fixing a problem that already exists. This section is about making sure the problem doesn’t come back.
The senders who consistently reduce email bounce rate over the long term aren’t necessarily the ones with the cleanest lists or the most sophisticated infrastructure. They’re the ones who catch problems early – before a soft bounce trend becomes a hard bounce spike, before a blacklisting goes unnoticed for weeks, before an authentication record gets accidentally overwritten and nobody realises for three campaigns.
That kind of early detection comes from a monitoring system. Not a complicated one. Just a consistent process for watching the right numbers at the right frequency and knowing what action each threshold triggers. Without this system, improving bounce rate is something you do reactively every few months. With it, it becomes something that runs continuously in the background with minimal effort.
The Metrics to Watch Alongside Bounce Rate
The most important insight for improving bounce rate monitoring is that bounce rate itself is a lagging indicator. By the time your bounce rate is visibly elevated, something has been wrong for a while. The metrics below are leading indicators – they signal a developing bounce problem before it shows up in the bounce rate number itself.
Track all of these alongside your hard bounce rate:
| Metric | What It Signals | Warning Threshold |
|---|---|---|
| Hard bounce rate per campaign | List quality and acquisition source health | Above 0.5% per campaign |
| Spam complaint rate | Content problems and list quality issues | Above 0.1% |
| Inbox placement rate | ISP trust level – are you reaching the inbox? | Below 85% |
| Open rate trend | Engagement decay and inactive contact accumulation | Declining across 3+ consecutive campaigns |
| Soft bounce recurrence | Accounts transitioning toward inactive or invalid | Same address soft bouncing 3+ times |
| Domain reputation score | Overall sending health with major ISPs | Any downward movement in Google Postmaster Tools |
The relationship between these metrics matters as much as the individual numbers. A declining open rate trend combined with a rising soft bounce recurrence rate is a strong early signal that your list has an inactivity problem developing. A stable bounce rate combined with a declining inbox placement rate suggests an ISP trust problem that isn’t showing up as bounces yet. Reading the metrics together is what makes the monitoring system genuinely useful for improving bounce rate long before a crisis develops.
The Monitoring Cadence
Knowing what to track is only half of the system. Knowing when to check and what to do at each checkpoint is what makes it operational. Here’s the full cadence to reduce email bounce rate proactively:
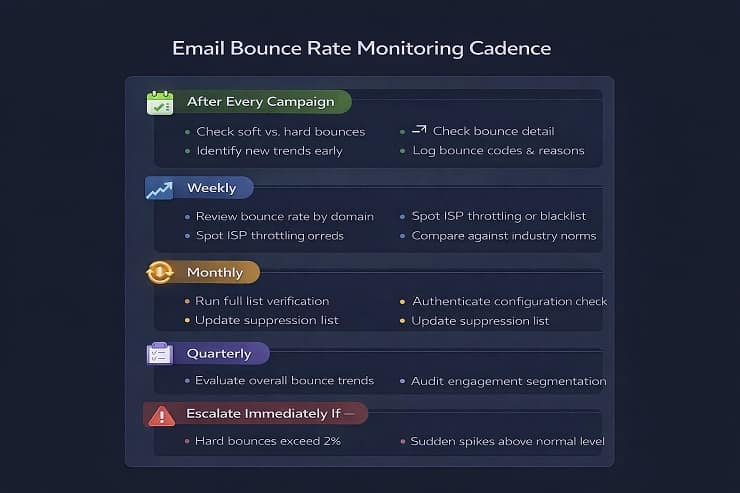
After every campaign:
- Check hard bounce rate – flag immediately if above 0.5%
- Check spam complaint rate – flag immediately if above 0.1%
- Note any new soft bounce patterns on addresses that have bounced before
Weekly:
- Check inbox placement rate if you have access to Google Postmaster Tools or a deliverability monitoring tool
- Review any flagged addresses from the post-campaign checks
Monthly:
- Review soft bounce recurrence patterns – identify addresses soft bouncing across multiple campaigns and move them to re-engagement or suppression
- Check domain reputation in Google Postmaster Tools and Microsoft SNDS
- Review engagement segmentation tiers – are any Active contacts sliding into Warming territory?
Quarterly:
- Full list verification run on your complete active list
- Acquisition source audit – which sources are producing the highest bounce rates this quarter?
- Master suppression list audit – is every sending tool correctly feeding into it?
- Authentication record check – have any DNS records changed or drifted since last quarter?
After any of the following events – immediately:
- Platform migration or new ESP setup
- New list import from any external source
- Addition of a new sending tool or service
- Any DNS changes to your domain
- Any unusual spike in bounce rate or complaint rate on a single campaign
When to Escalate to Emergency Response
The monitoring cadence handles the routine. But some signals bypass routine and require immediate action to reduce email bounce rate before the damage compounds. These are your escalation triggers:
- Single campaign above 5% hard bounce rate – pause sending, jump to Emergency Protocol
- Spam complaint rate above 0.3% on any campaign – pause sending, conduct full content and list review before next send
- Any blacklist listing detected – immediate investigation and delisting process regardless of current bounce rate
- Sudden drop of 20%+ in inbox placement rate – investigate ISP trust signals and authentication records before next campaign
- Google Postmaster Tools domain reputation moving from High to Medium – reduce volume and prioritise engaged segments until reputation recovers
- Three consecutive campaigns with rising hard bounce rate – even if still below 2%, a consistent trend warrants a full Fix 1 through Fix 4 review
The key principle behind all of these triggers is acting on the signal, not waiting for confirmation. By the time a signal becomes undeniable, the damage has usually already accumulated. The value of the monitoring system is that it lets you act on early signals while the problem is still contained and fixable quickly.
How Long Does It Take to Reduce Email Bounce Rate?
This is the question every sender has after reading a guide like this – and almost nobody answers it directly. So here’s a realistic set of expectations based on the cause category and the fix applied.
The honest answer is that bounce rate itself can improve relatively quickly after the right fix is applied. ISP trust, however, takes longer to rebuild. Your bounce rate might drop back below 2% within one or two campaigns of a successful list clean – but inbox placement may take several more weeks to recover as ISPs observe your improved sending consistency over time. These two timelines are related but separate.
Here’s a realistic breakdown by scenario:
| Scenario | Cause | Bounce Rate Recovery | Full Deliverability Recovery |
|---|---|---|---|
| List quality problem caught early | Category 1, addressed with Fix 1 | 1–2 campaigns post-verification | 2–4 weeks of clean sending |
| Infrastructure fix (auth misconfiguration) | Category 2, DNS records corrected | 1–2 campaigns post-fix | 1–3 weeks for ISP trust to update |
| Blacklist removal | Category 2, delisted and cause fixed | Immediate post-delisting | 2–4 weeks depending on blacklist |
| Content trigger resolved | Category 4, HTML and content fixed | Next campaign post-fix | 1–2 campaigns |
| Systemic long-term neglect | Category 1 + 2 compounding over months | 3–5 campaigns of clean sending | 2–3 months of consistent clean behaviour |
| Warm-up period on new domain or IP | Category 2, insufficient warm-up | Gradual improvement over warm-up period | 4–8 weeks of structured warm-up |
Two things are worth noting about these timelines. First, the systemic neglect scenario takes significantly longer to recover from than any single-cause problem. This is because ISPs track sending patterns over time, not just recent campaigns – and a long history of poor sending behaviour takes a long track record of good behaviour to offset. Second, all of these timelines assume the fix is applied completely and correctly. A partial fix – cleaning part of the list, fixing one authentication record but not another – produces partial recovery at best and continued deterioration at worst.
The most important thing you can do to reduce email bounce rate recovery time is start with the right diagnosis. Applying Fix 1 to a Category 2 problem doesn’t just fail to help – it wastes the time it takes to realise you’re fixing the wrong thing. This is why the diagnostic section at the start of this guide exists and why it matters.
Closing Thoughts
Here’s the thing about bounce rate problems. They’re almost never a single issue with a single fix. They’re usually a combination of a list quality problem, a small infrastructure gap, and an acquisition source that nobody has looked at in months – all running simultaneously and compounding each other quietly.
That’s why the fix sequence in this guide is structured the way it is. Diagnose first. Apply the emergency protocol if you need it. Then work through the fixes in order – list, infrastructure, acquisition, suppression, engagement segmentation, content. Build the monitoring system so the next problem gets caught early. And give the recovery timeline realistic expectations so you don’t panic when the bounce rate improves before the inbox placement does.
To reduce email bounce rate permanently – not just for one campaign, not just until the next bad import – requires treating it as an operational system rather than a one-time cleanup task. The senders who stop fighting recurring bounce problems aren’t the ones who found a better tool or a smarter fix. They’re the ones who built the process that makes the same problems stop recurring.
That’s the shift this guide is designed to help you make.